1992 30hp prop seals

kdx1980

Cadet
Joined
Apr 3, 2016
Messages
25
Hi all,

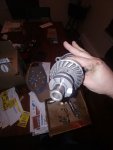
I am new to the forum and not terribly experienced at working on my outboard so please be patient. Let me start out by saying I am on an extremely low budget so I cannot take my outboard to the dealer. I bought this boat about 6 years ago for 1100 dollars and it has been a great little boat and motor but last fall when I drained the lower end oil it was pure milk, and I did notice oil rings hitting the water coming from the prop area during the summer. I pulled the prop off and found braided fishing line imbedded in my prop seals not to mention they just looked old and all beat up. To make a long story short I bought a lower end seal kit and am trying to do the seals. I have watched youtube videos on the process and have managed to remove the bearing carrier and prop shaft seals from it. however inside the bearing carrier housing/lower unit housing there is a small rod that clearly is supposed to go into the end of the prop shaft along with a steel ball the fell out of the hollow end of the prop shaft when I removed the bearing carrier. This rod is supposed to go into the prop shaft, push against the steel ball and engage shifting of the gears.


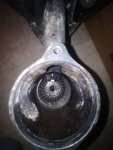
So here is the problem the little push rod at the back of the housing is angled up so when I try to put the bearing carrier/prop shaft assembly into the housing it does not line up with the rod because of how the rod is angled up. I reached in with a long thin screw driver to try and angle it down a bit to line up with the prop shaft, it moves a bit but starts pushing on the gear inside and will not go completely straight because of the gear, however the gear will move a little but then gets stopped by the drive shaft gear coming down from the top?

all the videos I have watched people just remove the bearing carrier pull out the old seals put in the new seals and put everything back into place, however that does not seem to be the process with this motor?

I was hoping someone experienced with these motors could point me in the right direction? as this is my only means of getting out on the water and Walleye season is upon us. Thank you in advance for any advice you can offer!
 
Last edited:

Sea Rider

Supreme Mariner
Joined
Sep 20, 2008
Messages
12,345
Is it a M30A4 2 strokes motor ? Checking the spare parts manual seems that you only needed to unscrew 2 bolts and pull out the entire plastic prop shaft housing where the only rear o'ring and front oil seal are located. If it was a seal related issue, why dismantled the whole gear case ? Now will have a hard time reinstalling correctly all the parts that were taken out, bad music!!.

Happy Boating
 

racerone

Supreme Mariner
Joined
Dec 28, 2013
Messages
36,298
What happens when you install that pin in the propshaft first.------Hold it in place with grease !
 

kdx1980

Cadet
Joined
Apr 3, 2016
Messages
25
Sea rider not sure what you mean you have to remove the two bolts and pull out the bearing carrier in order to remove the pressed in shaft seals if you do not remove the bearing carrier and prop shaft , you risk scratching or damaging the shaft while trying to remove the seals because the seals are pressed in and take a lot of effort to remove. the prop shaft housing is not plastic its all steel when you remove the bearing carrier the shifting clutch comes out with the prop shaft that is all I removed. The only extra thing I did was remove the lower unit to get a better look and angle which was literally 4 bolts and a pin that holds the shift linkage together. Racer one im not sure what you mean, I never removed the pin. When I pulled out the bearing carrier and prop shaft, I pulled the prop shaft away from the pin. the pin is in the back of the housing its just angled up now so I cannot line the prop shaft back up properly with it. I cannot hold the pin in place with grease as it is bound by the gear inside the housing which is keeping me from moving the pin in a straight position which is why the prop shaft will not line up with the pin. I put a pic below to illustrate everything that came out when I removed the two bolts and removed the bearing carrier
 
Last edited:

kdx1980

Cadet
Joined
Apr 3, 2016
Messages
25
Here is a side view of what I removed when I removed the two bolts it is all together with the the prop shaft running down the center.
Click image for larger version  Name:	03231906399.jpg Views:	1 Size:	166.7 KB ID:	10715528
 

pvanv

Admiral
Joined
Apr 20, 2008
Messages
6,509
1. Tohatsu/Nissan motors are serviced based on model/serial, not year. If you have a ball bearing in there you likely have a 30A4. The A3 usually did not have one.

2. The prop shaft housing is aluminum, not steel. It goes in and out as a unit, fully assembled, including the push rod. So after you have the new prop shaft seal, etc., installed, reinsert the prop shaft, complete with clutch and stuff, and reinsert. Don't drop the push rod. It must stay in the prop shaft.

002-21025-5_FIG12.JPG
 

Sea Rider

Supreme Mariner
Joined
Sep 20, 2008
Messages
12,345
Yep it's alum not hard plastic. Paul, the prop shaft housing must be pulled out along the prop shaft ? or the prop shaft should stay in place while the housing is pulled out as it were a sleeve, once out procede to change both o'ring and oil seal and reinstall backwards ? Which number corresponds to the push rod in the diagram ?

Happy Boating
 

kdx1980

Cadet
Joined
Apr 3, 2016
Messages
25
ok so when i removed the prop shaft housing as you can see by the photos the push rod clutch part number 22 in the diagram did not come out with it is is behind part number 3 which is held in by the drive shaft gear, the pin i am referring to that i cannot get to straighten out is part number 22 the push rod clutch. when i reach in to try and straighten it it binds and the bottom of part number 3 pushes out a bit but then gets stopped by the drive shaft gear part number 5. Clear as mud right? Yes you are correct it is aluminum not steel
 

kdx1980

Cadet
Joined
Apr 3, 2016
Messages
25
im thinking where i went wrong is i should have left the prop shaft intact and just pulled the housing out from around it? So if that is the case any idea how to fix it?
 

kdx1980

Cadet
Joined
Apr 3, 2016
Messages
25
Ok Pvanv if i am reading your post correctly and after thinking about it. What your saying is the push rod clutch is not actually connected to anything? So what i need to do is get in there with some long needle nose pliers and try to wiggle that push rod free and just pull it out? then put the steel ball then the push rod back into the prop shaft, then reinstall housing with oring and prop shaft seals. im guessing it just fell out and got wedged back there when i removed the prop shaft housing?

I also ordered a service manual, i suppose i should have started there.
 
Last edited:

Mohawkmtrs

Chief Petty Officer
Joined
Jan 13, 2010
Messages
561
Your Part #3 is the forward gear...your part #5 is the pinion gear and is attached to the Drive Shaft.

The pinion gear (and drive shaft) has dropped down binding everything up.

Assemble everything according to Paul's instructions, lift up on the drive shaft (which will lift the pinion gear), push the forward gear to line up and slide everything in.
 

kdx1980

Cadet
Joined
Apr 3, 2016
Messages
25
Ok Mohawk I will try that. Thank you to everyone who has replied so far. I will work on it this weekend and update with results.
 

pvanv

Admiral
Joined
Apr 20, 2008
Messages
6,509
Yep it's alum not hard plastic. Paul, the prop shaft housing must be pulled out along the prop shaft ? or the prop shaft should stay in place while the housing is pulled out as it were a sleeve, once out procede to change both o'ring and oil seal and reinstall backwards ? Which number corresponds to the push rod in the diagram ?

Happy Boating

When you pull the housing, the R gear and prop shaft come out, complete with the push rod, item 22 in the diagram. The rod may drop out; if so, reinsert it in the end of the prop shaft before reinstalling.
 

pvanv

Admiral
Joined
Apr 20, 2008
Messages
6,509
Leave the A (forward) bevel gear in there. It's retained by the pinion (B) gear, anyway. After replacing the propshaft seal and installing the new o-ring, reassemble the whole prop shaft assembly, including the push rod. If you have an A4, you also need the ball bearing. Then insert the complete assembly into the housing, allowing the push rod to enter the A gear, followed by the prop shaft journal. This is usually best done with the housing skeg in a bench vise, so that the opening is horizontal. Here is what the castings look like. Keep in mind that you will assemble the complete prop shaft housing, shaft and bits first, then insert them into the gearcase.

002-21025-5_FIG11.JPG
 
Top