125hp Force cylinder #3 repair

Sandy-man

Petty Officer 3rd Class
Joined
Aug 10, 2019
Messages
88
I have a 1988 125hp Force motor that needs repair on the #3 cylinder, looks like fairly bad grooves at the bottom of the cylinder. First a little background so you know how I got to this point.

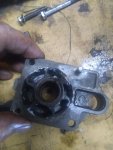
While out on Lake Erie my boat motor overheated while on plain and died, haven't been able to start it since. I suspected the water pump failed and I was right, the Ikey dislodged and jammed between the impeller and the pump housing. I installed a new pump kit. Motor won't start without the help of spraying starting fluid into the throat of both carbs. A couple nice gentlemen on this forum lead me through diagnostics to get me to this point. The fuel pump needs rebuilt so I got everything I need for that and it's done.

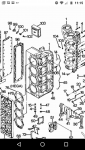
Now for the real work. I know I have to pull the head to start this big job and pretty certain I have to pull #1 in the attached diagram. Will I need to pull the entire power head off in order to do this? I feel like I might be getting in over my head but if it's not much more difficult than rebuilding a 650 Yamaha motorcycle motor then I believe I can handle it. Just will require a lot of time and even more patience, I'm sure.

Any helpful hints from the much more experienced outboard mechanics on this site would be greatly appreciated. I'm not exactly sure where to start.

​​​​​​​#2 pic is what started this entire project, #3 pic is the bottom of #3 cylinder with light shining through the port
 

Attachments

  • photo320433.jpg
    photo320433.jpg
    536.8 KB · Views: 0
  • photo320453.png
    photo320453.png
    281.3 KB · Views: 0
  • photo320454.jpg
    photo320454.jpg
    1.7 MB · Views: 0

Jiggz

Captain
Joined
Oct 23, 2009
Messages
3,817
Here's to get you started. It may be a big job but it's not that complicated as long as the cylinder is not gouge that it'll need machinining. Anyways here you go. Note, don't buy any parts until you're done with all these steps. CAUTION: Stuff the gap between the powerhead and mid-leg with rags to prevent losing parts if dropped. This is especially critical on the forward section under the carbs. Lastly take pics of all the work you are doing just in case, so you have a reference where things go.

1. Position the powerhead so it's level or a little bit leaning forward (preferred). This is to make sure any falling parts will go forward of the crankshaft cavity or intake opening. Remove the head, save the gasket as much as possible for post mortem analysis
2. Dismount the bottom carb, this includes all attached parts, i.e. choke, fuel lines, etc.
3. Dismount intake adapter, this is where the carb mounts
4. Remove Reed V-Block

You should now have access to the crankshaft and more importantly the #3 piston rod cap.

5. Rotate flywheel so the #3 caps is at its closest point to the intake opening. This makes it easy to access the rod cap bolts.
6. CAUTION: THERE ARE LOOSE ROLLER BEARINGS THAT WILL FALL OFF! Using an extension rod and a 12 pt 1/4 inch socket, remove two bolts off the rod caps. Recover all roller bearings. DO NOT USE MAGNET TO PICK THEM UP AS THEY ARE HARDENED STEEL and can become magnetized that can caused overheating. Instead, use thick grease on a stick or even better long needle noose.

7. Using a wooden rod or even a screw driver, push out the piston out to the top. NOTE THE ORIENTATION OF THE PISTON ROD. Normally, the stencil marking faces up (to the flywheel direction)

From here on you need to check the following:
1. Cylinder walls, note if the scouring is not bad and if it's below the ports, you can just hone it. If not sure, post pics.
2. Check the stamped number on the piston crown. #1 means it is still the standard size piston.

Personally, I'll use Wiseco piston for a replacement. The only complicated part of this is that you will need a piston wrist pin bearing kit. When you order the piston might as well get one that comes with the ring kit already installed and a wrist pin bearing kit.

The old wrist pin is pressed in so you will need to press it out. The new wrist pin is NOT pressed in but has circ clips lock on each side.

Parts, Tools and Materials you will need, at least:
1. Piston, rings and bearing kit
2. Head gasket
3. Gaskets for the intake adapter and carb mounting
4. Cylinder honing kit, HF has this for about $30 or if you can just rent one the better
5. 12 pt 1/4 inch socket
6. Hydraulic press to press out the wrist pin, so you can reuse the piston rod
7. A torque wrench
8. Flashlight
9. Thick grease, you will need this to pick up roller bearings and also for putting back together the rod cap
10. Piston ring compressor

OPTION: While the cylinder is empty, it's recommended to bevel the sharp edges of both the intake and exhaust ports. I did this using a dremel tool with a conical grind stone. To prevent accidental grinding the cylinder, put in some ducting tape around the ports.
 
Last edited:

Sandy-man

Petty Officer 3rd Class
Joined
Aug 10, 2019
Messages
88
Here's to get you started. It may be a big job but it's not that complicated as long as the cylinder is not gouge that it'll need machinining. Anyways here you go. Note, don't buy any parts until you're done with all these steps. CAUTION: Stuff the gap between the powerhead and mid-leg with rags to prevent losing parts if dropped. This is especially critical on the forward section under the carbs. Lastly take pics of all the work you are doing just in case, so you have a reference where things go.

1. Position the powerhead so it's level or a little bit leaning forward (preferred). This is to make sure any falling parts will go forward of the crankshaft cavity or intake opening. Remove the head, save the gasket as much as possible for post mortem analysis
2. Dismount the bottom carb, this includes all attached parts, i.e. choke, fuel lines, etc.
3. Dismount intake adapter, this is where the carb mounts
4. Remove Reed V-Block

You should now have access to the crankshaft and more importantly the #3 piston rod cap.

5. Rotate flywheel so the #3 caps is at its closest point to the intake opening. This makes it easy to access the rod cap bolts.
6. CAUTION: THERE ARE LOOSE ROLLER BEARINGS THAT WILL FALL OFF! Using an extension rod and a 12 pt 1/4 inch socket, remove two bolts off the rod caps. Recover all roller bearings. DO NOT USE MAGNET TO PICK THEM UP AS THEY ARE HARDENED STEEL and can become magnetized that can caused overheating. Instead, use thick grease on a stick or even better long needle noose.

7. Using a wooden rod or even a screw driver, push out the piston out to the top. NOTE THE ORIENTATION OF THE PISTON ROD. Normally, the stencil marking faces up (to the flywheel direction)

From here on you need to check the following:
1. Cylinder walls, note if the scouring is not bad and if it's below the ports, you can just hone it. If not sure, post pics.
2. Check the stamped number on the piston crown. #1 means it is still the standard size piston.

Personally, I'll use Wiseco piston for a replacement. The only complicated part of this is that you will need a piston wrist pin bearing kit. When you order the piston might as well get one that comes with the ring kit already installed and a wrist pin bearing kit.

The old wrist pin is pressed in so you will need to press it out. The new wrist pin is NOT pressed in but has circ clips lock on each side.

Parts, Tools and Materials you will need, at least:
1. Piston, rings and bearing kit
2. Head gasket
3. Gaskets for the intake adapter and carb mounting
4. Cylinder honing kit, HF has this for about $30 or if you can just rent one the better
5. 12 pt 1/4 inch socket
6. Hydraulic press to press out the wrist pin, so you can reuse the piston rod
7. A torque wrench
8. Flashlight
9. Thick grease, you will need this to pick up roller bearings and also for putting back together the rod cap
10. Piston ring compressor

OPTION: While the cylinder is empty, it's recommended to bevel the sharp edges of both the intake and exhaust ports. I did this using a dremel tool with a conical grind stone. To prevent accidental grinding the cylinder, put in some ducting tape around the ports.

Well that's great news I don't have to pull the block apart as I originally thought. Getting at the bolts that come up through the base flange looks like will be a chore but the rest looks pretty straight forward.

Would I have to replace the piston if only honing of the cylinder walls is needed, not machining, rather than just replace the rings? Unfortunately the grooves look deep in this blown up pic, hopefully not deep enough to need machining.
 

Jiggz

Captain
Joined
Oct 23, 2009
Messages
3,817
You need to do an open and inspect and then go from there. The most challenging part of this job is the re-installation of the rod caps back. But with patience and positive attitude it can be done much easier than pulling and splitting the block. And if you have a second set of hands, it's even easier.
 

racerone

Supreme Mariner
Joined
Dec 28, 2013
Messages
36,256
The block has to come apart.-----The powerhead needs to come off.-----One cylinder need to be bored O/S at least.-----That amount off scoring needs more than a " band aid " repair.
 

jerryjerry05

Supreme Mariner
Joined
May 7, 2008
Messages
17,926
That was my question, how is he gonna bore the cyl. with the head intact?
Never found a machine shop that can bore a block still on the mid section?
#3 pic

It wouldd take a month to hone out the grooves.
Then the cyl. would be lopsided.
 

The Force power

Commander
Joined
Feb 3, 2019
Messages
2,250
OPTION: While the cylinder is empty, it's recommended to bevel the sharp edges of both the intake and exhaust ports. I did this using a dremel tool with a conical grind stone. To prevent accidental grinding the cylinder, put in some ducting tape around the ports.

Hi Jiggz,

To "bevel" grind the sharp edges on intake/exhaust-ports; on what side to you grind it? inside the Cylinder(wall) side?
 

Sandy-man

Petty Officer 3rd Class
Joined
Aug 10, 2019
Messages
88
The block has to come apart.-----The powerhead needs to come off.-----One cylinder need to be bored O/S at least.-----That amount off scoring needs more than a " band aid " repair.

What I've read so far along with available parts from various sources, it looks like the max O/S is .030". So if I take the cylinder block in to a machine shop and if it requires more than .030 boring to clean up then I will need a new, different cylinder block to salvage the rest of the motor. Is this correct?
 

racerone

Supreme Mariner
Joined
Dec 28, 2013
Messages
36,256
The ------WISECO------ folks offer a 0.040" O/S piston for your motor.-----Look it up in their catalog.
 

Sandy-man

Petty Officer 3rd Class
Joined
Aug 10, 2019
Messages
88
The ------WISECO------ folks offer a 0.040" O/S piston for your motor.-----Look it up in their catalog.

Ok, thanks. I was just out looking at what it's going to take to get the motor head off. Please correct me if I'm wrong, but Im pretty sure I have to pull the rear leg cover off in order to get at the bolts/nuts under the motor head flange. Is there anything else I need to pull off before pulling motor head, like maybe the carbs to eliminate risk of damage? I'm not even sure how I'm going to pull the motor head because the boat trailer is about 2" wider than my garage door opening, so I can't use my chain fall. What a conundrum I'm finding this whole thing to be.
 

Jiggz

Captain
Joined
Oct 23, 2009
Messages
3,817
Remove the head and do an open and inspect. It's the first thing to do to know exactly what repairs need to be done. If it needs machining, then the next step is to dismount the powerhead from the midleg. Obviously, you will need to disconnect wires and cables and hoses to do this.

I've seen others build an A-frame with 2 X 6 lumber over the motor and a chain hoist to lift the powerhead off. Or rent an engine hoist from auto stores.
 

Jiggz

Captain
Joined
Oct 23, 2009
Messages
3,817
Hi Jiggz,

To "bevel" grind the sharp edges on intake/exhaust-ports; on what side to you grind it? inside the Cylinder(wall) side?

The best way if you already have the powerhead torn apart is through the port covers and exhaust ports. If not, you can still do it through the cylinder opening albeit cramped and awkward. It doesn't have to be a big bevel, in fact all you need is about 1/32-1/16 of an inch bevel on the perpendicular sides (relative to cylinder) of each port hole.
 

racerone

Supreme Mariner
Joined
Dec 28, 2013
Messages
36,256
The powerhead is not that heavy.----2 able bodied individuals can lift it off without the need for a hoist.
 

Sandy-man

Petty Officer 3rd Class
Joined
Aug 10, 2019
Messages
88
Ok, thanks. I was just out looking at what it's going to take to get the motor head off. Please correct me if I'm wrong, but Im pretty sure I have to pull the rear leg cover off in order to get at the bolts/nuts under the motor head flange. Is there anything else I need to pull off before pulling motor head, like maybe the carbs to eliminate risk of damage? I'm not even sure how I'm going to pull the motor head because the boat trailer is about 2" wider than my garage door opening, so I can't use my chain fall. What a conundrum I'm finding this whole thing to be.

Not the rear leg cover, but the lower cowling.
 

puffitu

Chief Petty Officer
Joined
Dec 30, 2018
Messages
555
Removing the block off these engines is actually very simple. Once unbolted; I gently pried starting in the back of the motor; there’s a lip-different size wooden wedges, then a bear hug and out...it took maybe 3 hrs and change. I just put it all back together in about 5 hr and change all one person.
 

jerryjerry05

Supreme Mariner
Joined
May 7, 2008
Messages
17,926
Once you get up to .040 over then you get into rejetting the carbs.
The block removal, the exhaust pipe, held on with 4 bolts.
One of them usually breaks. I just don't take them off and remove the adaptor plate and pipe as an assembly.

I have a tree I use to lift the motors.
Or make a lift out of 4x4's
The blocks not heavy, just awkward.

A small fine rat tail file can do the job of beveling the edges.
You don't need to remove much at all.
 

Sandy-man

Petty Officer 3rd Class
Joined
Aug 10, 2019
Messages
88
Removing the block off these engines is actually very simple. Once unbolted; I gently pried starting in the back of the motor; there’s a lip-different size wooden wedges, then a bear hug and out...it took maybe 3 hrs and change. I just put it all back together in about 5 hr and change all one person.

There was once a day I would have attempted this, but that was more than 8 years ago you before the day that I herniated 2 discs in my lower back. Did you do all this with the motor still mounted to the back of the boat?
 

Jiggz

Captain
Joined
Oct 23, 2009
Messages
3,817
Another thing to consider if you over sized to 0.040, machinist will most likely recommend doing the rest of the cylinders.
 

Sandy-man

Petty Officer 3rd Class
Joined
Aug 10, 2019
Messages
88
Once you get up to .040 over then you get into rejetting the carbs.
The block removal, the exhaust pipe, held on with 4 bolts.
One of them usually breaks. I just don't take them off and remove the adaptor plate and pipe as an assembly.

I have a tree I use to lift the motors.
Or make a lift out of 4x4's
The blocks not heavy, just awkward.

A small fine rat tail file can do the job of beveling the edges.
You don't need to remove much at all.

Well there's the answer to my problem of lifting the motor out. All this time I was thinking that motor would be too heavy for anything less than my chain lift, the low-hanging branches on the big tree in my front yard will work. After reading the more recent posts here I believe I can do it with a come along and that low hanging branch.
 

puffitu

Chief Petty Officer
Joined
Dec 30, 2018
Messages
555
Yup, the blocks are not that heavy just awkward as Jerry said. I too have a tree directly above it but my helper did a no show so I elected to do it myself. The biggest challenges we’re getting bolts under the carbs and swing bracket bolt off and back on and lining up everything as you lower the block back down onto the lower. I would recommend removing the bottom carb though-it’ll make things a lot easier.
 
Top