70 HP Force Rebuild

brianq

Petty Officer 2nd Class
Joined
Jul 15, 2012
Messages
145
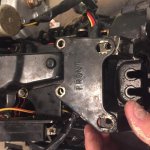
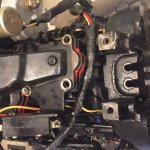
Made the 5/8th 1/4-20 screw tonight and attempted to install the reed plate. Since this thread is for someone else to potentially learn from I will post my worst mistake to date.

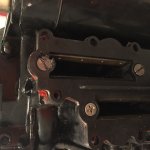
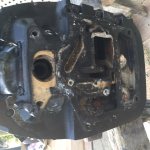
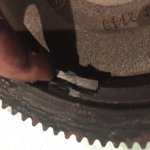
I miss read http://www.maxrules.com/fixforcetorque.html and put too much torque on the top screw and cracked the reed plate :faint:. In the picture you will see the slotted screw with cracked plate and the philips screw at the correct torque and the plate intact.

Not my most shining moment.

It is currently 18 degrees here with 20 mph winds so I dont think I would be outside reconnecting to the lower unit anyway.
 

Attachments

  • IMG_5885.JPG
    IMG_5885.JPG
    382.5 KB · Views: 1

jerryjerry05

Supreme Mariner
Joined
May 7, 2008
Messages
17,927
Not that big a deal.
Take off the broken piece and the cover should keep it in place.
Maybe some silly cone?

Yup been watching the weather for UP there!!! SO GLAD I moved south.
 

brianq

Petty Officer 2nd Class
Joined
Jul 15, 2012
Messages
145
No Title

Put everything together that I can, just the exhaust tube left. Ready to install on the lower. The front bracket which reads "Front" seems like it needs a large washer? I attached pictures I cant imagine its supposed to sit as it is. Gasket 820475A 1 arrived. It seems a bit different then the pictures of the original one. It also arrived with two other gaskets which I am assuming are for different size motors? (pictures attached). Had about 3" of snow last night (getting your moneys worth in florida!) and rain all day today and tomorrow. Cant wait for it to clear up so I can try and test this motor.
 

Attachments

  • photo256665.JPG
    photo256665.JPG
    356.5 KB · Views: 1
  • photo256666.jpg
    photo256666.jpg
    115.9 KB · Views: 1
  • photo256667.jpg
    photo256667.jpg
    123.1 KB · Views: 1
  • photo256668.jpg
    photo256668.jpg
    123.8 KB · Views: 1
  • photo256669.jpg
    photo256669.jpg
    127.1 KB · Views: 1

jerryjerry05

Supreme Mariner
Joined
May 7, 2008
Messages
17,927
Your right about the gaskets.
easier to have 1 part # and just use what you need.

Nope no big washer on the hole.

​That 'Front" thing goes lower on the front.???
It connects the block to the spacer plate
Try lowering it???
Can't see very well in the pics.
​A couple more pics of the front area with the front plate removed.
 

brianq

Petty Officer 2nd Class
Joined
Jul 15, 2012
Messages
145
No Title

Pictures as requested
 

Attachments

  • photo256711.jpg
    photo256711.jpg
    110.6 KB · Views: 1
  • photo256712.jpg
    photo256712.jpg
    105.5 KB · Views: 1

brianq

Petty Officer 2nd Class
Joined
Jul 15, 2012
Messages
145
I thought it was just an imperfection in the casting it doesnt look cut down
 

brianq

Petty Officer 2nd Class
Joined
Jul 15, 2012
Messages
145
No Title

I found a "service Manual" for my motor on ebay for around $20 which I wish I bought a few months ago. Its very detailed with lots of pictures all specific to my motor. I took a picture of a page which talks about a sealant for the exhaust tube (picture attached), I am at the point where I need to install it. I dont have a gasket for it, do I just use Silicone?

I found a broken magnet under the fly wheel so I will purchase some high heat adhesive tomorrow and put it back together.

Merry Christmas Iboats peps! Thanks for all the help this year! Looks like christmas day will be the day I install the motor (decent weather) lets hope for a christmas miracle.
 

Attachments

  • photo256885.jpg
    photo256885.jpg
    105 KB · Views: 0
  • photo256886.jpg
    photo256886.jpg
    108.9 KB · Views: 0
  • photo256887.jpg
    photo256887.jpg
    119.4 KB · Views: 0
  • photo256888.jpg
    photo256888.jpg
    109.2 KB · Views: 0
  • photo256889.jpg
    photo256889.jpg
    109 KB · Views: 0

jerryjerry05

Supreme Mariner
Joined
May 7, 2008
Messages
17,927
I wouldn't glue the piece back in.
The magnet will probably just come loose and maybe take out the stator???
​Just one piece won't affect the operation.
Yes silicone and use a good amount.

Merry Christmas!!
 

brianq

Petty Officer 2nd Class
Joined
Jul 15, 2012
Messages
145
Should have checked the page this am before I glued the flywheel magnet. Used "Quicksteel" from auto zone, its metal based which makes using it with magnets a real treat LOL. Any advice on getting the flywheel bolt to torque? The local auto shop zipped it off for me. I dont have air impact tools. I could get one from HF but how do I measure torque on that?

Hope you are enjoying the holiday, I have been doing lots of cooking.
 

jerryjerry05

Supreme Mariner
Joined
May 7, 2008
Messages
17,927
The torque is 85#
​Harbor Freight has inexpensive wrenches.
​Don't think you can accurately measure torque with an impact wrench, unless you can regulate the compressors pressure down to 85#
Unless your gonna do a lot of work an impact isn't really an important tool.
A torque wrench is.
I have 3
 

brianq

Petty Officer 2nd Class
Joined
Jul 15, 2012
Messages
145
Hey Jerry hope you had a great Christmas. It was pretty nice here today got outside cleaned up the matting surface for the motor and put it in. I cant seem to get the fly wheel key to stay in place while placing the fly wheel on. Any tricks for this? Tried putting a little silicone to hold it, didnt work. I also cant tell if I properly lined up the power head on the motor leg. I spun the prop while I did it but nothing feels engaged. Any tips here? I spun the drive shaft by hand and the prop didnt move not sure if it should?
 

jerryjerry05

Supreme Mariner
Joined
May 7, 2008
Messages
17,927
Make sure the groove for the key is ok???
Sometimes a little sandpaper or even a file is needed to clean the edges.

​Was the lower in gear when you were trying to engage?
​If it fit in lace?? then it's almost impossible to miss the shaft going in to the crank end.
I usually have the drive off and install it later.

You shoud probably replace the impeller and check the tubes for blockage??
 

brianq

Petty Officer 2nd Class
Joined
Jul 15, 2012
Messages
145
Make sure the groove for the key is ok???
Sometimes a little sandpaper or even a file is needed to clean the edges.

​Was the lower in gear when you were trying to engage?
​If it fit in lace?? then it's almost impossible to miss the shaft going in to the crank end.
I usually have the drive off and install it later.

You shoud probably replace the impeller and check the tubes for blockage??


My goal was to get proper compression and perhaps even a start before spending anymore time and money. I have held off rewiring and the lower unit rebuild incase I am unable to get the motor running, be it issues with my drilling and tapping or matting surface pitting. Can I remove the drive and still test the motor?

Not sure with the cables disconnected how to tell if it is in gear? The prop is spinning free so I assume its in neutral? Would I use the shift link on the lower unit to put it into gear? In place before being tightening down the motor it has a bit of a bow to stern rock making me think its sitting up on something.

All the youtube videos I have been following get pretty "and heres it running" for this part.
 

jerryjerry05

Supreme Mariner
Joined
May 7, 2008
Messages
17,927
Yes you can run it without the drive.
​I have a hose without an end for this purpose.
​I just jam the hose on the pickup tube and run it.
​Just make sure the hose doesn't come off when you turn on the water.

​If it was in gear you wouldn't be able to turn the prop.

​Until the linkage is hooked up you shift at the shift shaft.

​The exhaust fits down inside mid section and there is a rubber gasket that gets compressed to make a seal.
​That could be the space/rocking you have??
 

brianq

Petty Officer 2nd Class
Joined
Jul 15, 2012
Messages
145
Finally an update! It has been super cold and last saturday we got 10" of snow. This week was unseasonably warm, which ends today, we are expecting morning snow. Snuck out of work today to get some progress done on the boat since the only nice weather has been mid week.

First I got the flywheel installed and it was super stiff, I checked the cylinder walls they looked fine couldn't figure out why so tight. Removed flywheel and discovered when I glued the flywheel magnet back in place it was sticking out too far and dragging on the (stator?). If only I had listened to Jerry and ditched that magnet (smh). rookie move chipped the magnet off reinstalled and moved freely.

I ran a compression test, finally! Not sure what to think about the results #1= 100psi #2= 110 psi #3=105psi.

I have not yet fully bolted down the motor in case I need to remove.

Attached are pictures of the compression tests for each cylinder (in order). What do we think? Do we continue with the reinstall?

Does anyone have a part number on a lower unit rebuild kit?
 
Last edited:

Nordin

Commander
Joined
Jun 12, 2010
Messages
2,438
Have just read through the thread quickly and if it is rebored with new pistons and rings the compression numbers are low.
My factory manual says #1 125-145 PSI and #2-3 135-150 PSI.

Could be the gauge, if the numbers were with just honing and new rings it would make sense but after reboreing. Feels a little weird.
 

jerryjerry05

Supreme Mariner
Joined
May 7, 2008
Messages
17,927
The comp reading are probably the gauge.

Rebuild or re-seal the lower?

​I'd drain it and pressure test before I do anything.
​If the oil is clean or black it probably doesn't need a re-seal.
​Any off color is probably water intrusion.
​But a pressure test is FIRST!!
 

brianq

Petty Officer 2nd Class
Joined
Jul 15, 2012
Messages
145
Have just read through the thread quickly and if it is rebored with new pistons and rings the compression numbers are low.
My factory manual says #1 125-145 PSI and #2-3 135-150 PSI.

Could be the gauge, if the numbers were with just honing and new rings it would make sense but after reboreing. Feels a little weird.


It was rebored and new pistons and rings installed, I also thought they were low but they are within the range that I have read online between 5-10 psi of each other. The gauge is a pretty good one on loan from autozone? Should I order a new one? Suggest one?

There is one place where there could be an issue. Where I tapped and screwed an insert into the valve cover bolts I did not use a punch to remove the tang from the insert, it didnt say on the package to do so, I read it in the selco book. It took more then the required torque to seal those valve cover bolts, I assume from my reading its because of the tang. Not sure how to check this. Or what my next step is.

I wont lie it was disheartening after all this work and money to get these low PSI readings, I have my fingers crossed its a gauge issue.

I will be pressure testing the lower unit and changing the oil. Does anyone know the thread pattern of the vent screw so I can build a pressure tester? I am thinking I will use the one I use to test residential gas lines as they have a filling chuck like a bike tire.

As always thanks for your help.
 
Last edited:

Nordin

Commander
Joined
Jun 12, 2010
Messages
2,438
Yes, 5-10 PSI is acceptable in a used engine that not been rebored. Your numbers are not bad and yes it can be the gauge.
Make a new reading and let the starter turn at least 5-7 turns on each cyl. or turn it until the readings not increase any more.

I do not think it has to be any thing with the valves cover bolts been retapped.
It would not show at the compression numbers.
If it should be problems with bolts/cover the engine will pulling air in a leak at the cover and you got runingproblems with to lean mixture.

I would go on and fix the flywheelmagnets issue and then try to start the engine and then run it with a break in period.
The compression numbers can increase after the break in, that is not so uncommon.
 
Last edited:
Top