1976 AeroCraft Fishmaster - Complete Restore

UConnMRB

Petty Officer 2nd Class
Joined
Jul 18, 2014
Messages
119
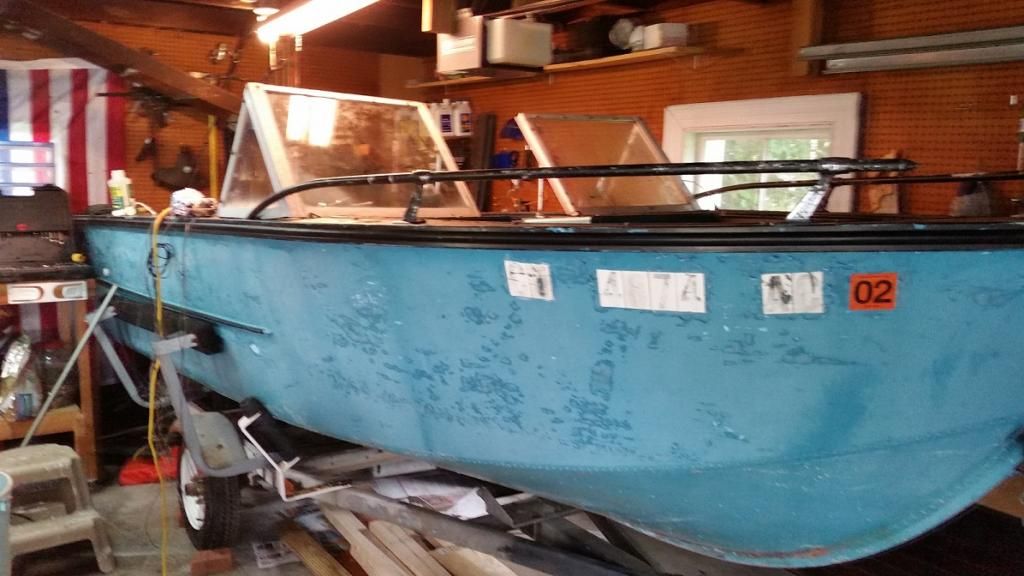
Hey guys (girls?), I will be working on the boat tomorrow, hopefully with floor and foam fully out. With the trailer being questionable I wanted to make sure I remove all possible weight before I bring it home. Not to mention I am going to have a few people over and we are going to lift it from trailer to the cradle. The boat is weighted at 650 lbs, but with flooring and foam out I am hoping its less than that. I will take some more pics and upload them.

Thanks for looking at my thread.
 

UConnMRB

Petty Officer 2nd Class
Joined
Jul 18, 2014
Messages
119
Ok, so over the weekend I was able to remove the rest of the decking and the foam, I power washed the inside (still need to scrub it) and brought the boat home. It rolls easily and fits in my garage so I scrapped the cradle. The entire hull on the inside has a brown coating but I believe that is just mud/dirt that I will grind/scrub off. Next on the list is to take the bow seating frames and splashwell out, then remove the transom. Also, I have the (I believe) original 35hp evinrude that came with the boat and I will probably get that running and putter around the lake for awhile with that. I cant get the steering arm to move, but I think soaking it in penetrating grease might do the trick.
20140802_114336.jpg 20140803_172841.jpg 20140803_172856.jpg
 

Attachments

  • 20140802_114336.jpg
    20140802_114336.jpg
    110.6 KB · Views: 0
  • 20140803_172856.jpg
    20140803_172856.jpg
    85.3 KB · Views: 0

UConnMRB

Petty Officer 2nd Class
Joined
Jul 18, 2014
Messages
119
I have been seeing a lot of similar starcrafts near me on craigslist (usually going for $1-2k depending on condition). I think when I want to repower, it will be cheaper to buy one of them with a 75-85 hp rather than look for just the OB itself. That also gives me a chance to steal some parts off it it and then I can put my current 35hp on the boat I bought, maybe do a little bit of fixing up and resell it.

I hope everyone had a good weekend.
20140803_172911.jpg 20140803_172826.jpg
 

Fleetwin

Lieutenant Junior Grade
Joined
Nov 23, 2011
Messages
1,141
Ok, s. I cant get the steering arm to move, but I think soaking it in penetrating grease might do the trick.

Replace the steering. If the cable is frozen, it's corroded. If it breaks underway, it is NOT a pretty sight.
 

UConnMRB

Petty Officer 2nd Class
Joined
Jul 18, 2014
Messages
119
Thanks for the reply Fleetwin. The cable moves, but the arm is frozen. I agree with you 100% though, I will have to look into the cost of it all, but I think a rotary style system could be in the budget. We will see when the time comes. Here are two more pics of steering, I check the cable (under all that protection) and it appears fine. They had a rubber, steel braids under the rubber, then plastic under the steel braids and then the cable itself is wrapped in a spring under all that.
20140802_134026.jpg 20140802_134031.jpg
 

UConnMRB

Petty Officer 2nd Class
Joined
Jul 18, 2014
Messages
119
I did a little bit of work this morning. I removed the dash and all the bolts related to the steering are frozen. I think I might have to drill through it and cut the dash (if I am neat enough, when I cut the dash, I should still be able to use it as a template. I started scrubbing off the dirt on the aliminum where there foam sat and I dont like what I see. There are many spots of what appears to be surface rust. Is this common? Can I just sand it down, coat everything with Gluvit, ZC it, prime and paint it? Should I abandon this project and get a different boat?
20140805_080427.jpg 20140805_080750.jpg 20140805_080743.jpg
 

UConnMRB

Petty Officer 2nd Class
Joined
Jul 18, 2014
Messages
119
When I view the page, I can see the images, but there are also files attached at the bottom. Can everyone else see the images in the thread without opening a new window?
 

jbcurt00

Moderator
Staff member
Joined
Oct 25, 2011
Messages
24,863
When I view the page, I can see the images, but there are also files attached at the bottom. Can everyone else see the images in the thread without opening a new window?
the images are in your browser cache, so you see them

We get pix error boxes IN the post, and have to open the attachments to see them.

When I open the pix, I right click and COPY them to paste here:
fetch

fetch

fetch


Because the Iboats server has your pix saved as attachments, the pix should show up IN my post.

this is a test

EDIT: that worked ;)

Open a free photobucket acct. There's an IMG code for each pix. Copy the IMG code for the pix you want to post, paste that code into your posts. It looks like this:
IMG]http://i1246.photobucket.com/albums/Snow.jpg[/IMG

and the pix show up IN your posts:
Snow.jpg
 
Last edited:

REdington

Seaman
Joined
Apr 22, 2014
Messages
69
I started scrubbing off the dirt on the aliminum where there foam sat and I dont like what I see. There are many spots of what appears to be surface rust. Is this common? Can I just sand it down, coat everything with Gluvit, ZC it, prime and paint it?

I used a wire wheel on my grinder and cleaned the hull where the foam used to be. Washed with TSP, let dry, and then used NAPA Alum-A-Bright acid wash. Rinsed with clean water. Used JB Weld to fill the pits. Primed with 2 or 3 coats of primer before I installed the foam. That is what I did, others may do it differently.
If you use Galvit, put that down before you paint.


The nice thing about aluminum boats is that almost anything can be repaired on them. Keep up the good work and you'll have a very nice boat when your done.
 
Last edited:

UConnMRB

Petty Officer 2nd Class
Joined
Jul 18, 2014
Messages
119
Sorry about the pics to this point, i will just drop them all here....

20140718_173243_zpsa3bb4eb0.jpg
 
Last edited:

UConnMRB

Petty Officer 2nd Class
Joined
Jul 18, 2014
Messages
119
See as how the StarCraft threads get way more action and this boat is basically a StarCraft, would it be against the gods of tin boats to move this thread over there? There is no Browning thread and only a few posts in the Aero Craft threads....I also wouldnt mind deleting this entire thread and starting fresh, due the issue with the pics being attachments in the earlier posts
 

jbcurt00

Moderator
Staff member
Joined
Oct 25, 2011
Messages
24,863
The traffic gets slow towards the end of the summer, the software glitches aren't helping, yes the SC tin boats get lots of traffic.

Keep posting in THEIR boat Topics, they'll swing thru here............ A MOD might tidy up the joint for you, just ask them to.

Or start a new Topic, and link to this one there, and that one here. A MOD might even tidy up this Topic and add it to the new one.
 

UConnMRB

Petty Officer 2nd Class
Joined
Jul 18, 2014
Messages
119
Thanks jbcurt. I did some more work. I grinder a little bit between some of the stringers. It looks better than when I used just the brillo pad. I was using a wire grinding wheel on my drill. That will be a long process....i also removed some parts from the gunwale. Is the gunwale the entire part from the top of the port or starboard side to the hull? Or is the gunwale only the upper part? I am a boating novice, sorry. Anyways, i had to drill out about 15 rivets that went through thw side of the hull and held the rubrail in place. I need to do the port side tomorrow. Last week I ripped up the decking and all the screws are still in place on the stringers. The wood was so rotten that it just came pulled up without budging the screws. The problem is that the screws are so frozen and stripped that they dont come out. Evwn after cutting a few down they are still in place and I will have ro grind those down to flush. I am still struggling with getting the steering cable out as one of thw bolts is so badly rusted that the nut wont turn but a little bit at a time before stipping.
 

UConnMRB

Petty Officer 2nd Class
Joined
Jul 18, 2014
Messages
119
I have decided that I am going to buy another boat for "parts". The motor I have, as mentioned in previous posts is the original 35 hp Evinrude that came with the boat. It has been sitting for 12 years and who knows if it runs, plus that is not enough HP for me. So I am wondering if I bought a spare boat with working oatboard, if the steering works on the scrap boat, would I been able to just attach it to this one? Again, I am a novice on boat repairs. Thanks in advance for any cooments.
 

jigngrub

Fleet Admiral
Joined
Mar 19, 2011
Messages
8,155
For the frozen screws and bolts, get a can of Liquid Wrench penetrating oil and give them a squirt and let them set for a little while. A pair of Vice-Grips will also help.

Steering systems aren't something you want to fool around with. The steering system from another boat more than likely won't fit your boat, and if it should happen to fit it'll still be old and subject to failure. A new steering system will be your best and safest bet.
 

UConnMRB

Petty Officer 2nd Class
Joined
Jul 18, 2014
Messages
119
Thats a good idea Jig. I was hoping to be able to drill them out but they all sit 1/2 inch above the stringers due to the flooring just crumbling around them. I will give them a good soak and see what i can do. They must have used some form of glue (5200 ish) because they dont even budge in the stringer holes when trying to bend them back and forth.
 

UConnMRB

Petty Officer 2nd Class
Joined
Jul 18, 2014
Messages
119
I was able to do a little bit more this weekend, but its tough to find time in large chunks. I am going to try a few different methods for stripping the paint. The first method I attempted was with paint stripper and then I saw on youtube a guy who used stripper and flour so it holds better on the vertical application. I don think I need the flour as this stripper is pretty thick, but he also mentioned that it seemed to help it "kick off". The stripper seemed to work the same with or without the flour. The boat has 2 coat of paint on it and the pics are of the section that I applied a coat of stripper, scraped the paint off and that only took off the top coat. To get the bottom coat I needed to do another 2 layers of stripper, scraping, stripper, scraping. I tried using my wire wheel on my drill and that didnt work too well either. I am going to try aircraft stipper next and then I will try to good ole sanding and see which I will settle on for removing all the paint.

20140807_091245_zpsd7023194.jpg


20140807_085707_zps1604b02e.jpg
 

Rickmerrill

Senior Chief Petty Officer
Joined
Mar 13, 2014
Messages
686
I went to a demo for using stripper put on by Homer Formby. The trick is to get it on thick and let it sit for a while. He said there is wax in it that seals the surface then a chemical reaction causes off-gassing which lifts the paint. Next time I used some I watched and that seemed to be right. Giving it time to do it's thing seemed to work better too.
 

jbcurt00

Moderator
Staff member
Joined
Oct 25, 2011
Messages
24,863
Covering the stripper w/ plastic helps it work better too.
 
Top