87 bayliner refurb/restoration project... "The Big Dirty"

bigdirty

Senior Chief Petty Officer
Joined
Oct 4, 2013
Messages
652
Re: 87 bayliner refurb/restoration project... "The Big Dirty"

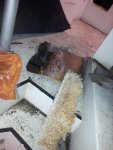
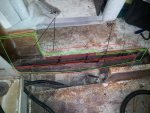
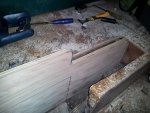
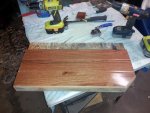
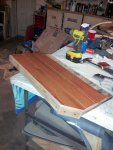
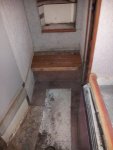
Figured I'd start with the step into the cabin.. start small right? :lol: I think its gona look nice when its all done, and I have some stain for the teak that should match the hardwood color almost perfect.. maybe a little lighter, but that will match the existing trim in the cabin anyway.. I have to rip a board down to finish the last piece on the back of the step, but I'm going to wait until i get the main floor covered/hatches built, as I have a limited supply of hardwood. If that one piece of the step is scabbed together from scraps its no big deal :tongue:

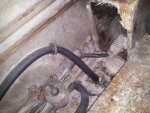
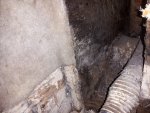
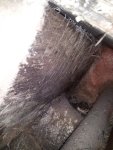
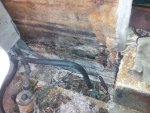
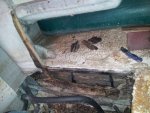
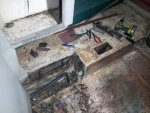
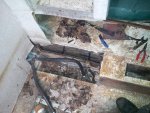
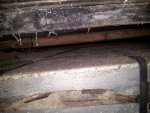
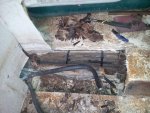
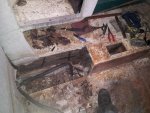
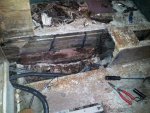
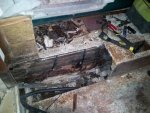
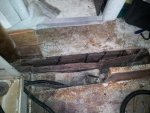
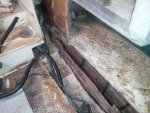
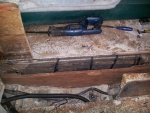
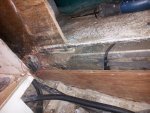
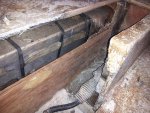
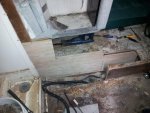
As for the cuts an nicks in the stringers (3 spots, about the width of a 1/16 saw blade, 3/8"-1/4" deep from the top) I think I'm just going to 'inject' them with some 2 part epoxy, with tape on the edges, and paint it all i the end.. that should seal them up well enough..
 

Attachments

  • cabin step01.jpg
    cabin step01.jpg
    75.7 KB · Views: 3
  • cabin step02.jpg
    cabin step02.jpg
    137.1 KB · Views: 3
  • test fit step1.jpg
    test fit step1.jpg
    101.5 KB · Views: 4

redneck joe

Supreme Mariner
Joined
Mar 18, 2009
Messages
10,268
Re: 87 bayliner refurb/restoration project... "The Big Dirty"

Thats awesome! I have a small spinning/multicolor light I'm planing on wiring permanently to the dash.. the switch for it will simply be labled 'DISCO' :laugh: :rockon: :party:
:


yeah thats the one! Went to Lowes one weekend at the boat with another boat friends and we made a deal as we were walking in - 'don't let me buy anything I don't need'. We even shook on it.

walked in, turned the corner, saw them and we both went 'ohhh' at the same time. We each bought one, but went with the battery powered.
 

redneck joe

Supreme Mariner
Joined
Mar 18, 2009
Messages
10,268
Re: 87 bayliner refurb/restoration project... "The Big Dirty"

since you are using oak, solid, make sure you leave a hair for expansion from moisture
 
Last edited:

bigdirty

Senior Chief Petty Officer
Joined
Oct 4, 2013
Messages
652
Re: 87 bayliner refurb/restoration project... "The Big Dirty"

since you are using oak, solid, make sure you leave a hair for expansion from moisture

I had wondered about this, and it seams that has been 'engineered' into the boards in a sense; the tongue appears to be slightly longer than the groove, so basically you are unable to get them totally 'flush' to the next one.. I'm talking a very small difference here, i measured them with my digital verniers :lol: but I was thinking it might be good to leave even a 1/16" gap between boards, and fill with black sekoflex/calking.. more work to finish off in the end, but would defiantly allow for expansion, and look slick too..
 

zool

Captain
Joined
Aug 19, 2012
Messages
3,432
Re: 87 bayliner refurb/restoration project... "The Big Dirty"

I had wondered about this, and it seams that has been 'engineered' into the boards in a sense; the tongue appears to be slightly longer than the groove, so basically you are unable to get them totally 'flush' to the next one.. I'm talking a very small difference here, i measured them with my digital verniers :lol: but I was thinking it might be good to leave even a 1/16" gap between boards, and fill with black sekoflex/calking.. more work to finish off in the end, but would defiantly allow for expansion, and look slick too..

You dont need the gap between boards, you need it on the outer edges, to keep from buckling, like any hardwood floor install. If you are using edge molding, or butting to carpet, just leave a small gap where it butts a wall or vertical surface.
 

tpenfield

Moderator
Staff member
Joined
Jul 18, 2011
Messages
17,705
Re: 87 bayliner refurb/restoration project... "The Big Dirty"

I think the wood is gonna look nice, but plan on it expanding a fair amount as the moisture levels in the cabin will tend to be high.
 

bigdirty

Senior Chief Petty Officer
Joined
Oct 4, 2013
Messages
652
Re: 87 bayliner refurb/restoration project... "The Big Dirty"

I think the wood is gonna look nice, but plan on it expanding a fair amount as the moisture levels in the cabin will tend to be high.


Ya, i was thinking about that.. I'm going to go with about a 1/4' gap all around the hardwood where it meets the front step of the v birth, and along the dinette area. Carpet should cover most of it in the end, but if there is a visible gap I'll trim it out in some teak strips along the edges. I'm thinking roughly the same 'gap' around the outer perimeter of the drop in hatches/floor panels, with some sort of 'T' trim to cover the gap, and add support as well. Maybe some rubber pieces in/under the corners to keep all the 'lines' lined up..

Spent a lot of today, and the evening, in and out of the boat.. as it was only -10C here :) I got all the carpet stripped out (boy, it looks even worse in the light of day!) and a few scab/fill in pieces made up to square off the hole I'm working with.. I'm still not sure what to use for glue to attach the 'permanent' hardwood pieces to the cabin floor though.. I have a right angle drill for tight spots, and in theory I could screw them in from the underside for a lot of it, but up near the v birth step and beside the cupboards will be impossible, as the hull curves up and basically meets the floor or stringers there... I know PL makes a 'water resistant' glue, but does anyone have another suggestion?
 

bigdirty

Senior Chief Petty Officer
Joined
Oct 4, 2013
Messages
652
Re: 87 bayliner refurb/restoration project... "The Big Dirty"

Ok... scratch all that for now, I've got bigger problems..:cold:

I know some are likely gona say "I told ya so" or "AH! I knew it!" so I'm prepared... got my floor rebuild sections/pieces made, and was getting ready to 'get down to it' on that part.. i figured i'd remove the wall section on the left side ad you enter the cabin to give me a bit more room to work and get in and out with tools and materials.. as i pulled it out I heard a tell tale 'crack' sound from the lower section.. hmm, that doesn't sound good.. right upper corner of the first pic WAS glassed over from the factory.. it is not at this point.. More pics to follow next post..
 

Attachments

  • oh dear.jpg
    oh dear.jpg
    71.3 KB · Views: 3
  • not good.jpg
    not good.jpg
    86.4 KB · Views: 3
  • not good 2.jpg
    not good 2.jpg
    138.6 KB · Views: 3

bigdirty

Senior Chief Petty Officer
Joined
Oct 4, 2013
Messages
652
Re: 87 bayliner refurb/restoration project... "The Big Dirty"

so seeing this, i had to investigate further.. it got worse, then worse..uh, er.. The stringers END at this bulkhead :confused: and although they appear to be mostly intact, the bulkhead is rotten pretty much right down to them and the hull either side. There is a section of 'sort of wood' i will call it, between the stringers, and that is still solid down in the lowest point of the keel... few more pics next post..
 

Attachments

  • its bad.jpg
    its bad.jpg
    55.7 KB · Views: 4
  • its more bad.jpg
    its more bad.jpg
    99.8 KB · Views: 4
  • beyond bad.jpg
    beyond bad.jpg
    89.8 KB · Views: 4
  • way beyond bad.jpg
    way beyond bad.jpg
    90.9 KB · Views: 4
  • leftovers2.jpg
    leftovers2.jpg
    127.3 KB · Views: 4

jbcurt00

Moderator
Staff member
Joined
Oct 25, 2011
Messages
24,869
Re: 87 bayliner refurb/restoration project... "The Big Dirty"

Bummer ^^^

But I'd rather find it now rather then after you'd redone a bunch of work that would have to come out......
 

bigdirty

Senior Chief Petty Officer
Joined
Oct 4, 2013
Messages
652
Re: 87 bayliner refurb/restoration project... "The Big Dirty"

I can see the top of the tank and for the most part it appears the aft cabin floor is good, but the front part (the step down looking area in the pics) would have to be removed to repair this bulkhead anyway, along with the right wall section when you enter the cabin.. and perhaps the entire head as well.. :facepalm:

Looks as though they GLASSED the tank onto place, and there is no way I'm going to have enough room to work on that side of the bulkhead to even tab in and properly affix any new bulkhead.. i have an idea how to fix this 'somewhat' properly, but its gona be an awkward PITA job.. And Ill be honest, part of me is sayin screw it, clean it up best you can, scab in a few pieces here and there with screws and aluminum angle for support, and cover it up; run the boat and get a few years out of her.. :cold:
 

Attachments

  • rotten to the core.jpg
    rotten to the core.jpg
    100.6 KB · Views: 3
  • oh, a fuel tank.jpg
    oh, a fuel tank.jpg
    79.7 KB · Views: 3
  • rotten to the core2.jpg
    rotten to the core2.jpg
    93.8 KB · Views: 3
  • rotten to the core3.jpg
    rotten to the core3.jpg
    88.1 KB · Views: 3

tpenfield

Moderator
Staff member
Joined
Jul 18, 2011
Messages
17,705
Re: 87 bayliner refurb/restoration project... "The Big Dirty"

Yea, wow . . . boat restoration certainly has its surprises. I usually try to draw or sketch out the structural pieces and how things go together. It may help in figuring out what you can fix and what you need to fix and hopefully how you can go about it.
 

bigdirty

Senior Chief Petty Officer
Joined
Oct 4, 2013
Messages
652
Re: 87 bayliner refurb/restoration project... "The Big Dirty"

Ya, it's defiantly gona take some planing and thinking to fix this.. I'm working on an idea, but I have to do bit more hacking and slashing in there to see the extent of what I'm dealing with.. In theory, this bulkhead should NEVER have seen the kind of water and moisture it did, and likely would still be ok.. but considering the boat was abandoned and filled with water for 2 years, this was the 'dam' and took the brunt of the damage as there is no drain from the cabin back to the rear bilge..:facepalm:
 

zool

Captain
Joined
Aug 19, 2012
Messages
3,432
Re: 87 bayliner refurb/restoration project... "The Big Dirty"

Rut Roh!, no problem, I would just Pull the cap, gut out all the old wood, glass in new stringers and bulkhead, and just put it back together!:rolleyes:

I suppose you could expose as much of the bulkhead you can, cut out the cancer spots and sister a glass skinned new bulkhead with screws and epoxy...and some surgery on the other side to tie in the existing stringers if they are ok...if the old bulkhead hasn't delaminated from the hull sides, you may not have to expose it all...
 

bigdirty

Senior Chief Petty Officer
Joined
Oct 4, 2013
Messages
652
Re: 87 bayliner refurb/restoration project... "The Big Dirty"

Rut Roh!, no problem, I would just Pull the cap, gut out all the old wood, glass in new stringers and bulkhead, and just put it back together!:rolleyes:

Oh ya.. :lol: sent a boat buddy a pic, he says 'Meh, that'll buff right out!'


I suppose you could expose as much of the bulkhead you can, cut out the cancer spots and sister a glass skinned new bulkhead with screws and epoxy...and some surgery on the other side to tie in the existing stringers if they are ok...if the old bulkhead hasn't delaminated from the hull sides, you may not have to expose it all...

yup, that's about where I'm at.. except it it was rotten right through in the center.... I've got it down to the hull between the stringers, and the port side cleaned back to decent wood at the edges.. looks to me as though the ends/sides that remain of the bulkhead are still intact and attached to the hull/aft stringers. She has seen a lot of water in there, but the aft stringers are still in good shape, and are placed further up the hull (they are thicker and heavier as well) so they likely didn't see near as much moisture.

I'm thinking i'll have to do it in 2 or 3 'stages' and in the end it should hold up well enough for several years.. its not a go fast 'pound through the rough water at 70mph' boat anyway :laugh: I'll post up a pic soon of my proposed repair pieces and plan, but ya, I would basically glass the panels in my shop, and then screw/epoxy them into the boat.. in a way, like you would redo a transom, leaving the outer glass.. in this case it will be the remaining glass from the rear of the bulkhead... And now a few pics of the destruction, and current state of things... the starboard side (last pic) still needs to be cleaned back some, and its a huge PITA as its behind the head, which Im gona try my darn-est to leave intact... just a whole pile more work to remove everything...:faint2:
 

Attachments

  • cutting.jpg
    cutting.jpg
    102.5 KB · Views: 4
  • cutting 2.jpg
    cutting 2.jpg
    96.1 KB · Views: 3
  • cutting more.jpg
    cutting more.jpg
    96.3 KB · Views: 3
  • cutting more 2.jpg
    cutting more 2.jpg
    113 KB · Views: 3
  • eww.jpg
    eww.jpg
    103.7 KB · Views: 4

bigdirty

Senior Chief Petty Officer
Joined
Oct 4, 2013
Messages
652
Re: 87 bayliner refurb/restoration project... "The Big Dirty"

Got it mostly cleaned up today, and I think I have a plan now that I can see everything. There was much cursing and swearing, some blood shed, and a shop vac might have learned how to fly.. ahem... First pic is maybe a little hard to tell, but it's cleaned out back to the aft stringer face on the starboard side, (behind the head) and what remains of the bulkhead past there is not 'perfect', but salvageable i believe. The face of the rear stringer looks very good to me in person, just not great in a picture :rolleyes: It is going to be interesting how i'm going to get screws in there however..

The 'plan' at this point is the third pic with green and red lines on it.. Basically the lower red piece will have to go in first (after being covered in resin) and get epoxied to the hull and the remaining glass from the back of the rotted out bulkhead. I figure making it only half height will allow me to get clamps/bracing behind it and get it glued in tight and right where i want it. The other red piece will also be resin covered, then screwed and glued to the bottom of the aft cabin floor, sticking out about 3/4", recreating a nice straight edge to work with. Then the green piece will span the lower red panel, and attach to the original remaining pieces of the old bulkhead either side, as well as the top red piece and anything else i can hit with screws and glue. :lol: (it will also become the attachment point for the cabin step) I'm taking this as an opportunity to make things a little more 'open concept' as well; I'm not going to re-install the aft cabin wall and door, and plan on leaving the wall section behind the step out as well.. curtains work just fine, and it makes it easier to move around in the cabin entrance area. In the end I may even cut down the dividing wall from the aft to the dinette as well... :laugh: but that can wait..

In the end I think i will make the rest of the floor/step rebuild pieces as screw in/removable panels, so access to this area is easy down the road.. I think this repair will 'work' but i'd like to be able to keep an eye on it, and also have good access to it if i need to revisit or further repair this area in the future..
 

Attachments

  • cleaned up 2.jpg
    cleaned up 2.jpg
    86.2 KB · Views: 3
  • cleaned up 3.jpg
    cleaned up 3.jpg
    96.6 KB · Views: 3
  • plan.jpg
    plan.jpg
    93 KB · Views: 3

bigdirty

Senior Chief Petty Officer
Joined
Oct 4, 2013
Messages
652
Re: 87 bayliner refurb/restoration project... "The Big Dirty"

Taking advantage of decent temps today, I've been able to forge ahead and make up the new pieces, and fit them all. I know its not ideal, but i do think this will work, and seeing as I am going to leave access to everything I'm feeling a bit better about it now.. and a bit of a funny thing, the wall section i'm not putting back in just happened to be made out of 5/8" ply, and although the bottom 6" was fairly rotted, (go figure, wallpaper does NOTHING to seal plywood..:facepalm:) i started measuring it up, and oh boy, there was just enough of a piece to make my 'new' lower bulkhead.. :lol: it was after all, an original part of the boat.. and now it shall remain a part of it, forever..

In the second pic you can see the face of the aft starboard stringer (i've circled it in red) that I assume was painted that blue color from the factory, possibly a sealer of some sort? It is solid, as well as the port side rear stringer (which actually comes further forward into the cabin, under the step up to the aft cabin) The smaller stringers in the cabin, forward of the bulkhead, are not in the best of shape at their 'ends' however.. you can tell now from the pics with the new bulkhead fitted, I have cut the first inch or so off the starboard side, and about 3/4' off the port side, but from there forward they are ok. (did a few core samples further up, they are not mint, but still wood.) Seeing as there is and will be easy access, I'll tab and glass them in in the spring, once the temps are decent again.

I was talking to my 'boat buddy' and he has suggested simply painting the pieces, then glue/screw/fit them in. The paint he is suggesting is apparently a high end machinery/industrial paint, some sort of epoxy base I assume, and he swears by it.. I'm considering it, because really, this area should never see THAT much water, and only needs to be sealed to maintain its structure and strength.. never mind that I cant glass the back side of this bulkhead anyway.. thoughts?
 

Attachments

  • new lower bulkhead 2.jpg
    new lower bulkhead 2.jpg
    91.7 KB · Views: 3
  • new lower bulkhead starboard.jpg
    new lower bulkhead starboard.jpg
    86.8 KB · Views: 3
  • new lower bulkhead port.jpg
    new lower bulkhead port.jpg
    102 KB · Views: 3
  • new upper port.jpg
    new upper port.jpg
    82.9 KB · Views: 3
  • new upper.jpg
    new upper.jpg
    70.5 KB · Views: 3
Last edited:

bigdirty

Senior Chief Petty Officer
Joined
Oct 4, 2013
Messages
652
Re: 87 bayliner refurb/restoration project... "The Big Dirty"

ok.. maybe i'm over thinking things, but I've spent the whole day doing reading, talking to my friend, and i'm kinda stuck on what to do, or how to proceed.. Turns out the paint my friend is talking about is an oil base.. i'm just thinking about long term here, and the fact that I'll never be able to access the back of this bulkhead ever again, aside from cutting it all out, again... covering the pieces in resin/glass will create thickness issues trying to fit into the existing area, and grinding the remaining tabbing out will be next to impossible unless i demo even more of the existing floor and remove the entire head... also, its still the dead of winter here, so any kind of glass work out there is a no go for at least another 6 weeks... :faint2:

I would rather coat the new bulkhead pieces in some sort of (epoxy?) paint, which should effectively seal them from moisture, but still allow them to be glued into place.. i did a test glue yesterday with PL400 (works in temps as cold as -17C) and a piece of painted 3/4 ply (floor and porch paint, enamel) and as I suspected, the PL stuck quite well.. to the paint, which it pulled it right off the wood...:facepalm: bare wood to wood or wood to glass works fine.. So option one is to leave the bottom edges bare, and the PL would become the seal as well as the bond between the new bulkhead and the existing wood and glass of the boat, and I'd have to paint over the edges and old tabbing after the glue set...next option; west systems epoxy (?) to glue the panels in.. but again, temps will be an issue, and still, what to paint/cover the pieces with to water proof?

There is this I suppose, http://www.iboats.com/System-Three-...445091--session_id.309880557--view_id.1123369 but I would still need to wait at least a few weeks, and the temps MIGHT climb above 0 C..

In my googling and research today it seams there are two types of 'epoxy coverings' if you will, either a typical two part, (100% solids) or some products that are 'called' epoxy coatings (less than 100% solids), but because of the solvents in the latter, they tend to leave tiny air gaps as the solvents flash of, in the end leaving you with a less than water proof surface.. you can to 2 coats, but that still leaves a doubt in my mind.. will it last?

I really want to do this as best I can, and try to prevent this repair from gathering moisture over time.. but its simply not feasible for me to do it 100% 'perfect' or proper, (grind it all out, tab and glass in from both sides) as it would involve further cabin demo, likely cutting apart the top cap and super-sturcture, removing engine/drive and fuel tank, not to mention add more cost to the project.. and lest face it, its a $1000 87 bayliner, its probably not even worth that much work. :laugh:

That said, if i abandon the project now, I'm out $2000, 6 months of my time/work, and will have a hell of a time trying to sell this hulk....:cold:
 
Last edited:

GT1000000

Rear Admiral
Joined
Jul 13, 2011
Messages
4,916
Re: 87 bayliner refurb/restoration project... "The Big Dirty"

Here is my take on your current predicament...
This next bit of advice is by no means endorsed by the ABYC, Coast Guard or any other respected organization, insert Iboats.com here...
It is a solution that has been performed in front of my very eyes by a boat repair yard...
The likelihood of it lasting quite a few years has gained acceptance among guys who do boat repairs for a living and have performed these repairs on several boats...
I am not going to give too many details, as I have never personally been involved with doing these types of repairs.
Basically they epoxy coat the structural members that need replacing and the structure in the boat that will receive the repair, add corner bracing to be able to run some galvanized deck screws into, pre-drill where the screws are going to attach, grind the surfaces where the epoxy needs to go, slather everything with epoxy and/or thickened epoxy [PB] where it will all come together, coat the screws with epoxy and drive them home...if possible they also add a layer of epoxy soaked cloth over the whole mess...
As far as getting screws into awkward places, if you pre-drill and pre-thread the screw, you may be able to run it in by hand when the time comes to permanently install them...keep in mind that they are basically just "clamps" to hold everything together while the epoxy dries...in cases where you just can't get access to installing screws, you could use some braces jammed into the spaces as temporary "clamps"...
If access is limited, as it usually is in the recesses of our boats, the repairs are usually WAY less than good looking, but they do seem to be structurally sound...BTW, these are mostly, if not all, salt water, ocean going boats...
I must interject here...These repairs are considered temporary and none of the guys that have done them, that I have spoken to, will NOT guarantee these repairs...However, one guy "told" me he learned about and performed this type of repair on a 30-something foot Cigarette over 10 years ago, and the owner regularly runs this go fast boat with no complaints...
Take the above with a grain of salt or two and determine if this is a possible option for your boat.
Also, keep in mind that you will not be able to attach anything on top of the epoxied parts with polyester resin, afterwards...you will have to stick with epoxy...
Best of luck!:)
 

bigdirty

Senior Chief Petty Officer
Joined
Oct 4, 2013
Messages
652
Re: 87 bayliner refurb/restoration project... "The Big Dirty"

All things considered, I think that is basically what i have to do, cause like I said im into the thing a few grand, and as she sits it aint worth near that! :lol: i was looking at it last nite, planing my attack, figuring out where and how to brace and clamp it.. I also found what I think will be a suitable paint for any areas that may be exposed to moisture/occasional water, behind the bulkhead ad the areas where I cant get to for epoxying/gluing in. (going to do a test piece tonite, more on that at a later date)

..the repairs are usually WAY less than good looking, but they do seem to be structurally sound...BTW, these are mostly, if not all, salt water, ocean going boats...
I must interject here...These repairs are considered temporary and none of the guys that have done them, that I have spoken to, will NOT guarantee these repairs...However, one guy "told" me he learned about and performed this type of repair on a 30-something foot Cigarette over 10 years ago, and the owner regularly runs this go fast boat with no complaints...

Yup,this is definatly going to be one ugly repair job, but i'm gona say 90% of it will effectively be hidden in the end, by the step, wall panel and carpeting.. And before 'looks' i will go with strength and reasonable longevity anyway.. its a low speed cruiser, and if i get a few seasons out of it i'll be happy.. and if it holds up well, I may sell it at some point to get into something with twins/newer drives. If it starts to fail, i will have to make a decision then.. likely part out, strip down, and scrap.. :grumpy: .. but I'll hope for the best.

Take the above with a grain of salt or two and determine if this is a possible option for your boat.
Also, keep in mind that you will not be able to attach anything on top of the epoxied parts with polyester resin, afterwards...you will have to stick with epoxy...
Best of luck!:)

So yes, I'll take that idea with some salt, and probably dump some more on it to... i'll brace it, smash it into place, glue it, screw it, paint it, bleed on it, and definitely swear at it... so it should work out in the end right?! :laugh:
 
Top