87 bayliner refurb/restoration project... "The Big Dirty"

bigdirty

Senior Chief Petty Officer
Joined
Oct 4, 2013
Messages
652
Re: 87 bayliner refurb/restoration project... "The Big Dirty"

Thanks Zool :)

So although the bench needs a few final touches to 'finish' i can do that once its mounted in the boat again.. so on to the the all important captains chair! Here's a few pics of what I was starting with... had to warm it by the fire for a bit (pulled it in from the boat/shed, was about -2F out there that day) It was definitely not happy about life anymore... bottom foam was pock marked like a teenaged kids bad acne, and the wood was returning to nature in my hands as i pulled the old material off :laugh: at least its a plastic shell to work with, and that was still in pretty good shape..
 

Attachments

  • old 1.jpg
    old 1.jpg
    122.4 KB · Views: 1
  • old 2.jpg
    old 2.jpg
    120.3 KB · Views: 1
  • old bottom.jpg
    old bottom.jpg
    96.1 KB · Views: 1
  • old stripped.jpg
    old stripped.jpg
    121 KB · Views: 1
  • shell 1.jpg
    shell 1.jpg
    119.2 KB · Views: 1

bigdirty

Senior Chief Petty Officer
Joined
Oct 4, 2013
Messages
652
Re: 87 bayliner refurb/restoration project... "The Big Dirty"

The sewing machine deal never materialized, so I figured I'd try something... its all wrapped/pulled and stapled panels, not one stitch :lol: I think it will work for now, and its a pretty good match to the bench seat color scheme.. and its quite a bit more comfortable than the factory was, with the added backrest pieces (all new wood and foam as well)
 

Attachments

  • back.jpg
    back.jpg
    91 KB · Views: 1
  • first wrap.jpg
    first wrap.jpg
    106.7 KB · Views: 1
  • head rest.jpg
    head rest.jpg
    85.8 KB · Views: 1
  • new backrest.jpg
    new backrest.jpg
    117.6 KB · Views: 1
  • new bckrest2.jpg
    new bckrest2.jpg
    116.7 KB · Views: 1

bigdirty

Senior Chief Petty Officer
Joined
Oct 4, 2013
Messages
652
Re: 87 bayliner refurb/restoration project... "The Big Dirty"

And here be the end result... now, originally I was going to just screw the front white piece on and be done with it.. then it fell off one nite as I walked away to grab tools, (but stayed perched on its own somehow) and it gave me an idea.. almost every boat I have owned/run, i'm standing at least 50-75% of the time.. (docking, running in narrows, heavy traffic areas, etc) hence the reason some manufactures make seats with flip up or down front bolsters in the seats; Gives a bit more room for standing the the helm, and it works for leaning on while running... Sooooo, i thought seeing as I definitely do NOT have the budget for a fancy expensive seat like that, maybe i could build something of my own? A combination of two hinged panels and a bit of 'fun' wrapping but it seams to work ok. Of course, the real test will be pounding through 6-7 foot waves at full throttle..:lol: I may end up having to re-engineer at some point but I'll cross that bridge if I get to it. :D
 

Attachments

  • finished 1.jpg
    finished 1.jpg
    95.9 KB · Views: 1
  • finished2.jpg
    finished2.jpg
    101.7 KB · Views: 1
  • finished3.jpg
    finished3.jpg
    107.9 KB · Views: 1
  • finished 4.jpg
    finished 4.jpg
    131 KB · Views: 1
  • an idea.jpg
    an idea.jpg
    98.9 KB · Views: 1

bigdirty

Senior Chief Petty Officer
Joined
Oct 4, 2013
Messages
652
Re: 87 bayliner refurb/restoration project... "The Big Dirty"

On to the next big dirty redo on this tub.. the radar arch panels... ugh.. Again, I'm a little disappointed and a bit bothered at the original design/build... they installed the wrapped panels on the inside of the arch BEFORE installing the entire arch on the boat! :faint2: yup, below the lowest point of the side windshield glass/frame, there were TWO screws holding the side panels to the arch, (you can see the white calking the po put at the top of the window frame there, and where i sliced it with my knife trying to figure out wtf was going on..) and on top of that, due to the mold/shape of that part of the hull, it was never a very good 'fit' anyway, and has let water sit in there likely since day one.. So looks like I'm gona do it a bit different in the end, and make a piece to go between the hull and the arch, secure and seal that first, and then make a separate panel above that for each side. I think for the uppers (the way i want to build them) the existing wood is ok to use, but the top panel is totally waterlogged and rotten.. its only 1/4" ply, but has at least the weight of 3/4" to it at the moment :laugh: Oh, and i discovered the speakers mounted in the radar arch are actually decent marine 120w! I know, small things....
 

Attachments

  • arch side panels 2.jpg
    arch side panels 2.jpg
    139.9 KB · Views: 2
  • arch side panels.jpg
    arch side panels.jpg
    126.8 KB · Views: 2
  • arch top panel.jpg
    arch top panel.jpg
    129.3 KB · Views: 2
Last edited:

bigdirty

Senior Chief Petty Officer
Joined
Oct 4, 2013
Messages
652
Re: 87 bayliner refurb/restoration project... "The Big Dirty"

blarg.. never-mind, these side panels are pretty much rotten as well.. :blue: templates they become! I came up with another idea tho, as i was puling staples and bleeding... i recovered/re-made the headliner of my old chris craft hard top with some plastic/acrylic material (the kind of stuff you see signs made of) and trimmed it out with teak, which I have a bunch of... so it hit me, if I made the 'new' arch panels out of it, i could run an LED rope light in behind and it would look pretty slick at night, with the whole inside of the arch 'glowing' :D
 

Attachments

  • 20140205_220050.jpg
    20140205_220050.jpg
    130.4 KB · Views: 3
  • 20140205_220108.jpg
    20140205_220108.jpg
    109.9 KB · Views: 3

kahuna123

Senior Chief Petty Officer
Joined
Jun 2, 2011
Messages
703
Re: 87 bayliner refurb/restoration project... "The Big Dirty"

And looking at this much rot the stringers and transom are ok???
 

bigdirty

Senior Chief Petty Officer
Joined
Oct 4, 2013
Messages
652
Re: 87 bayliner refurb/restoration project... "The Big Dirty"

And looking at this much rot the stringers and transom are ok???

Well, yes, but they have a little more 'meat' to them, and were better protected for the last few years. The canvas top is set up UNDER the arch, leaving these panels completely and totaly exposed to all the elements, for 4 years outside, not covered.
 

GT1000000

Rear Admiral
Joined
Jul 13, 2011
Messages
4,916
Re: 87 bayliner refurb/restoration project... "The Big Dirty"

Hey BD,
Seat turned out real nice, I like the accidental flip up bolster design development...
Have fun with the arch...I'm sure you'll make it way better than original.
It's the little things that add up to the whole...;)
 

Tboner7864

Petty Officer 2nd Class
Joined
Mar 27, 2013
Messages
177
Re: 87 bayliner refurb/restoration project... "The Big Dirty"

Lookin good big dirty cant wait to see the boat done
 

zool

Captain
Joined
Aug 19, 2012
Messages
3,432
Re: 87 bayliner refurb/restoration project... "The Big Dirty"

Isnt there supposed to be some 80's pink accents to that vinyl?:lol::rolleyes:

The two tone white/blue looks nice and crisp!
 

bigdirty

Senior Chief Petty Officer
Joined
Oct 4, 2013
Messages
652
Re: 87 bayliner refurb/restoration project... "The Big Dirty"

Hey BD,
Seat turned out real nice, I like the accidental flip up bolster design development...
Have fun with the arch...I'm sure you'll make it way better than original.
It's the little things that add up to the whole...;)

Thanks man, wow are there about a MILLION little things though! :faint:

Lookin good big dirty cant wait to see the boat done

Ya, me too.. spring is coming.. slowly..

Isnt there supposed to be some 80's pink accents to that vinyl?:lol::rolleyes:

The two tone white/blue looks nice and crisp!

Heh heh.. thanks Zool.. and pink what? you mean like, to match the counter top and carpets/ect in the cabin? :laugh:
 

Attachments

  • cabin demo5.jpg
    cabin demo5.jpg
    73.5 KB · Views: 2
  • aft cabin2.jpg
    aft cabin2.jpg
    81.4 KB · Views: 2

zool

Captain
Joined
Aug 19, 2012
Messages
3,432
Re: 87 bayliner refurb/restoration project... "The Big Dirty"

Heh heh.. thanks Zool.. and pink what? you mean like, to match the counter top and carpets/ect in the cabin? :laugh:

Ahh, I knew it was there somewhere!....with a little luck, maybe you could color match that "mauve" for when you redo the cabin:lol::loco::puke:
 

bigdirty

Senior Chief Petty Officer
Joined
Oct 4, 2013
Messages
652
Re: 87 bayliner refurb/restoration project... "The Big Dirty"

Ahh, I knew it was there somewhere!....with a little luck, maybe you could color match that "mauve" for when you redo the cabin:lol::puke:

Ya.. um, yuck :laugh:

It 'warmed up' a bit here today (only -12c.. that's about what, 10F for you guys down there?) so I was able to get into the cabin and start picking/puling a bit of carpet, and begin to formulate a plan of attack for the floor rebuild and repair. I hoping the weather continues for tomorrow so I can get the fridge and cupboard doors out, and possibly get the bulk of te carpet ripped out.

I may put the radar arch panels on the back burner for now, as I want to rework/re-design my camper top and bars in the spring, and for the plan I have in mind it could require the upper (inside) corners of the arch to bear some load/weight and I'd have to engineer that into the top and side pieces.. i doubt the original (or ANY) 1/4" ply would have any sort of 'structural' support :lol: I figured a drawing on a napkin wouldn't give a good indication, so I've tried to learn myself some ms paint skills.. First pic is how she sits, second is my 'proposed bar setup' which I'm hoping will allow me to use most of the original canvas, possibly only having to add some clear plastic zip out pieces at the front of the windshield. I'm thinking the main top section can remain permanently mounted to the arch, supported by two bars, and the very front bar would just be on a hinge/pin for easy removal or set up.. It is very annoying as it sits anyway, its way too low at the front, and i touch the canvas with my head even SITTING at the helm.. Cant imagine trying to run this thing in even a bit of rain.. and by the way the plastic side panels look, and seam to roll over onto the top, I'd imagine it was intended to have another piece/kick up added but the po must have run short on $$. Also the rear/back piece of canvas (not visible in the pic) also has a stitched in section that appears to have been meant for plastic/zip out, but it never got it..
 

Attachments

  • new.jpg
    new.jpg
    116.8 KB · Views: 1
  • new bars.jpg
    new bars.jpg
    117.2 KB · Views: 1

bigdirty

Senior Chief Petty Officer
Joined
Oct 4, 2013
Messages
652
Re: 87 bayliner refurb/restoration project... "The Big Dirty"

Bit of an update;

I was in the cabin today ripping out cupboard doors and teak trim so i can get all the carpet up, and yes, there is a water/dirt stain on all of them.. (more on that in a few) I had just assumed i would be replacing/remaking them but to my surprise, they are actually made of decent wood! Marine grade ply I assume, and all the pocket hinges save for one, are perfectly intact and working! A few are bit rusty, but can easily be cleaned up. Took about 10mins apiece with a green kitchen scrubby and windex to clean the doors up.. :laugh: and only one has to have the veneer re-glued on the bottom edge.. A lot better than i thought I was gona be into that's for sure! I will say it has restored a small bit of faith in the 'build quality' of this old girl to me, as these would have been a higher end door hinge for 1987, and even the teak pieces that support the table when converted to a bed were NUT&BOLTED through, not just screwed in..

Although some inherent design flaws are apparent to me now; All the 'sections' in the v birth and back through the table/bed area have either NO drainage, and in a few, there is a hole but it's quite high up on the bulkhead.. Looks as though without the front bilge powered up, it would fill a lot of the bow areas with water eventually, and then spill over and back through the rest of the cabin... and just sit there.. I am guessing that is exactly what happened over the course of the last 4 years this ol girl sat on land, basically abandoned. Now, the canvas top and cabin hatches may have stopped MOST of it for a year, maybe two.. but once they started leaking, it was game over. Which explains to me why the original front bulkhead which was likely on its way to rotten aready (only 1/2" ply, and not fully glassed on the top) finally rotted out completely, and with all the extra weight of water in the cabin, crushed the hull/keel where the front blocking wood was set. Anyway, here a few pic to prove I actually DID something today :tongue:
 

Attachments

  • cupboard doors.jpg
    cupboard doors.jpg
    141.5 KB · Views: 3
  • cupboard doors2.jpg
    cupboard doors2.jpg
    71.1 KB · Views: 3
  • cupbard door cleaned.jpg
    cupbard door cleaned.jpg
    63.3 KB · Views: 3
  • vbirth.jpg
    vbirth.jpg
    129.4 KB · Views: 3
Last edited:

bigdirty

Senior Chief Petty Officer
Joined
Oct 4, 2013
Messages
652
Re: 87 bayliner refurb/restoration project... "The Big Dirty"

Oh yes, then there was this.. In the aft cabin there is a dresser, and I hadn't paid much attention to it yet.. i knew there were obvious signs of rodents ripping up newspaper and whatnot, but I happened to glance at it while taking the cabin door off.... Not sure if its funny 'ha ha' but defiantly strange.. I didn't know what else to do but take a pic.. :laugh: wonder if this is some kind of omen or...?
 

Attachments

  • strange omen.jpg
    strange omen.jpg
    76 KB · Views: 2

redneck joe

Supreme Mariner
Joined
Mar 18, 2009
Messages
10,277
Re: 87 bayliner refurb/restoration project... "The Big Dirty"

Save those papers, put them in a small frame and hang up when the boat is finished.

I am in the process of putting the carver (below) back together and i was amazed at how well door panels, hinges and stuff cleaned up. The walls on the head I was sure would be stained permanently but about 15 minutes each with some ajax all is well.


And I DO NOT miss my Bayliner pink. I've got some retro orange now but nothing was worse than the pink.
 

bigdirty

Senior Chief Petty Officer
Joined
Oct 4, 2013
Messages
652
Re: 87 bayliner refurb/restoration project... "The Big Dirty"

Save those papers, put them in a small frame and hang up when the boat is finished.

Ya, i had the thought already :lol:

I DO NOT miss my Bayliner pink. I've got some retro orange now but nothing was worse than the pink.

Yup, my 81 253 Chris had the 'tweed brown w/orange' color scheme in the cabin, (along with fuzzy shag type headliner :laugh:) .. still better than pink/mauve IMO.

I have used a product from home de pot on kitchen counter tops that simulates granite, and i may look into that to cover up the existing counter tops in the boat.. maybe a slightly darker shade to match the doors, which I really don't mind, and should go nice with some hardwood flooring in there.
 

redneck joe

Supreme Mariner
Joined
Mar 18, 2009
Messages
10,277
Re: 87 bayliner refurb/restoration project... "The Big Dirty"

yeah this carver had the shag headliner which I really wanted to keep and add my disco ball (yes I have a small battery powered one). But it was just too nasty and falling apart. I'm also replacing all the tweed but i'm thinking I like the retro orange.
 

bigdirty

Senior Chief Petty Officer
Joined
Oct 4, 2013
Messages
652
Re: 87 bayliner refurb/restoration project... "The Big Dirty"

yeah this carver had the shag headliner which I really wanted to keep and add my disco ball (yes I have a small battery powered one). But it was just too nasty and falling apart.

Thats awesome! I have a small spinning/multicolor light I'm planing on wiring permanently to the dash.. the switch for it will simply be labled 'DISCO' :laugh: :rockon: :party:

And the shag was cool, but sorta got me in trouble once.. a girl i was... 'showing my boat to' ...ahem.. looked up at it and said "um, are those foot prints up there?" (They weren't hers anyway..) "Oh.. uh... maybe.." :redface:
 

bigdirty

Senior Chief Petty Officer
Joined
Oct 4, 2013
Messages
652
Re: 87 bayliner refurb/restoration project... "The Big Dirty"

Ok folks, I'm getting ready to start on the cabin floor, looking for thoughts and theory's, ideas, or even constructive "OH MY GOD NO! DONT DO IT LIKE THAT!!" comments...:lol:

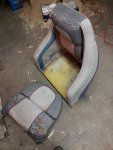
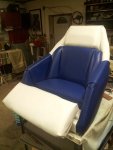
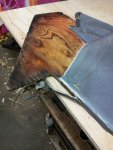
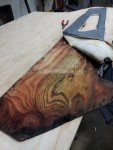
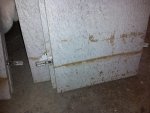
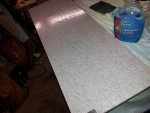
Heres my plan at this pint.. er, point.. I have measured it out, and believe i have just enough hardwood to cover the whole thing. (freebe, leftovers from a friends house, 3/4" oak, nice stuff.. a piece is sitting there in the first pic) The curved side will be a lot of custom cuts, but I think its the only way it will look good in the end. The hull curves/tapers up from there so I don't see another option.. I'll start the new carpet there, and along with everything else it will get re carpeted in a light grey of some sort. Anyway, after the rest of the original gawd awful carpet is removed, i'm going to 'square off' the cut section of the floor and build back/scab in what and where I need, to end up with a roughly 6 foot long by 15" opening. (I originally told the glass guy 'just cut out what you need to, i don't care'.. sort of regretting that now.. he nicked my stringers in a few spots, so I'll have to repair/cover that first, but i can sill work ahead regardless at this point.) In the end i'd like two removable floor hatches, or panels, so I can easily access that area of the boat if need be. It will also make it easier on one hand, as I can easily handle smaller pieces, and work away in a WARM garage.. for the most part anyway.

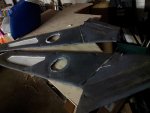
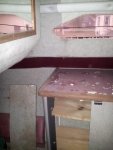
It's not shown in the first pic, but back by the cabin entrance is the pump and raw water pickup for the head, and the front bilge pump is at the top of the pic there too.. (the factory 5" square access was kinda silly Imo..) Seeing as this area of the boat was/is prone to collecting water, but its basically SEALED from the factory I've elected to make an improvement here.. thats my story and I'm sticking to it.

So; I'm thinking of just gluing the hardwood to the factory floor, around the opening I create, and screwing/gluing the hardwood to the panels i will build, leaving about a 3/4" overhang on the sides. i hesitate to screw the permanent pieces to the boat, as it is literally right on the hull.. a few screws punching through the hull would just suck. Maybe its overkill, but I notice the floor REALLY flexes at this point, so I'm thinking of adding some aluminum angle crossers underneath for support of the whole thing in general, and to support the removable panels.

The factory only put a few 2x2 pieces of wood across, one by the aft cabin door and one about where the fridge is.. just don't seam tough enough for me.. and the rear most bulkhead is new as well, there was nothing there from the factory which I consider either a design flaw, or perhaps it was 'forgotten' during the build? Its literally a 6 foot + span from the first bulkhead back to the firewall/cabin entrance.. :eek: 
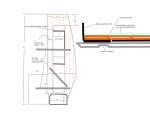
I just see that section of the hull taking a lot of the pounding while running.. second pic is my ms paint 'schematic' drawing/idea :laugh: NTS but hopefully you get the idea..
 

Attachments

  • the hole 2.jpg
    the hole 2.jpg
    125 KB · Views: 6
  • floor sketch and measurmets.jpg
    floor sketch and measurmets.jpg
    35 KB · Views: 5
Top