1976 Tom Boy Boat, 1976 40 HP Johnson Outboard and who knows what Trailer

sphelps

Supreme Mariner
Joined
Nov 16, 2011
Messages
11,435
Looks pretty fishable to me ! Looking forward to see how you gunna use the cooler for a live well ..
 

gm280

Supreme Mariner
Joined
Jun 26, 2011
Messages
14,592
Thanks WOG and sphelps, yes I am working towards installing the wire tubing now so I can button up the floor for a final. I am trying my best to think of everything that needs to be installed before I PD the floor in for keeps. Even though all the wiring is basically for seat base and live well lights and such, I still want the tubing there so if there ever is a need to run new wiring, it will be a snap. Yesterday's update I also talked about waiting for parts, and amazingly some of those parts came in just after I posted that update and that was really a pleasant surprised since the company I ordered them from gave me a receive date of May 20th. My 6' stainless steel piano hinges came in. So rod boxes, live well lid and seat bases can now proceed... yea! A little pricey over standard steel hinges, but these will never rust out. Nothing is going into this boat that is not brass, aluminum or stainless steel. I seen all the old steel parts that were on this boat. Not a pretty sight! WOG, this layout is really basically a take off of most every stick steering pan-fish layout on the market these days. So I can't take credit for how it looks. Not mine idea, but I like their payouts and am copying it! However, it will not even resemble the original Tom Boy layout at all...

Until next update, you all have a wonderful day... :thumb:
 

Woodonglass

Supreme Mariner
Joined
Dec 29, 2009
Messages
25,924
Yeah, I kina figured you were doing a "Kopy Kat" thing. I owned a Chrysler Bass Buster Stick steer back in the 90's and it's layout was almost identical to what you are creating. Even had the center live well. Mine had a Cushioned top seat for the 3rd Passenger. That was a good ole' boat. Had a narrow beam and could get back into some tight fishing holes.
 

gm280

Supreme Mariner
Joined
Jun 26, 2011
Messages
14,592
Yeah, I kina figured you were doing a "Kopy Kat" thing. I owned a Chrysler Bass Buster Stick steer back in the 90's and it's layout was almost identical to what you are creating. Even had the center live well. Mine had a Cushioned top seat for the 3rd Passenger. That was a good ole' boat. Had a narrow beam and could get back into some tight fishing holes.

Yea, I am copying those typical design stick steering setups...I confess. But I didn't try to pass it off as uniquely my design... I have plans to put a nice cushion vinyl live well hinged seat top on that copies the actual seat designs as well. And sides made like I did for the seat bases as well so it looks like it was made that way. So it will look like a factory design but my efforts. I am still amazed how much leg/foot room is in it thus far. Actually better then some factory designs I've seen. Maybe my next boat project will be a bass type boat...IDK :noidea:
 

Woodonglass

Supreme Mariner
Joined
Dec 29, 2009
Messages
25,924
Hey, nothing wrong with Kopy Kattin'. Momma always said..."If it ain't broke, don't fix it" Like I said, I loved that old Chrysler cept for it being kinda narrow. 2 ft wider and a Steering wheel and I prolly would still have it. You have the advantage of being able to design it the way YOU want it!!! That's KOOL!!!
 

gm280

Supreme Mariner
Joined
Jun 26, 2011
Messages
14,592
Okay I need some help. Well not so much help as a good explanation. As you can see the last pictures I provided about the mundane covering of the floor sections top and bottom with poly and CSM, I have an interesting situation crop up. My present method of water-proofing those floor panels is to cover them initially with poly resin and then about 15 minutes later (about that give or take) I lay the CSM clothe on top and soak it down with more poly resin. Problem is, even after I cover it with lots of poly resin, it looks like it isn't covered with a white cloudy look in various areas. It looks to me as if there isn't enough poly resin on those areas but other area look totally soaked in. So I tried using more poly and the 4" roller again...doesn't work. In fact it starts to pull up the CSM and causes lots of CSM separation. So I tried my bubble roller. Again it doesn't make the CSM lay down and it too tries to pull up the CSM. So I applied more poly with a 2" chip brush. That seems to work a little better buy certainly not the answer. So can anybody explain to me what is going on? The poly mix is 1%, the temps is 90 degree roughly, and the humidity is in the 65 to 70 range. So why the white looking CSM as if it didn't soak up the resin, and how do I get rid of it for future lays? After it cures I still can see what looks like cloudy areas, not as many or as bad, but still some. The CSM I use looks like it is made up of two layers and you can actually separate them if you try hard. The panels are total flat. but those areas look like air could have gotten in under the CSM before it cured, but it doesn't look like actual bubbles either... What gives? :noidea: :confused: :frusty:
 

Woodonglass

Supreme Mariner
Joined
Dec 29, 2009
Messages
25,924
Well is the CSM saturated with resin or not?? Are there air bubbles or not? It it's saturated with resin and there's no air bubbles and it's properly adhered to the wood then it's just cosmetic and there's nothing to worry about. Could be a defect in the Glass but if it's performing as it should I wouldn't worry about it. Now, if it's not laying down as it should that's a different kettle of fish. Got Pics??
 

sphelps

Supreme Mariner
Joined
Nov 16, 2011
Messages
11,435
After coating with resin on the raw ply and let soak in . Before you lay the csm put another coat of resin on then lay the csm . Start working it in then add resin on top until it clears .. Do you have a fan on it or is it out in a breeze ? I know it sounds weird but sometimes I think that will make it kinda snow up .. Or maybe i,m imagining it .. :der:
 

gm280

Supreme Mariner
Joined
Jun 26, 2011
Messages
14,592
WOG and sphelps, I'll see if tomorrow I can get the results posted here to let you guys see what I'm talking about. I don't know what to actually call it. It doesn't look like raised bubbles, it looks flat. But it does have a whitish or cloudish look to it. The panels look useable but what do I know. And one panel was done in the outside while the other ones were done inside the shop with two fans running but not necessarily pointed at the panels. They are running on their lowest speed to keep the fumes at bay. I still use a respirator as well but I also run two fans most of the time I'm in the shop with the side door open and the 10' garage door open whenever I'm in the shop working...
 

gm280

Supreme Mariner
Joined
Jun 26, 2011
Messages
14,592
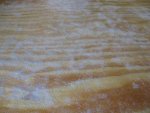
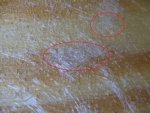
Okay here are a few pictures of what I was talking about. When I saturated these panels initially, there was basically zero areas with anything that resembled unwetted CSM. But here is what I've been referring too. You can see the whitish cloudy areas and I haven't a clue as to why... Any ideas? When I apply the poly I soak the CSM with lots of poly and everything looks pretty good. Then I usually close up shop and the next day this is what it looks like. It starts shortly after the initial soaking and if I try to work it out, I start cause the CSM to actually separate and lift off the panel. Even the bubble roller does it. So I soak the poly with a 2" chip brush and let it alone and WALA this is what it looks like after cured... It feels and even looks perfectly flat and smooth but I can't figure it out. My son was over and I should it to him. He builds molds for different character masks and props (a side hobby for him) and he said it looks like the poly is too thin when I'm applying it. I have zero idea! :noidea:
CSM-1.JPG
Here is a panel I polyed and CSMed yesterday. This ia after cured. You can see the variants in the panel color poly.
CSM-2.JPG
Another shot.
CSM-3.JPG
Here is a really good shot of what I'm talking about...
CSM-4.JPG
Here is a really close up shot and I circled some of the areas...

Anybody have an idea and more important a solution? I still have some panels to cover and certainly would like to know I'm not royally screw them up!

Until next time, you all have a great day... :thumb:
 

Woodonglass

Supreme Mariner
Joined
Dec 29, 2009
Messages
25,924
What's your "Kick" time? What's your humidity. Is this the end of the roll on the CSM? If it sits around for a while it can get contaminated from the humidity. The blotchiness can also occur when the resin doesn't have enough time to fully saturate the fibers before it starts to kick, or high humidity and dampness. Your humidity is not that high but temps in the 90's is not optimum for glassing but you are inside and not in direct sunlight sooo... You might try sitting it in a cooler of ice for and hour or so before you apply it. (no Kidding!!) You can fool it into thinking the temps are cooler and it will take longer for it to "Kick" Even though your substrate will be warmer the resin will be cooler and thus the chemical reaction should take a bit longer and extend the saturation time a bit longer. I agree with sphelps in that I always roll out a layer of fresh resin first and then lay the CSM on top of it. Then pour more resin on top of the CSM or fabric. This ensures that both sides gets resin and when you roll it or dab at it with a brush the resin is being absorbed from both sides of the glass which will help with absorption and total wet out of the fibers. That's an Old Dumb Okies best guess at the problem.;)
 
Last edited:

gm280

Supreme Mariner
Joined
Jun 26, 2011
Messages
14,592
Hmmmm , has your csm gotten wet or moist ?

No it stays inside my shop on a roller setup on a table top so I can roll off the proper amount and cut it off. So there is not even a chance it got wet or even high moisture other then the humidity of the day. And when I water proof a panel, I do poly first and do other things for a while (usually more then one panel so it takes time between them) and then I lay the CSM down over the tacky poly previously allied and then poly over top that CSM until it is clear or near clear. Then I work those areas to see if I can get them to go away. Some times I can't regardless how much more poly I apply and other times it goes totally clear. Then after the cure there they are starting me in the face...

WOG

What's your "Kick" time? What's your humidity. Is this the end of the roll on the CSM? If it sits around for a while it can get contaminated from the humidity. The blotchiness can also occur when the resin doesn't have enough time to fully saturate the fibers before it starts to kick, or high humidity and dampness. Your humidity is not that high but temps in the 90's is not optimum for glassing but you are inside and not in direct sunlight sooo... You might try sitting it in a cooler of ice for and hour or so before you apply it. (no Kidding!!) You can fool it into thinking the temps are cooler and it will take longer for it to "Kick" Even though your substrate will be warmer the resin will be cooler and thus the chemical reaction should take a bit longer and extend the saturation time a bit longer. I agree with sphelps in that I always roll out a layer of fresh resin first and then lay the CSM on top of it. Then pour more resin on top of the CSM or fabric. This ensures that both sides gets resin and when you roll it or dab at it with a brush the resin is being absorbed from both sides of the glass which will help with absorption and total wet out of the fibers. That's an Old Dumb Okies best guess at the problem.;)

Kick time is about ~30~45 minutes as it starts. The mixture is 1%. And I watch that pretty closely too. The humidity presently is around 70% and was about the same for the last panel poly session, but falling now but still will be 60% or there about. I honestly don't know the total cure time because I usually leave the shop after polying and the next day everything is cured... I'm assuming these panels are sill usable aren't they? Because they really are smoooth and solid. I can't push on any of the whitish areas like a bubble... I guess I will carry on and maybe try a little smaller percentage like .75% and see what effect that has... IDK. :noidea:
 

sphelps

Supreme Mariner
Joined
Nov 16, 2011
Messages
11,435
I do poly first and do other things for a while (usually more then one panel so it takes time between them) and then I lay the CSM down over the tacky poly previously allied and then poly over that

Before you lay the csm down roll more resin over the tacky poly .. Try that and see if you still have the same issue...
 

gm280

Supreme Mariner
Joined
Jun 26, 2011
Messages
14,592
Before you lay the csm down roll more resin over the tacky poly .. Try that and see if you still have the same issue...

Okay Sam. I will try that as well. I have a few more panels to waterproof before this boat project is finished. But getting towards the end of such things now. I just looked them over again and even tried to press them in to see if they were separated. And I can't. It looks like they are totally solid, but still whitish. Thanks for the idea! :thumb:
 

Woodonglass

Supreme Mariner
Joined
Dec 29, 2009
Messages
25,924
Yeah, again I agree, I precoat the wood and let it cure and then I roll out new resin and while it's still wet I place the mat or fabric on the fresh resin so it will absorb up from the back side as well as the resin I pour on the top. I never lay glass on "Dry" or tacky substrate. I always roll fresh resin down first.. Especially on vertical surfaces. It helps to keep the glass in place. As long as there's no air pockets and the fibers seem to be adhered properly I wouldn't worry about it.
 

gm280

Supreme Mariner
Joined
Jun 26, 2011
Messages
14,592
Yeah, again I agree, I precoat the wood and let it cure and then I roll out new resin and while it's still wet I place the mat or fabric on the fresh resin so it will absorb up from the back side as well as the resin I pour on the top. I never lay glass on "Dry" or tacky substrate. I always roll fresh resin down first.. Especially on vertical surfaces. It helps to keep the glass in place. As long as there's no air pockets and the fibers seem to be adhered properly I wouldn't worry about it.

Thanks WOG. I actually have such a panel I already rolled with poly and it is totally cured. So before I lay the CSM, I will repoly the panel again and lay the CSM and poly on top as well. I'll see if that solves the issue. Thanks for the info and reply... :thumb:
 

gm280

Supreme Mariner
Joined
Jun 26, 2011
Messages
14,592
Okay a little update to this issue. Today I laid the CSM on the panel I polyed a couple days ago. So since this panel already had poly that was cured, I rolled out another poly resin on it and then laid the CSM on top and used some more poly on top of it. It presently is curing. But it seem to work a lot better without the white cloud issue thus far. I was see in an hour or so if it still looks clear (for the most part) or turns cloud as well. Either way, I can't see how these panels are not useable or acceptable. They look and feel total smooth and flat. And since this is the first CSM covering and will get another after PBed in place and tabbed, I thing they will do the job perfectly too... We will see...

Now for a little update on the live well cooler conversion.

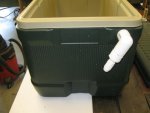
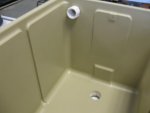
I drill out the cooler for the spray bar inlet and even the drain hole as well. And I even made the spray bar too. I even tested the spray bar and it does a great job of allowing fresh water in and also aerating the live well water that is in there too. Here are some pictures of that conversion.


IMG_0007.JPG
I removed all the handles and lid and associated hardware. Then used a forstner drill bit to cut the spray bar inlet opening. I made this using a 3/4" barbed PVC fitting to a threaded 90 degree elbow to the threaded inside outlet to the spray bar. Fits nice too...
IMG_0009.JPG
This is a shot from the inside. You can see the inlet for the sprayer bar and the drain opening I cut. Clean cut when using forstner bits.
IMG_0010.JPG
Another shot will it laying on its side so you can see the drain hole better. A really clean cutout for the drain.
IMG_0011.JPG
Next I took about a twenty inch length of 1/2" PVC pipe and marked it about every 1/2" on a straight line for the actual spray bar, stopping about an inch from each end. 1/2" spacing works very nicely and does a really good job of allowing fresh water and aerating the water as well. I used a 1/16" drill bit to keep the holes small enough to actually spray into the water. Any larger and it will more so just drain into the water. So stay about 1/16" size for a good spray stream. You can easily mark a perfectly straight line on a pipe like this by laying a piece of wood aside of it and using a sharpies marker (or even a pencil) to draw a line. Some drawers in your house will work too by laying the pipe on the draw lip and drawing your line. Then I marked every 1/2" along that line. I also had (from previous work) a "V" channel piece of wood to set the pipe into to drill the hole. It holds the pipe and keeps it from tuning as well. But whatever works for you... The I drilled all the holes pretty quickly too...
IMG_0012.JPG
I then took some Lacquer thinner and wiped off all the markings and there is my new spray bar with the two ends yet to be glued on for my conversion live well cooler... An easy to make spray bar that does the job extremely well... More to come!

Okay, until next time, you all have a wonderful day... :thumb:
 

sphelps

Supreme Mariner
Joined
Nov 16, 2011
Messages
11,435
Nice work ! Will it drain through the hull ? And what about the clean water supply ..
 

gm280

Supreme Mariner
Joined
Jun 26, 2011
Messages
14,592
Nice work ! Will it drain through the hull ? And what about the clean water supply ..

No Sam, it will have a separate inlet line and outlet line thru the transom. I will be using a Rule live well pump (500GPH size or smaller, no need for anything larger for alive well) that has it's pickup through the transom and then pump water in through the spray bar and the standpipe over flow will exit out the drain line through the transom back to the lake. As long as the standpipe is higher then the water level on the hull it will drain without issue. I basically had this same setup on another boat and it works without problems. And of course I am installing a manual fill aerator timer setup as well. I already built the timer circuit and it is sitting ready to be installed as well. If you look back over my structural layout on the hull you can see three 1" size PVC pipes I installed in the bulkheads. Those were for the inlet and outlet hose runs to the live well and the battery wires from front to back for the battery selector switch. All I have to do now is cut the seat boxes and install the SS piano hinges and they are ready to install. I have to drill some small holes where each seat base is going to install and where the live well will install so I can run the black tubing to support the wires for them to have lights inside when opened. So it really is getting exciting and coming along as planned....so far. :smile:
 
Top