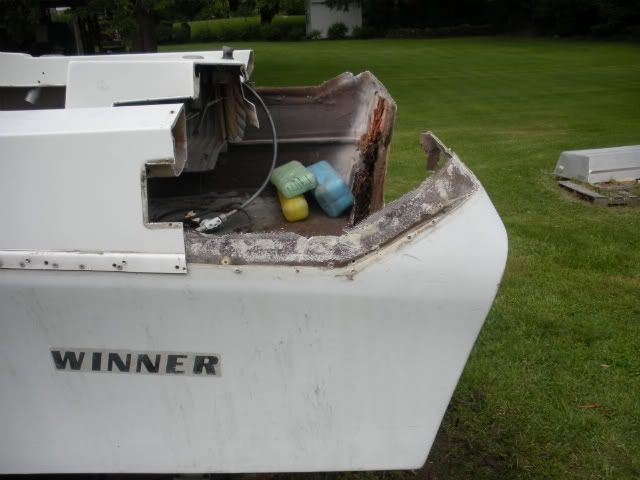
Transom OOOPS

Status
Not open for further replies.

curtisv

Cadet
Joined
Apr 29, 2012
Messages
15
Re: Transom OOOPS

inside...
inside.jpg

thinking id like to do a full transom, so no "jack plate"
so now i have to remove the outer skin and the rotted wood??...
 

Woodonglass

Supreme Mariner
Joined
Dec 29, 2009
Messages
25,924
Re: Transom OOOPS

Not quite sure if the PO cut the outer skin or not. Usually not advisable but if it's been done once you might have to do it again but this time we'll walk you through doing it right. Let's have OOPS or some of the other pro's chime in. the Top cap is gunna have to come off or at the very least the splash well cut and removed.
 

curtisv

Cadet
Joined
Apr 29, 2012
Messages
15
Re: Transom OOOPS

Not quite sure if the PO cut the outer skin or not. Usually not advisable but if it's been done once you might have to do it again ... the Top cap is gunna have to come off or at the very least the splash well cut and removed.

i'm looking at it and looks like its been "repaired" along the whole outside all around the transom.
i'd rather just remove splash well and not the whole top cap. if thats an option i'm in for that!
i'm thinking of peeling the back skin off tomorrow when i get home from work.
it's already "waiting" to come off, it will be the tell all when its off, no??
 

sphelps

Supreme Mariner
Joined
Nov 16, 2011
Messages
11,435
Re: Transom OOOPS

I'm no expert but I think you would cut the cap a few inches forward of the splashwell ..
 

sdowney717

Petty Officer 2nd Class
Joined
Jul 16, 2011
Messages
155
Re: Transom OOOPS

I dont like the idea of cutting off the outer fiberglass.

I redid a transom on older inboard 1966 glastron with OMC.
I did not remove the outer hull skin or cap. If cap means top of boat.
I cut and dug out the rotten wood from inside. Both easy and hard. I recall having to wedge and chisel parts loose.
Then using PT plywood 3/4" managed to fit it inside and glued with PL premium construction adhesive and used SS deck screws run thru outer skin into the wood. Then layered in another layer of plywood. The OMC inboard has a aluminum top bar mount so I glued and bolted a treated 2 by 6 to the top which secured that for the trans intermediate housing.

I may have even done the plywood in sections that overlapped, so side by side mirror pieces covered by a single larger section to get it to fit.
In my situation, the inner transom wood did not need to go all the way to the top.
I then coated the outer skin with several layers of glass cloth which covered the screws and strengthened it some more.

On the inside, the PT plywood is up from the hole anywhere from 1.5 to 2 inches on the lower edge. That helps to keep it dryer. It is also uncoated, no paint of glass which also keeps it dryer. If it gets wet it can dry out.
 

Woodonglass

Supreme Mariner
Joined
Dec 29, 2009
Messages
25,924
Re: Transom OOOPS

sdowney this is NOT an I/O boat, and the methods you describe for your transom restore, goes against everything that is recommended here on the iBoats forum as far as making sure that all wood is encapsulated in resin and glass.

Here's a pic of how the splashwell is cut. Just in front of the splash well itself, gunwales are cut to the top of the hull, rubrail removed, rivets removed and everything lifted off.

CuttingoffBackSplash.jpg
 

sdowney717

Petty Officer 2nd Class
Joined
Jul 16, 2011
Messages
155
Re: Transom OOOPS

Well regardless, my boat works fine, better than new as that replacement wood has never rotted.
Keeping PT uncovered is good as it lets it dry out. I did use quite a few screws to secure this along with the construction adhesive which is 100% water proof.
Encapsulated wood is an invitation to rot if your glassing it in.

That inner transom wood is mostly not exposed to weather. Sun heating and cooling and rain water logging induce movement in wood which breaks it down plywise.

I also own a 1970 wooden eggharbor sedan cruiser which I replaced the entire transom. and rebuilt the entire bottom frames floors and planks.
I did encapsulate this boat in liquid rubber called sanitred permaflex. Inside and outside. That stuff moves with the wood and wont crack.

basically stuff like this
4866015310_783c3bcecb_z.jpg

to stuff like this etc... I have more pics but what is the point of talking.
45405404_7791aa0c79_z.jpg


45405402_8db397e433_z.jpg
 

curtisv

Cadet
Joined
Apr 29, 2012
Messages
15
Re: Transom OOOPS

ok...
got off work early today... well my paying job anyways!!!
came home to my NEW job....
took some initiative and did a few things.
cut the cap 18' ahead of splashwell, there was a seam in the inside trim on opposite side and THAT determined where i was cutting.
drilled out the rivets and pulled it off. was pretty easy, came off clean. cleanest part of the day.
removed the hardware and outer skin came right off.
PO or PPO must've made a transom repair and F'd it up. just to put it bluntly.
here's a link to my SPRING TIME ADVENTURE.
the pics closer to end have titles and descriptions.

http://s1256.photobucket.com/albums/ii498/cvolovich/

now questions i have are.....
can i use 2 pieces of 3/4 ply and adhere together? can i use pressure treated? or?? if i can't find marine grade?
can i use SS screws or bolts, to secure the 2 pieces together?
i have the complete inner 3/4 ply to use as a template for new transom. i can trace and cut out, correct??
there is really nothing to screw or bolt new transom onto....
can i use SS screws through existing FG shell? or can i just glass it in?
can i re-use outer FG skin or re-glass all new?
i am replacing all the hardware with SS. and as far as the aluminum "trim" that was on the top of transom,
i can just glass over to extra reinforce?
i'm sure i'll have a whack more ??'s as the days go on. but looks like it's not as scary as i first thought.
thanks again to all who's posted advice/comments....
KEEP 'EM COMING!!!
 

Scott Danforth

Grumpy Vintage Moderator still playing with boats
Staff member
Joined
Jul 23, 2011
Messages
47,542
Re: Transom OOOPS

i recommend that you read the first 16 pages of Oops! hull extension thread. yes, 2 layers of 3/4" exterior plywood glued together (with PB) will be perfect.

you shouldnt need stainless screws, just clamp in place until the PB sets, then glass in place.
 

Woodonglass

Supreme Mariner
Joined
Dec 29, 2009
Messages
25,924
Re: Transom OOOPS

Check the first link in my signature below. It has drawings and info on the recommended methods for fabricating Deck, Stringers and Transoms.
 

oops!

Supreme Mariner
Joined
Oct 18, 2007
Messages
12,932
Re: Transom OOOPS

ok....

look......the guy that did this first really messed it up....

you will need to do some major surgery.

here is what normally happens......

you remove the transom by chipping away the old.....the grinding and prying till you get to the hull of the boat.
then you make a new transom and laminate that to the hull skin.

the reason you do it that way is because the outer hull or "skin" is true to the running surfaces of the boat. the angle of the transom is correct....as well, the side to side or left to right axis of the transom is true.
if this axis is not true to the running surface of the boat, the motor will be pushing the boat sideways, thus loosing performance and causing handling issues.
as well....if the angle of the transom is not correct.....proposing issues will happen or nose dig....or submarning.

now......the guy before you ......cut this crutial area of the transom off......the outer skin..
then he slapped in some wood.....and glassed it in....and then gellcoated the joint area.

this method of transom replacement ,,,,,has no bond to the insides of the hull....so there is no grab fron the inside of the transom to the hull sides......aka tabbing..
for this reason.....this type of repair is bound to fail.....as you have just noticed.

to repair it.....you will need to make a new outer skin of the hull....
but you have lost all the reference points to make the skin....
the only reference points you have.....are the bow nose....and the keel line.

that means....you will have to string line the bow nose to get the proper angle of attack for the transom.

that means ......cap off.

you will have to cut the transom out....the inner skin out....install the transom.....glass the back to the hull....then glass the inside to the hull....the re gellcoat....fair and finish the gellcoat.
if this repair is not done correctly......the boat will have serious issues.....

this is one case.....where i will strongly suggest to scrap the hull.
your in manitoba man.....lots of hulls around !

if you want to fix it....ok.....we can help you. and we will......but the time and money it will take...is more than a different hull....

just to let you know.....this is as intensive as a hull extension....in fact......very little different.
click the link in my sig....and start reading.

but either way...we are here for you.
 

curtisv

Cadet
Joined
Apr 29, 2012
Messages
15
Re: Transom OOOPS

so today i went out and got some 3/4" ply.
ripped it in 1/2 then cut it to 5'8" so i have a 2'x5'8" piece of 3/4 ply x 2.
mixed up some chopped and resin and made me a sandwhich this afternoon!! :D
spread it all with a 1/8 notched trowel.
kinda did my own thing to clamp it all down. should suffice... better than bricks i 'spose :rolleyes:
clamping1.jpgclamping2.jpg

so i am going to use the piece of transom that came off in 1 piece for template to trace for new transom.
IMG_1685.jpg
the smaller is the piece PO? cut in after he cut out the whole outer skin of the transom, as i found out after removing the hardware for grab handles and whatnot.
IMG_1678.jpg
it WAS NOT glassed in, but he used some form of hard adhesive or some type of silicone i've never seen.
then painted.

but with you all listening to my rants, and putting in some helpfull advice,
i think this girl will not end up in the scrap yard!!!:D

tomorrow if i have time i'm going to cut out and coat my sandwhich in resin!!:)
 

oops!

Supreme Mariner
Joined
Oct 18, 2007
Messages
12,932
Re: Transom OOOPS

curtisv said:
i'm kinda getting to like this little PITA boat!!:)

lol.....that is exactly why my screen name is oops.......i fell in love with an old P.O.S. boat !

ok.....before you cut out the new transom....(it should be 2 ins thick....not thicker or your motor wont clamp on)
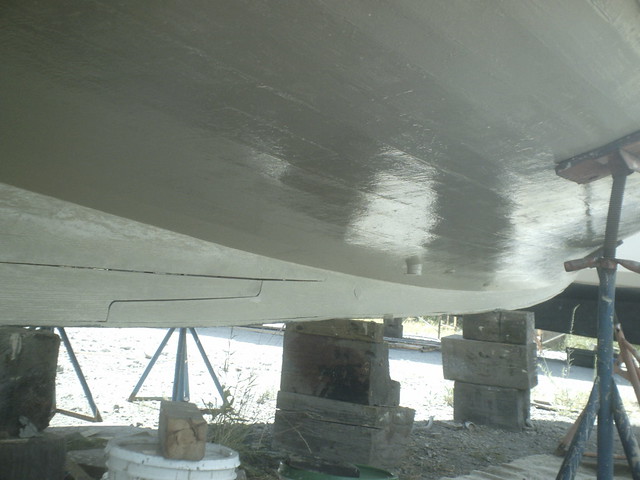
and 3/8ths smaller on the sides and keel, (so that when you glass it in and fair it that you will not hook the hull)

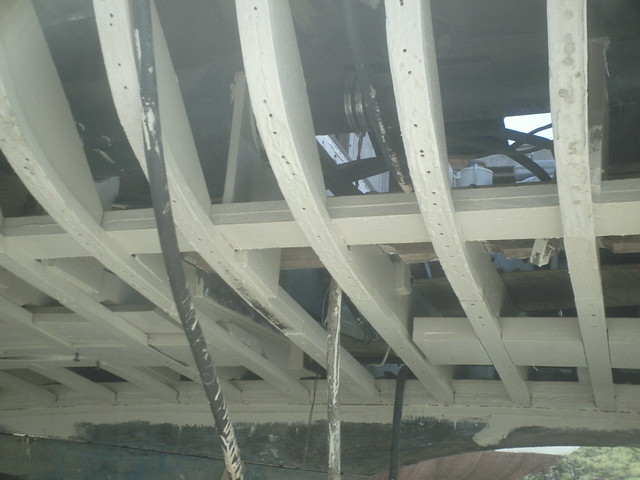
you need to cut the back deck out......you will have to get at the new transom all the way around, on the inside.

the most important thing you MUST do....is correctly line up the transom....

the transom MUST be true to the keel.....if not......the motor will want to push the boat sideways thru the water.

as well.....if the angle of attack is incorrect.....you could push the nose down,,,,or make it bounce up and down in the water.

the correct transom angle....is 110 deg. or.....20 deg off vertical.

the way to insure that.....is string lines from the bow.

boats are not symmetrical..... so taking string lines from other areas and hoping it will be lined up correctly, will not always work....

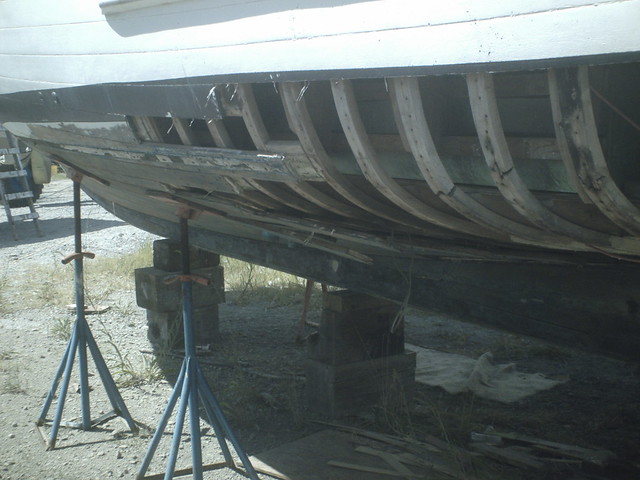
to correctly get the measurement.....the boat must be supported correctly.....flat and level across the keel and chines.

then you can get the proper angle of attack......then....the stringlines will help with getting the transom true and squair to the running surface, via the string lines to the bow nose.

is any of this making sense to you so far?.....if not ...let me know and i will explain it differently.

in the hull extension thread....(the link in my sig) i have detailed pics of the use of stringlines on the hull.

there is another thread called man VS boat.
Patrick had to a similar alignment....and he has some vids on the process.

take your time with this.....if you mess up.....you wont know till its too late, and the ENTIRE job will have to be re done.

post pics when you have the boat flat and level......
as i mentioned earlyer, i suggest you pull the cap so the stringlines will be able to run straight and true
 

cdenrco

Recruit
Joined
May 7, 2012
Messages
4
OOOPS > I gave up trying to find completion of your stretch project . I never lost interest tho , just thought you needed time ? Is there more , have you finished ? where is the thread ?
 
Status
Not open for further replies.
Top