1972 19' AeroCraft Help Formulating A Resto Plan

Woodonglass

Supreme Mariner
Joined
Dec 29, 2009
Messages
25,924
Re: 1972 19' AeroCraft Help Formulating A Resto Plan

I usually try to cut my mat with enuf overlap to go just over the edge. When it hardens if you have some hand over you can grind it off quickly and then do the other side. Sounds Like yer learnin!!!!!;)
 

Bendie

Seaman
Joined
Apr 16, 2010
Messages
58
Re: 1972 19' AeroCraft Help Formulating A Resto Plan

Nice boat. Looks like you jumped in the deep end of the "fix it up" pool. You are doing great. Putting new pieces beats pulling out wet junk!
 

TruckDrivingFool

Lieutenant Commander
Joined
Jul 30, 2007
Messages
1,818
Re: 1972 19' AeroCraft Help Formulating A Resto Plan

Thanks for the kind words Bendie. Ya I tend to live up to my name when I jump into something. :p
 

TruckDrivingFool

Lieutenant Commander
Joined
Jul 30, 2007
Messages
1,818
Re: 1972 19' AeroCraft Help Formulating A Resto Plan

So I'm still giddy as I feel I have this FG thing figured but I'm just short of taking a step back and restarting on the trans lam. I obviously didn't get the wood sealed near well enough as I have a million tiny bubbles (isn't that a song?) under my nice layup. I'm still proud of it just not so much of my prep. It also seems on top of the bow it has a bit of a twist. :mad:

What do ya think time to cut my loses, chock it up as a prototype and start over?

The result of poor sealing in prepwork.
Woodnotsealed.jpg


On the upside maybe I can sand and polish this up to make a lamp base. :rolleyes:

MixedTooMuch.jpg
 

parrisw

Ensign
Joined
Jun 8, 2009
Messages
985
Re: 1972 19' AeroCraft Help Formulating A Resto Plan

So I'm still giddy as I feel I have this FG thing figured but I'm just short of taking a step back and restarting on the trans lam. I obviously didn't get the wood sealed near well enough as I have a million tiny bubbles (isn't that a song?) under my nice layup. I'm still proud of it just not so much of my prep. It also seems on top of the bow it has a bit of a twist. :mad:

What do ya think time to cut my loses, chock it up as a prototype and start over?

The result of poor sealing in prepwork.
On the upside maybe I can sand and polish this up to make a lamp base. :rolleyes:

How are you applying your glass? I pour a section at a time spread it around with a body filler applicator then roll it out with a fiberglass roller. Like this.

Alum_roller_H_P.jpg


You really need one of these, roll it out and it gets all the air out.
 

TruckDrivingFool

Lieutenant Commander
Joined
Jul 30, 2007
Messages
1,818
Re: 1972 19' AeroCraft Help Formulating A Resto Plan

I've just been using a regular mini paint roller. I do have one of the bubble rollers but haven't tried it yet.

The bubbles are down at the wood surface and I never saw them at any point in while it was wet they were just when I went out to look at this morning. Would the bubble roller have prevented this?
 

Woodonglass

Supreme Mariner
Joined
Dec 29, 2009
Messages
25,924
Re: 1972 19' AeroCraft Help Formulating A Resto Plan

Typically you don't need a roller for mat, but it can't hurt. Those bubbles, in by opinion are from over rolling. I mean rolling when the resin is to tacky and possibly using to much resin. It needs to Self Level a bit after you roll and spread it. What kind of roller cover are you using? I use these...1/4" nap.


TruckDrivingFool

Lieutenant Commander
Joined
Jul 30, 2007
Messages
1,818
Re: 1972 19' AeroCraft Help Formulating A Resto Plan

They're just like that with 1/4" nap (had to go double check) from Purdy.

Every last one the bubbles is right down at the wood surface. Wouldn't they be mixed in from over rolling?
 

parrisw

Ensign
Joined
Jun 8, 2009
Messages
985
Re: 1972 19' AeroCraft Help Formulating A Resto Plan

I've just been using a regular mini paint roller. I do have one of the bubble rollers but haven't tried it yet.

The bubbles are down at the wood surface and I never saw them at any point in while it was wet they were just when I went out to look at this morning. Would the bubble roller have prevented this?

Yes, I think so. And don't over roll like Wood said. Don't do a huge section at a time, I did maybe 2' square section, spread out the resin with a spreader till the CSM soaked it all up then roll it out with the metal roller, if you have it use it!! You'll love it, I feel it makes a difference in finish as well, you'll see, just try it. I never did one layup without it. When you roll with it, you can see the little bubbles come to the surface.
 

Woodonglass

Supreme Mariner
Joined
Dec 29, 2009
Messages
25,924
Re: 1972 19' AeroCraft Help Formulating A Resto Plan

I really appears those are LIFT bubbles from the roller. Next time get an OLD cheap brush and after rolling brush a small section and see if it is different. It could be gas bubbles releasing from the wood but since you presealed the wood, I seriously doubt it.
 

TruckDrivingFool

Lieutenant Commander
Joined
Jul 30, 2007
Messages
1,818
Re: 1972 19' AeroCraft Help Formulating A Resto Plan

I'm just wondering if I got it sealed well enough. Maybe I'll flip it over and spend today practising.

By brush do you mean brush brush or dab brush?
 

Woodonglass

Supreme Mariner
Joined
Dec 29, 2009
Messages
25,924
Re: 1972 19' AeroCraft Help Formulating A Resto Plan

Brush Brush, G E N T L Y!!!!! Roll and then BRUSH immediately and then don't touch it again. See what happens. If no bubbles then you are rolling to long. Just roll it long enough to get total saturation and then get off it. Pour it, Spread it, Roll it, DONE!!!! Make sure and put the resin down first then lay the mat on top of the freshly coated resin, Dab it in using the roller,Pour some more resin on an area, this allows resin to penetrate from the bottom and the top. Roll it in with a few firm strokes and move to another area. Practice Makes Perfect! You'll be a pro in no time!!!!!;)
 

TruckDrivingFool

Lieutenant Commander
Joined
Jul 30, 2007
Messages
1,818
Re: 1972 19' AeroCraft Help Formulating A Resto Plan

By goodness I just might get this, its purely a technique fail on my part.

I must not of been watching for the little bubbles, because they were there from the moment I wetted out the cloth. I did four test sections the only thing that was the same between them was that my initial coat of resin on the wood I rolled out w/ the roller. Is there where your talking about over rolling? I poured some on and rolled it just enough to spread a layer.

The air bubbles were obvious this time as I was watching for them on my first try where I used nothing but a chip brush to apply resin to wet out. The roll and brush looked just like the brush only. The only difference I could see between brushing on the resin then bubble rolling vs. rolling on/bub rolling was that it looked like the brush on side was a bit on the resin rich side.

Finally just to see for myself I set the left over resin out in the sun where about half was shaded by the edge of the cup. I'm amazed at how much faster the the side in the direct sun kicked and geled. It was enough so that I moved the cup a cresent shaped hockey puck floated out into the liquid from the shaded side.

Thanks for pointing me to the fix for my technique Parris.

I've made up mind that next weekend I'm starting over on the transom as I know I can get better results and think it will lead to less of a headache in trying to get it installed.
 

TruckDrivingFool

Lieutenant Commander
Joined
Jul 30, 2007
Messages
1,818
Re: 1972 19' AeroCraft Help Formulating A Resto Plan

Transom remake took place today. Hopefully this one will come out better.

This time went through the trouble of making a template to try and get a better fit across the bottom. The first one was a decent fit but didn't account for the angle between the trans and the floor, so there was a large gap.

Is there a pattern making 101 thread? If not I think I took enough pics while I was at it to do one.

I tried a stacked pattern to account for the angle

07TransomTemplate28.jpg


but neglected to take into account the extra thickness of the pattern material which changed the amount of angle. So I just used a bevel gage to set my jigsaw and cut it that way.

I got a bit better fit but not much

07TransomFitted.jpg


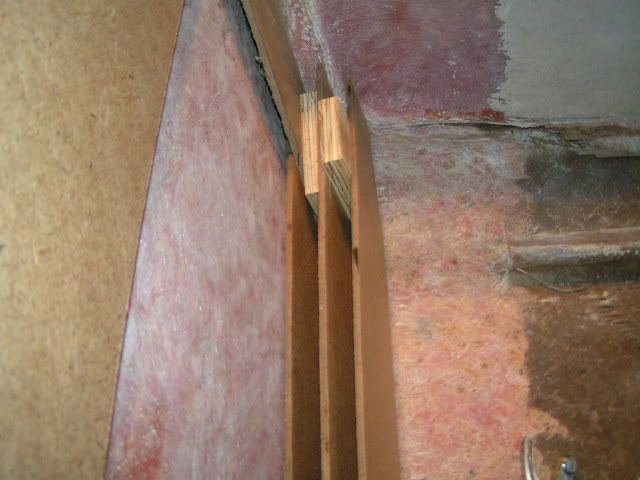
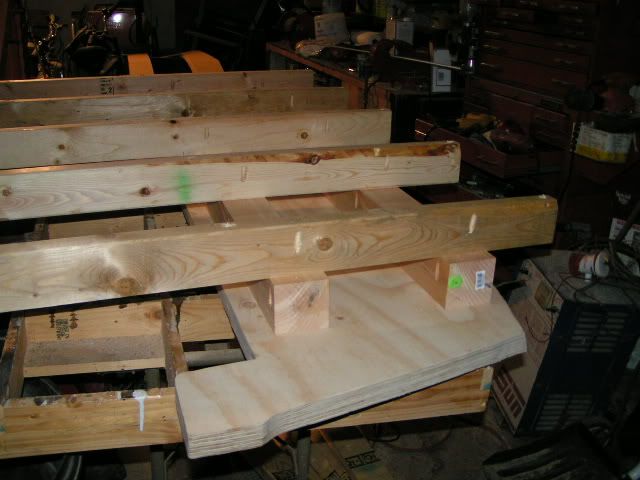
With that done, no real flat place to use to laminate, and inspired by Wood's transom claps I commenced making a jig to make a flat transom.

I took a 10' 4x4 cut it in half, jointed and planed it flat, then used pocket hole screws to screw them to one half of the plywood. I then added an extra hole to the transom clamps in the end and pocket hole screwed them to the 4x4s.

07TransomJig01.jpg


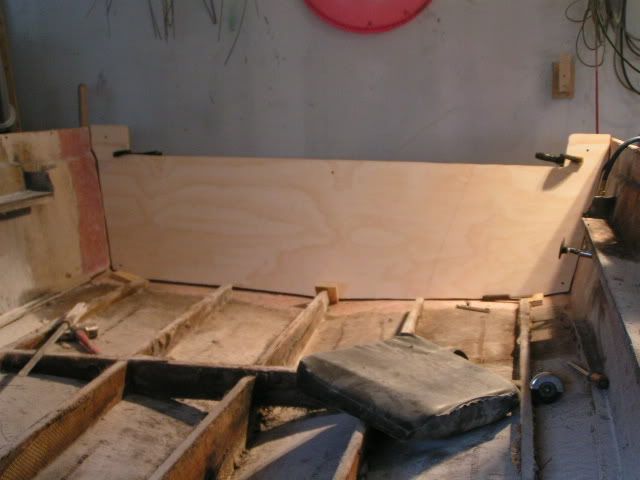
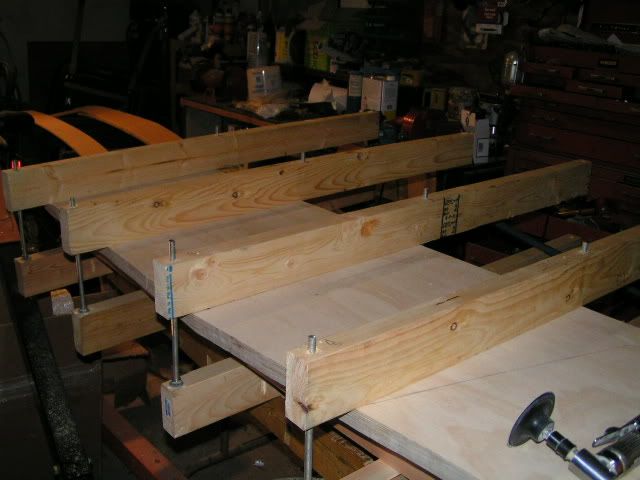
Flip the whole thing over, sealed the plys, and proceeded with the lamination. Once the halves where together I tagged a screw into each corner and clamped it up just enough to give a bit of squeeze out. I also added a few screws down the outside edges just for good measure.

07TransomJig03.jpg


No that's not clamped down. I took the pic when I got done setting it up on my trial run. But you get the gist.


Hopefully in the morning when I get up I'll have a dead flat lamination.
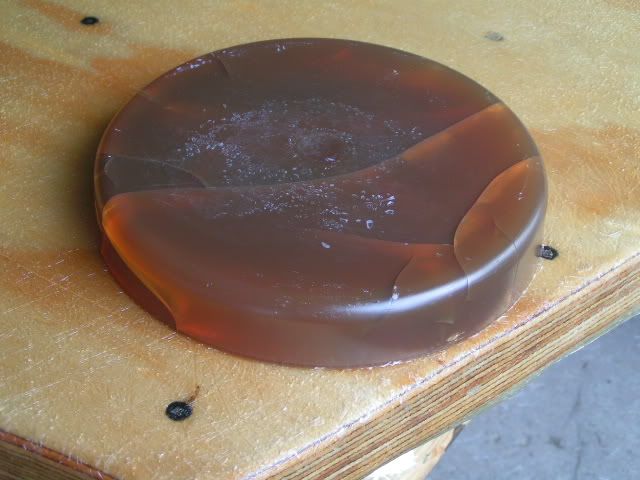
 :) I will have to refit a bit, since somehow when I put the alignment screws in instead of dropping in the holes that where there from previously being screwed together while I fitted it they made new ones about an 1/8" off. So much for all the painstaking work of the first fitting. :facepalm:
 

Woodonglass

Supreme Mariner
Joined
Dec 29, 2009
Messages
25,924
Re: 1972 19' AeroCraft Help Formulating A Resto Plan

Man, you're getting SERIOUS. If it ain't flat this time then it never will be. Your glassin skills will be at the PRO level in NO TIME!!!
 

TruckDrivingFool

Lieutenant Commander
Joined
Jul 30, 2007
Messages
1,818
Re: 1972 19' AeroCraft Help Formulating A Resto Plan

All that and I did still have (small)fears over night that once pulled off it would pop into a bow. Happily my fears were just hand wringing, It came off dead flat. :D

Not much to report after my flurry of mess making yesterday I had to clean out the garage. Got both sides and the edges sealed. Got one side glassed pretty happy with it still getting a few tiny bubbles but nothing like before. Storm came rolling in so I picked up, closed up, and called it a day.

Question, since it'll be wrapped I can go straight to PBing the trans in right? IE no more mat needed until I tab?

Just to be sures:

If I mix two quarts and thicken with cabosil I should end up with 3/4 to 1 gallon of product right? Will this be enough?

1/4 notch trowel to spread said PB I assume I do it like spreading thinset to lay tile.

Cover both surfaces or just one?
 

Woodonglass

Supreme Mariner
Joined
Dec 29, 2009
Messages
25,924
Re: 1972 19' AeroCraft Help Formulating A Resto Plan

Well not exactly! The cabosil thickens the resin but does not exactly increase the volume all that much. Your spreading technique is Spot ON. Both on the transom and the outer skin. No more mat needed. to be on the safe side, I'd make those LARGE quarts!!!! Maybe 2 1/2 qts just to be safe. You don't want to run out. When you Clamp it up. DON't Clamp it too hard. Just enough to get squeeze out. but make sure to leave enough resin between the skin and the transom. Have a spoon handy to fillet the squeeze out around the edges. Are you drilling holes in the transom to let air escape. YOu can do that and the resin will fill em. Won't hur a thing.
 

TruckDrivingFool

Lieutenant Commander
Joined
Jul 30, 2007
Messages
1,818
Re: 1972 19' AeroCraft Help Formulating A Resto Plan

Got the other side wrapped today so short of cleaning up the overhang I'd say I'm about ready to start setting up to glue it in. :) All I can say is that hopefully wrapping short tabs around edges of plywood is as hard as this gets as I don't like doing it, too tedious for my OCD anal self. Once the flat was wet out I spent a good bit walking around fussing small bubbles out and getting the mat to lay right but I got it done and looks great though.

Do I need holes? I kind of figured the way the clamps work you'd be squeezing the bottom in first, then as the top gets pulled in the majority of the air should rise up. Then again I don't now what I'm doing. LOL

Along the bottom there's only two holes from where bilge plugs were, then of coarse the motor mount holes, hole for the splash well drain, tie down/tow hooks on each side. On the starboard side at the top there's all kinds of holes between the three for the steering mount bracket and the four for a kicker bracket that was on there.
 

Woodonglass

Supreme Mariner
Joined
Dec 29, 2009
Messages
25,924
Re: 1972 19' AeroCraft Help Formulating A Resto Plan

You should tape off ALL the hole in the outer skin with Packing tape and seal them off. Personally, I WOULD drill several 1/2" Air Relief Holes in it. If your using the clamps I recommended then actually the work just the opposite. You snug up the top first, just barely and then the bottom and then the top going back and forth trying to keep em parallel as best you can. Again NOT TO TIGHT just snug enuf to get good squeeze out. DON"T be afraid to use enuf GLUE/RESIN. Do a dry run and Make sure you're confident on how everything is going to go. If you have a friend to help get em. Once the resin is mixed you only got 15 mins to get this done and you don't want any hiccups. It ain't Brain Surgery but it can be tricky especially if you haven't done it before. DRY RUN is important.
 
Top