1991 Bayliner Trophy 2002 Transom Repair

Status
Not open for further replies.

j_k_bisson

Lieutenant Junior Grade
Joined
Oct 6, 2010
Messages
1,082
Re: 1991 Bayliner Trophy 2002 Transom Repair

Jeff, fantastic! I'm in the beginning stages of redoing the stringers in my 1990 Campion Fishing machine (same hull and layout as the trophy). I'm popping the top and that seems fairly straitforward....what would you estimate the cap weighs? Your aluminum fuel tank looked in great condition...any pitting corrosion on the bottom? Your boat is damn near identical to mine other than the name "Trophy" on the side. thanks for the play by play on the resto......

The top I would guess is around a 700-1000lbs. I used an automotive engine lift to lift it up. But would not recommend doing it this way. It was very unstable. I have seen on here where some guys make a lifting stand out of 2x4 and stuff for this. That would be the more appropriate way of doing things. Deffinately have 4-5 buddies help you. I almost lost my top when it decided to flip over on the lift. We where able to save it from falling.

Good luck on your resto and post your progress for everyone to follow. It will become a bit of an addiction after awhile.
 

j_k_bisson

Lieutenant Junior Grade
Joined
Oct 6, 2010
Messages
1,082
Update 11-08-2010 Fiberglassing is done!!! Almost.....

Update 11-08-2010 Fiberglassing is done!!! Almost.....

Well yesterday afternoon I suited up I hope for the last time! I ground the fiberglass I laid on Saterday night flat for one last coat of resin. Here is a pic of it after grinding.

DSCN0787-1.jpg

You will see the drill with a wire brush. I like using this piece of equipment due to less dust being generated then by a 5" circular grinder. Plus it takes of less so you can really finess the area you are grinding. One last thing, the wire brush seams to tear the glass mat and leaves the fiber exposed/standing. Allowing, in my opinion, for a superior bond from old to new resin.

DSCN0789-1.jpg

Here is a pic of the final product after giving it my white pigmented resin coat. Not factory but good enough for me!:D 
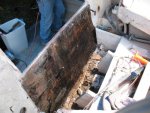
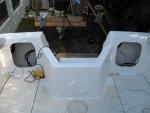
Notice the heat lamp. One of the ways I have learned to overcome the dripping/runing of the resin on vertical walls. I also added a bit of silica to it to thicken it up some. Is only for show anyways.

DSCN0790-1.jpg

Here is out come of filling the void on the other side. I did not remove the wood just filled in with some PB epoxy and sealed it after drying it out. Just need to clean up the holes for the thru-hull fitting when I come to install. The other side still needs the holes drilled and sealed. That will be te last of the fiberglassing I hope.

In the evening I removed the hand rail on the bow along with removing the windows. My wife helped with both after the kids went to bed. The hand rail is in the back yard for now. I'll assemble it back together with the windows and the windsheild after buffing and waxing. It will deffinately be easier to buff without all this stuff on. A note to all The rail was loose allowing water to enter the hull. Also there is wood in the top lip so if you get enough water in there it will rot. I guess my point is this if your is loose just dont re tighten, put some good sealer in there to! Here is the pics of the window after removal.

DSCN0791-1.jpg
DSCN0792-1.jpg

I'll be updating my window question thread with these pics and more info on how to remove them. Check it out is you need more info for your project.

Tonight finish taking out the other window and remove the windshield. Also need to sturdy up the cap so I can climb on it . Do not want to flex/crack the cap when working on it. Basically add another saw horse under the middle.

That it for now......
 

j_k_bisson

Lieutenant Junior Grade
Joined
Oct 6, 2010
Messages
1,082
Re: 1991 Bayliner Trophy 2002 Transom Repair

The honey do list hit me like a freight train last night and I had to get a couple of very inportant things done. Or so the Admiral said......

I had to fix the vaccum cleaner power head last night and by the time I was able to complete that task, and a couple more from the list, I decided to take the night off from the boat and go out. So nothing changed, no pics, and no update today.

Tonight there will be work completed. Have not figured out what, but I am on the short list of things to do on the cap. Here it is. I underlined the ones I hope to compete tonigh.

1) Drill and finish the thru-hull holes for the dech drains.
2) Fiinish removing the windows and clean them up for installation.
3) Remove the windsheild from the boat.
4) 3-5 gel coat repairs to complete on the cap.
5) Wash the cap and get ready for buffing it.
6) Buff and wax th cap.
7) Replace the antena mount with a stainless one.

Hope to finish these tasks by end of weekend. Then here is the rest before joining the cap to the hull.

8) Push out the cap and push in the hull in.
9) Install the trim tabs.
10) Finish all wiring in the hull.
11) Run all control cables (throttle).
12) Install swim Platform

I am shooting for next weekend to reassemble the cap to the hull. It might be agressive timing, but we all need to shoot for something.......
 

j_k_bisson

Lieutenant Junior Grade
Joined
Oct 6, 2010
Messages
1,082
Re: 1991 Bayliner Trophy 2002 Transom Repair

Last night finished removing the side windows and cleaned up the left over silicone. Also cleaned up the left over silicone from the hand rail. And remove the windsheild. Then again cleaned up the silicone. I will be posting the way the windsheild goes together on my windshield thread.

I also started removing my cleats. I figure seeing I am resealing all the other stuff attached to the cap, might as well reseal these.

I did not get into the drain holes or the gel coat repairs. I'll be doing that tonight along wih some vaccuming and washing the cap. All prep work for buffing the cap.

Sorry no pics today.....:(
 

j_k_bisson

Lieutenant Junior Grade
Joined
Oct 6, 2010
Messages
1,082
Re: 1991 Bayliner Trophy 2002 Transom Repair

Well, fell off the "boat" wagon there for a couple of days. Got sucked into a good series of books I have been looking forward to reading for quite some time. All I have to say is that W.E.B. Griffin is the best author ever!

Anyways......I got back into the swing of things last night and spent 4hrs buffing a top outer lip of one side. Here are pics of the other side and the side I did. Just for comparison. I have a decent shine on it, but I do not want to go anymore in fear of burning through the gell coat. Check it out.

Other side
DSCN0806-1.jpg
Side did
DSCN0802-1.jpg
DSCN0804-1.jpg

I also finished the cockpit drains last night. I drill a small hole seeing I did not know where the original hole in the fiberglass was. Then I used a wood burr, I picked from Harbour Freight, and opened up holes to the right sizes. It worked out pretty nicely. I then sealed it up with some thined out epoxy. Heres some pics of the finished product. And yes, I dry fitted it before I epoxy'd it.

DSCN0807-1.jpg

Tonight I will do the other side of the boat and the pictured area. I remove the seat resting wood (Teak) now that I can get to the nuts on the under side of cap. I also remove the rod holders. I plan on fixing the rod holders so I can remove them later and replace them with some custom stainless holders. I used 6-10 rods when I fish and would like to be able to hold them here when running. Here is the pic of before. I get some tomorrow of the finish product.

DSCN0805-1.jpg

I also want to clean the drain areas and give them a coat of wax/sealer before I assemble the thru-hulls. Itsd easier now that there is nothing in the ways to work around.

Wish I didn't take the days off now. Don't know if it will be going back together next weekend. Maybe the weekend after.......
 

JJB

Petty Officer 1st Class
Joined
Dec 28, 2006
Messages
274
Re: 1991 Bayliner Trophy 2002 Transom Repair

Great Job JK ! I also have the same boat and replace the transom . Were your stringers wet that far back ? I had this boat 20 yrs and are great , except for the transom and the cap design on the transom . I replaced the plastic trim around my transom with glass and epoxy . I could not find the plastic trim to replace my trim around the transom so I just glassed it closed , came out great .............. . JJB
 

j_k_bisson

Lieutenant Junior Grade
Joined
Oct 6, 2010
Messages
1,082
Re: 1991 Bayliner Trophy 2002 Transom Repair

Great Job JK ! I also have the same boat and replace the transom . Were your stringers wet that far back ? I had this boat 20 yrs and are great , except for the transom and the cap design on the transom . I replaced the plastic trim around my transom with glass and epoxy . I could not find the plastic trim to replace my trim around the transom so I just glassed it closed , came out great .............. . JJB

My stringer where rotton due to the bottoms not being glass'd/sealed. It was on the underside of the drain holes. If you probably feel the underside you yours they will probably be no resin/glass on them. Maybe a winter project for you. They where wet that far back so while I was doing it, I might as we fix it.

I plan on making the plastic cap on the transom out of stainless. I kept the old pieces so I have a pattern. I plan on glass'n them closed as well. I just do not want to get into gel-coat repair of that size. I'm not that good yet.
 

j_k_bisson

Lieutenant Junior Grade
Joined
Oct 6, 2010
Messages
1,082
Re: 1991 Bayliner Trophy 2002 Transom Repair

Worked to 2am again last night. I love buffing a bit less than fiberglass'n! Need to get some dispossable masks. That dust will kill you!!!! :eek: But here are pics of what I got done. Only did the other side's outside rail and vertical wall. I also was able to clean up and buff the inside vertical wall and top face of the splash well. Where the rod holders and rear seat teak mounts to. Here are the pics.

DSCN0813-1.jpg
DSCN0814-1.jpg

I will need sand the teak and oil it. I also want to rework the rod holders so I can bungee cord a fish cooler to it. A couple of 1/2"-3/4" holes need to be drilled. I show that when I get to it. This afternoon I will get these two items done. I hope install them and other sides drains tonight if I am lucky. Here are two pics of the deck drains I installed on the one side. Did not get the other side in due to the hole size being to small. I did not want to get into grinding fiberglass last night. Here are the pics.

DSCN0815-1-1.jpg
DSCN0817-1.jpg

The list of things to do before the cap/top is done.

1) Install the other deck drain
2) Install the fish well drains
3) Refinish the teak
4) Rework the rod holder bracket
5) Install the rod holder bracket and teak.
6) Quick vaccum/wash cap down
7) Hang the streering cable to cap. Replace broken straps
8) Clean garage

The reassebly is still off for a couple days after this stuff is done. I still have to install the trim tabs.
 

bear_69cuda

Commander
Joined
Oct 10, 2008
Messages
2,109
Re: 1991 Bayliner Trophy 2002 Transom Repair

Dude,

I've been lurking and reading this thread for a few days, awesome work brutha! Love the lines on this boat, and when your finished she's gonna be incredible! Man you're just dominating this project at warp speed!
 

j_k_bisson

Lieutenant Junior Grade
Joined
Oct 6, 2010
Messages
1,082
Re: 1991 Bayliner Trophy 2002 Transom Repair

Dude,

I've been lurking and reading this thread for a few days, awesome work brutha! Love the lines on this boat, and when your finished she's gonna be incredible! Man you're just dominating this project at warp speed!

Thanks, I have a tendancy to spend large quanty of time in my garage. Some say its it's because I love my boat, or working on a project. I say my kids drive me crazy!!!! LOL

But thanks for the compliment. I have a ton of work to do inorder to get this ready for catching a few walleyes next year. I'm planning on going on the fishing tour next year with this boat. Nothing professional. Just where I live, "on the shores of Lake Erie," there is a local fishing tournament almost every other weekend. They are for money but not alot. Around $300-&1000 for top place. It pays for the fuel you spend fishing. The tour starts thrid week in April. So this needs to be done and done right! Also need to rig the boat properly for this type of fishing. So like I said lots of things to do.......
 

Fireman431

Rear Admiral
Joined
Sep 17, 2007
Messages
4,292
Re: 1991 Bayliner Trophy 2002 Transom Repair

Great work on the Trophy! I had a 1996 2002 and it had the same lines. I'm surprised your speed/performance suffered with the smaller engine. I ran a Merc 150 (saltwater series) O/B and WOT was 50 MPH! However, with the 225 and trim tabs, you should be able to get in the 55+ range.

Are you going to reapply the TROPHY labels? If so, any particular reason why? Just as a thought, when I redid mine, I replaced the sailfish logo in the original spot and just continued the horizintal pinstripe to the back of the boat. It really cleaned up the lines of the boat without having the giant TROPHY across the side. Another option is going with a smaller decal (5-6" high) and relocating it. Those can be custom made cheaply at any vinyl sign shop.

Regardless, whatever you do, keep it up. You're doing a great job and the boat is going to look great!
 

JJB

Petty Officer 1st Class
Joined
Dec 28, 2006
Messages
274
Re: 1991 Bayliner Trophy 2002 Transom Repair

Hey JK I found that out also about the stringers , I was lucky to catch my boat before the rot got to the wood box and foam area . I had to cut my cap , I did not have the help or space to pull the whole cap , it came out great . I wanted to ask you about under the windshield . Did you find any leaks around the base of it when you took it off ? oh btw I use a lot of products over the yrs and I found that magic buff is a great product for buffing and polishing fiberglass and works on all metals to. I top with fleet wax past. Has keep my boat look like new ! your boat is looking great . I went with a Johnson 175 carb , long shaft and its only weights 375 lb . The lightest one I could find . My 150 force weight 350 lb . I got 16 yrs of off shore fishing out of it . The max for our boat is 175 and it will push you around 48 mph loaded with out trim tabs , The 175 Runs nice with our boat . I also put a nice bobs machine shop adj bracket that help a lot with getting our engine at the right height , for max output with our hull . As you will see the top bolts don't have a lot of room to go either way with that transom . good luck with it and thanks for the input . JJB
 

Attachments

  • Picture 005.jpg
    Picture 005.jpg
    76.3 KB · Views: 27
  • Picture 085.jpg
    Picture 085.jpg
    112.6 KB · Views: 27
  • pic5.jpg
    pic5.jpg
    111.1 KB · Views: 29
  • 1.jpg
    1.jpg
    148.3 KB · Views: 25
  • Picture 077.jpg
    Picture 077.jpg
    90.5 KB · Views: 25

j_k_bisson

Lieutenant Junior Grade
Joined
Oct 6, 2010
Messages
1,082
Re: 1991 Bayliner Trophy 2002 Transom Repair

Hey JK I found that out also about the stringers , I was lucky to catch my boat before the rot got to the wood box and foam area . I had to cut my cap , I did not have the help or space to pull the whole cap , it came out great . I wanted to ask you about under the windshield . Did you find any leaks around the base of it when you took it off ? oh btw I use a lot of products over the yrs and I found that magic buff is a great product for buffing and polishing fiberglass and works on all metals to. I top with fleet wax past. Has keep my boat look like new ! your boat is looking great . I went with a Johnson 175 carb , long shaft and its only weights 375 lb . The lightest one I could find . My 150 force weight 350 lb . I got 16 yrs of off shore fishing out of it . The max for our boat is 175 and it will push you around 48 mph loaded with out trim tabs , The 175 Runs nice with our boat . I also put a nice bobs machine shop adj bracket that help a lot with getting our engine at the right height , for max output with our hull . As you will see the top bolts don't have a lot of room to go either way with that transom . good luck with it and thanks for the input . JJB

I'm glad you checked the stringers. Its a common problem with these boats.

As to the windshield it did leak. Here are some pics of the cap/hull after I removed the windshield. You will see in the pic where the silicon was. You will notice that there was no siliconew on the cockpit side of the windshield and around the screw holes. This was the cause of any leaks I had. I also noticed that the hole where the wires for the light came thru was not quite sealed as well. Definately something to have fixed if anyone is have this issue. Here are the pics.

DSCN0820-1-1.jpg
DSCN0822-1.jpg

As to what I have been able to accomplish so far today. I was able to sand the teak on a belt sanded using 120 grit belt. It only took off a small amount. Like buffing does. Then I nice heavy coat of teak oil. Will give it two more coat during the rest of today. Heres' a pick of the out come so far.

DSCN0819-1.jpg

After I drop one of my daughters off at a B-day party I start the rod holder rework. I hope to instrall both this evening.
 

j_k_bisson

Lieutenant Junior Grade
Joined
Oct 6, 2010
Messages
1,082
Re: 1991 Bayliner Trophy 2002 Transom Repair

Great work on the Trophy! I had a 1996 2002 and it had the same lines. I'm surprised your speed/performance suffered with the smaller engine. I ran a Merc 150 (saltwater series) O/B and WOT was 50 MPH! However, with the 225 and trim tabs, you should be able to get in the 55+ range.

Are you going to reapply the TROPHY labels? If so, any particular reason why? Just as a thought, when I redid mine, I replaced the sailfish logo in the original spot and just continued the horizintal pinstripe to the back of the boat. It really cleaned up the lines of the boat without having the giant TROPHY across the side. Another option is going with a smaller decal (5-6" high) and relocating it. Those can be custom made cheaply at any vinyl sign shop.

Regardless, whatever you do, keep it up. You're doing a great job and the boat is going to look great!

I'm going with the 200hp because its what was available in the price range I wanted to spend ($500) I need to sink $1000 into it, but that is all new electronics that I would have done to any other motor I bought. I'll be posting that rebuild/resto when I get to it here.

As to the graphics, I am planning on puting something back on. My hull is to fadded not to. Also the gloss/oxidation has left a ridge where the old sticker was. After buffing the area for 5+ hrs it still there. So graphics are a definate.
 

j_k_bisson

Lieutenant Junior Grade
Joined
Oct 6, 2010
Messages
1,082

j_k_bisson

Lieutenant Junior Grade
Joined
Oct 6, 2010
Messages
1,082
Update 11-15-2010

Update 11-15-2010

I was able to finish the deck drain installation along with the fishwell drains. I do need to attach a piece of 3/4" hose to the fishwell drains though to finish them. I was a bit sloppy with the 3M 5200 on one side. Need to get the razor blade out along with the gas to clean up tonight.

I also gave the teak 5 coats of teak oil. They are coming out rather nicely. I need to pick up some nuts and a screw for the installation of the rod holder and teak for tonight. Did not work on anything else though.

Sorry not picks for today. I forgot to get some. Maybe tomorrow.
 

proshadetree

Lieutenant Commander
Joined
Jul 19, 2008
Messages
1,887
Re: 1991 Bayliner Trophy 2002 Transom Repair

Put on 5 more coats of oil on that teak. I be there to pick it up tomorrow so go ahead and put the cap on.:D:D I cant wait to see this ride together
 

j_k_bisson

Lieutenant Junior Grade
Joined
Oct 6, 2010
Messages
1,082
Update 11-16-2010

Update 11-16-2010

Could not get the wet oil look on the teak with 5 coat of teak oil. It kept drying to a dull shine. I talked to the wife, and she would no volunteer to be a test bed of wet look and oil, so we are going to leave the teak at 5 coats. LOL

Proshadtree "show me the money! And she will be yours...." LOL

Did not get anything done last night. My fathers 69th B-day was Sunday and we through a party for him seeing he was out of town that day. Tonight is the night the cap work is finished. And the garage get's cleaned.

Already started putting the word out to my buddies about Thanksgiving weekend reassembly party. Looks like either Friday or Saterday night of that weekend it will be going back together. :D Finally.
 

proshadetree

Lieutenant Commander
Joined
Jul 19, 2008
Messages
1,887
Re: 1991 Bayliner Trophy 2002 Transom Repair

Its just boat envy on my part I already have 3 but I love the lines on that baylinner. Did you clean the teak first?
 
Status
Not open for further replies.
Top