1961 Lonestar Flamingo - SPLASHED w/Pics

tistore

Banned
Joined
Jan 17, 2010
Messages
121
Re: 1962 Lonestar "Flamingo" - I finally Started w/pics

Re: 1962 Lonestar "Flamingo" - I finally Started w/pics

i have a fuel tank shapped just like the bow or your lonestar boat that came out of a 66 lonestar boat that will fit right under your bow..i have it on ebay.plus some other parts ...:D
 

Woodonglass

Supreme Mariner
Joined
Dec 29, 2009
Messages
25,924
Re: 1962 Lonestar "Flamingo" - I finally Started w/pics

Re: 1962 Lonestar "Flamingo" - I finally Started w/pics

:DWell, here's a pic of my first attempt at sewing. I cut the arm pad apart and used the vinyl as a pattern. I made the pattern 5/8" larger all the way around. I bought a piping foot off of ebay for $13.00 and learned how to adjust the machine to set the tension for the vinyl etc. I'm using nylon cord for the piping. After a LOT of trial and error on scrap pieces I finally decided to give it a go. I just finished this first pass and I wanted to post my results. I am pretty pleased with how it is turning out. This is the cover for the arm rest.

attachment.php


Side View
attachment.php


Rounded Corner (NOT easy to do!!!
attachment.php


I'll post more when I finish, and , I will try to video how this is all done. I am finding this to NOT be as easy as it looks on the videos on the web but I am a stubborn old fart, and it is to cold to do anything else so I plan on persevering to the end. If I can recover these Fising seats then I will design the bench seats for the boat, buy additional vinyl, and "Git er Dun"
Let me know what you all think!!! Good or Bad!!!!

I'm just sayin...
 

Attachments

  • ArmPad.JPG
    ArmPad.JPG
    23.8 KB · Views: 10
  • Armpad2.JPG
    Armpad2.JPG
    12 KB · Views: 8
  • Armpad3.JPG
    Armpad3.JPG
    15.5 KB · Views: 8

jetskier16

Petty Officer 2nd Class
Joined
Sep 26, 2010
Messages
197
Re: 1962 Lonestar "Flamingo" - I finally Started w/pics

Re: 1962 Lonestar "Flamingo" - I finally Started w/pics

I wouldn't believe it if you told me this was your first experience with a sewing machine; it looks great!
 

Woodonglass

Supreme Mariner
Joined
Dec 29, 2009
Messages
25,924
Re: 1962 Lonestar "Flamingo" - I finally Started w/pics

Re: 1962 Lonestar "Flamingo" - I finally Started w/pics

Thanks JS but Let's see how it ALL looks when I'm done. I might have all my fingers sewn together before it;s done.:eek:

I'm just sayin...:D
 

bonz_d

Vice Admiral
Joined
Apr 22, 2008
Messages
5,274
Re: 1962 Lonestar "Flamingo" - I finally Started w/pics

Re: 1962 Lonestar "Flamingo" - I finally Started w/pics

Great thread!

Believe it or not but I 1st learned how to water ski behind one of those boats, same color too! Only difference was that one had a 50hp Merc on it. That was way back when.

Also have that same vintage Gator trailer under my Lund and as old as it is it's still solid as a rock. I really like the way the bunks rotate down while it's bed is tilted. Boat rolls right off.

Best of luck with the sewing!
 

Hoggar

Seaman
Joined
Mar 11, 2009
Messages
57
Re: 1962 Lonestar "Flamingo" - I finally Started w/pics

Re: 1962 Lonestar "Flamingo" - I finally Started w/pics

Great looking Project Wood, That Gator trailer is sweet.
My Elgin Trailer is the same style, while you have the boat
off check all the welded seams. My trailer was solid looking
until l started sanding to repaint there were several cracked
welds where the cross beams attached, I just re-mig welded
them and all was well with the world. how ever the leaf-springs
failed last summer after 40+ years so I will be buying new ones
this spring.

Trailer-Before.jpg


Trailer-Before2.jpg


Trailer-After.jpg


Trailer-After2.jpg
 

Woodonglass

Supreme Mariner
Joined
Dec 29, 2009
Messages
25,924
Re: 1962 Lonestar "Flamingo" - I finally Started w/pics

Re: 1962 Lonestar "Flamingo" - I finally Started w/pics

Yeah, this spring, one of the very first things scheduled is a sandblasting, inspection, and a paint job. I already know of a few Welding jobs she needs and I'm sure a few more will pop up but over all she appears to be sound. The Gators are really GREAT trailers. Easy loading and launching.

I'm just sayin...:D
 

proshadetree

Lieutenant Commander
Joined
Jul 19, 2008
Messages
1,887
Re: 1962 Lonestar "Flamingo" - I finally Started w/pics

Re: 1962 Lonestar "Flamingo" - I finally Started w/pics

Wood You need to practice that sewing. Come and do my baylinner before you screw your boat up. :D Looks good man.
 

Woodonglass

Supreme Mariner
Joined
Dec 29, 2009
Messages
25,924
Re: 1962 Lonestar "Flamingo" - I finally Started w/pics

Re: 1962 Lonestar "Flamingo" - I finally Started w/pics

Yeah, I need a LOT of practice, I KNOW. My Sis is gunna help me this week end. She is a MASTER seamstress so maybe she can give me some TIPS on how to set everything up. I AM learning some things and it IS getting a bit easier. Videos on YouTube have been a GREAT source of info. The small stuff is harder than the bigger stuff and I'm learning that getting the tension on the machine is the CRITICAL thing. If it is set correctly then it is pretty much just feeding the material into it and watching that it is straight and true. The thickness of the vinyl makes it a PITA. If I had an Industrial quality machine, I'm sure it would be much easier. Craigslist in Tulsa, had one come online yesterday for $50.00. Would'nt you know'nt you know it!!! Two months after I paid $35.00 for mine. Oh well. Mine IS working and I'll "Git er Done" More pics and a video coming this weekend. Thanks for the encouragement!

I'm just sayin...:D
 

archbuilder

Vice Admiral
Joined
Sep 12, 2009
Messages
5,697
Re: 1962 Lonestar "Flamingo" - I finally Started w/pics

Re: 1962 Lonestar "Flamingo" - I finally Started w/pics

Hey Wood, any updates?
 

Woodonglass

Supreme Mariner
Joined
Dec 29, 2009
Messages
25,924
Re: 1962 Lonestar "Flamingo" - I finally Started w/pics

Re: 1962 Lonestar "Flamingo" - I finally Started w/pics

Well, Christmas has gotten in the way of my Recovering Project. Two New Grandsons needed some Rocking horses. My Sis and I are planning on doing some SERIOUS sewing Next Week. I will try and Post pics and a video then.

Here's a pic of the Horses.

attachment.php


Merry Christmas and Happy New Year to all my iBoat Friends!!!!

I'm just sayin...:D
 

Attachments

  • Horses_small.jpg
    Horses_small.jpg
    56.1 KB · Views: 2

archbuilder

Vice Admiral
Joined
Sep 12, 2009
Messages
5,697
Re: 1962 Lonestar "Flamingo" - I finally Started w/pics

Re: 1962 Lonestar "Flamingo" - I finally Started w/pics

I bet the rocking horses get some serious mileage put on them! :D Looking forward to your sewing!
 

Woodonglass

Supreme Mariner
Joined
Dec 29, 2009
Messages
25,924
Re: 1962 Lonestar "Flamingo" - I finally Started w/pics

Re: 1962 Lonestar "Flamingo" - I finally Started w/pics

I finally have found some time to devote to sewing on my seats. I have completed the seat portion of one of the captains chairs. It was Quite a challenge but I think it came out pretty good. Now that I have one complete and two more to go, I think I will try and video the next one so you all can see the process. It is pretty straight forward but I have learned some things along the way that should benefit any of you that decide to jump in an try to make your own. Here are a few things I HAVE learned. Sewing straight lines is much easier than curves!!! Big pieces are MUCH easier than small ones. You Break or Bend a LOT of needles. An industrial grade machine would be much easier to use than a REGULAR model. Setting the Tension of the Thread, the bobbin, the feed dogs, and the presser foot is CRITICAL to success! Medium speed is Best. Having your material "Basted" (pre-assembled and lined up, I used a regular paper stapler) is the ONLY way to go!!! I will hopefully show and explain all of these in the video. Any way I hope these pic's will help to inspire others to do their own upholstery work. Believe me, If I can do it ANYBODY can. These pic show the cover laying over the foam. It still needs to be glued to the foam to form it and then stretched and stapled to the seat. The basic process was to cut the originals from the seat use them as patterns then sew it all back together. Sounds easier than it is. I am not the best at making videos so we'll see how it goes. I will try and get something posted this week.

Photo0170.jpg
Photo0172.jpg
Photo0171.jpg

I'm just sayin...:D
 

usarmyharley

Cadet
Joined
Jun 28, 2010
Messages
18
Re: 1962 Lonestar "Flamingo" - I finally Started w/pics

Re: 1962 Lonestar "Flamingo" - I finally Started w/pics

this is great im really looking forward to seeing your upholstry videos or pics with tips.....im planning on sewing new seats for my malibu in march.
 

Psiclown

Petty Officer 1st Class
Joined
Nov 27, 2010
Messages
331
Re: 1962 Lonestar "Flamingo" - I finally Started w/pics

Re: 1962 Lonestar "Flamingo" - I finally Started w/pics

I finally have found some time to devote to sewing on my seats. I have completed the seat portion of one of the captains chairs. It was Quite a challenge but I think it came out pretty good. Now that I have one complete and two more to go, I think I will try and video the next one so you all can see the process. It is pretty straight forward but I have learned some things along the way that should benefit any of you that decide to jump in an try to make your own. Here are a few things I HAVE learned. Sewing straight lines is much easier than curves!!! Big pieces are MUCH easier than small ones. You Break or Bend a LOT of needles. An industrial grade machine would be much easier to use than a REGULAR model. Setting the Tension of the Thread, the bobbin, the feed dogs, and the presser foot is CRITICAL to success! Medium speed is Best. Having your material "Basted" (pre-assembled and lined up, I used a regular paper stapler) is the ONLY way to go!!! I will hopefully show and explain all of these in the video. Any way I hope these pic's will help to inspire others to do their own upholstery work. Believe me, If I can do it ANYBODY can. These pic show the cover laying over the foam. It still needs to be glued to the foam to form it and then stretched and stapled to the seat. The basic process was to cut the originals from the seat use them as patterns then sew it all back together. Sounds easier than it is. I am not the best at making videos so we'll see how it goes. I will try and get something posted this week.

View attachment 80408
View attachment 80407
View attachment 80406

I'm just sayin...:D

Nice job Wood that looks great!
 

archbuilder

Vice Admiral
Joined
Sep 12, 2009
Messages
5,697
Re: 1962 Lonestar "Flamingo" - I finally Started w/pics

Re: 1962 Lonestar "Flamingo" - I finally Started w/pics

Looks like you are making great progress, looking forward to the video!
 

tallcanadian

Captain
Joined
Sep 7, 2006
Messages
3,245
Re: 1962 Lonestar "Flamingo" - I finally Started w/pics

Re: 1962 Lonestar "Flamingo" - I finally Started w/pics

Hey Wood, good to see you back at it. The seats look awesome. Can't wait to see them all done.
 

Woodonglass

Supreme Mariner
Joined
Dec 29, 2009
Messages
25,924
Re: 1962 Lonestar "Flamingo" - I finally Started w/pics

Re: 1962 Lonestar "Flamingo" - I finally Started w/pics

Well I gave it a shot at creating a video on sewing my seats. Not very good but maybe I'll get better. I think I might have started out with too much of a a BASIC approach but we'll see. Some notes The patterns I made are all cut 1/2" oversize to account for the piping. When the piping is complete it is 1/2" wide and this allows me to line it up exactly with the outside edge of the base material when doing the final sewing, which for me is a much easier method to keep everything lined up. Some of my explanations need to be made more clear and I will try and do that better in future videos. Let me know if you think this has any value and if NOT I won't bother. Andgott did an AWESOME job with his demo cushion so I am wondering if I should bother.
This may benefit those of you trying, like me, to do this job using a basic home machine. It can be done but... a Commercial Industrial machine would make it a MUCH easier proposition.
Any way here it is for what it's worth. Your observations and critiques are very much welcomed!!!!


I'm Just Sayin...:D
 

andgott

Master Chief Petty Officer
Joined
Sep 2, 2009
Messages
801
Re: 1962 Lonestar "Flamingo" - I finally Started w/pics

Re: 1962 Lonestar "Flamingo" - I finally Started w/pics

Great video- Seeing it on video is nice! I was going to shoot some, but I couldn't find the tripod!

One tip that'll make things a LOT easier for you is to make the panels like this up, THEN cut out the final shape of the cushion, rather than trying to get all the measurements correct. Hopefully this diagram I put together for a later installment of my tutorial will help explain it-

normal_Diag5.jpg


1) Cut your materials. The only 'critical' measurement is the width of the center panel (the grey one in this case).... You want to cut it 1" wider than your final width, to allow a 1/2" seam allowance on each side. The two side panels need to be wide enough so that the whole panel- when done- is at least 1" wider than the finished cushion needs to be. But, it can be wider, it won't hurt. You'll be trimming it later. You also need two strips of piping as long as the panel. The panel should be as long as needed to make all the cushions you need- Remember that 1/2" seam allowance, too :)

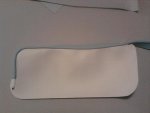
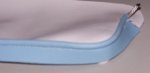
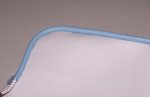
2) Assemble the three panels, with the piping in between.

3) Lay your template on the BACK SIDE of the vinyl, and mark the panel. You can put marks on the pattern to line up the stripes so they are perfectly vertical. I can't say it enough- Remember the seam allowance!

4) Cut out the panel, then sew as usual.

This saves you a LOT of trouble in measuring and lining up panels- Especially if you're doing LOTS of stripes, like this one I did as an example-

IMG_1409.JPG


Trying to cut all those panels to the correct size would be a nightmare... But, if you make a bigger panel, then cut the shape you need out of that, it's a breeze....

the only drawback is it will waste a little more material, but I think it's worth it.

-Andrew

4
 

Woodonglass

Supreme Mariner
Joined
Dec 29, 2009
Messages
25,924
Re: 1962 Lonestar "Flamingo" - I finally Started w/pics

Re: 1962 Lonestar "Flamingo" - I finally Started w/pics

Thanks Andrew,

What I did was disassemble the OLD seat covers and made paper patterns from them to transfer to the NEW vinyl material. I AGREE with the allowance for the Piping. The 1" ALWAYS has to be taken into consideration. These Captains Chair seats are a Little unique in that they have a uniqued skirting to allow for the various contours of the foam as you can see from the picture below
attachment.php

The vinyl is also stapled to the plywood base in a unique way, in that it is stapled to the EdGE of the plywood and then the staples are coverd with a Staple hiding folded strip. I will try an show this feature in my next video. Maybe between the two of us we can encourage others to take on the task of doing their own upholstery.

I'm just sayin...:D
 
Top