1986 Sea Ray Seville Restoration

SDSeville

Lieutenant
Joined
Mar 19, 2010
Messages
1,481
Here is what I have spent so far (replaced transom, stringers, deck, carpet, and most of the upholstery). I am sure I forgot a few minor things, but this should cover most of it.

Stringers, deck, and upholstery:
$152 Wood - (5) sheets 1/2" CDX plywood, (6) 8' 1x 6, (6) 8' 1x 4
$21 Foam (noodles to deaden sound -- not really for flotation)
$50 Fiberglass (cloth) - (50 yards by 36? -- got lucky on craigslist)
$20 Fiberglass (mat)
$240 Resin (7 gallons poly)
$30 Bilge Paint (Rustoleum)
$6 Paint for outdrive (Rustoleum)
$150 PL/Misc tools - (adhesive, sanding discs, sawzall blades)
$115 Carpet & glue - (Home Depot special)
$40 Terry cloth for lounge seats
$40 SS Staples
$20 Misc fasteners and brackets
$190 new covers for doghouse, rear seats, and bow cushions
$20 Upholstery foam
$133 marine vinyl for upholstery
$1,227 Total for stringers, deck, and upholstery

Transom:
$55 Resin
$16 Glass/Mat
$40 3/4" plywood
$57 Misc tools - respirator (borrowed last one), chip brushes,...
$60 gaskets and o-rings
$30 lower transom bolts
$15 SS Lags for front motor mounts
$5 rear motor mount bushings
$50 Engine alignment
$328 Total Transom

Bellows Replacement:
$150 Bellows (all 3)
$10 more gaskets
$160 Total Bellows Replacement

Total $1,715


HERE IS WHERE THE ORIGINAL THREAD STARTED

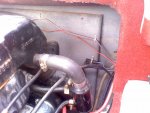
I am a Newbie in the forum and to boat restoration itself. I am beginning to restore a 1986 19? Sea Ray Seville BR I/O. I had a 2005, but had to get rid of it because of the lousy economy. To keep the family on the water, I figured I would by an older boat and slowly restore it for a fraction of the coast of new. I was able to by this boat for $1,200 from a friend. It has a very solid Merc 170 to build around. My plans are to 1) replace the floor and upholstery, 2) repaint, and then 3) tackle the transom. However, I may need to change the order depending on what I learn here.

When I purchased it I felt a small soft spot in the corner of the piece of wood that covers the gas tank. Everything else felt solid. After reading this forum for a few days I decided to remove the carpet and fully inspect the floor. Like many of these threads, I was not happy with what I found. The floor is either rotten or soaking wet from about the middle of the boat back.

After reading a few more horror stories here, I decided to drill into my transom to check it out. The 1st couple of holes brought solid dry wood. Then, about 12 inches from the bottom, I got some wet shavings. A little lower, black rotten shavings.
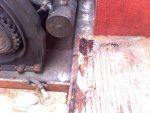
Rotten Floor
wetrottenfloorboardspassengerside.jpg


Rotten stringer
wetframearoundgastank.jpg


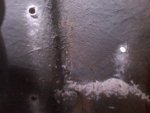
Checking transom. Top left hole - dry. Bottom left hole - wet. A little lower left (not pictured) - rotten. See the hole to the right...ooops -- not transom, straight through the fiberglass.

3holesintransom1.jpg


My first 2 (of many I am sure) questions are ---

Floor ? I plan to rip the old floor up and replace it with ?? plywood with a couple of coats of resin to waterproof. What should I do with the foam that is under the existing wood? Its seems dry from some cores I took. Do leave it alone? Remove it? Replace it (if so, with what?)?


Transom - 1st of all, I am very confused here. It appears that 60% of my transom is solid fiberglass (or maybe I don?t know the correct definition of ?transom?). When looking from inside the boat, there is a raised section about 20 to 24? across that is filled with wood (wet and bad in the bottom 3rd). The rest of the back end is solid fiberglass. I drilled a spot to the right of the raised section and went straight through (with some heavy drilling) with no wood.

My question is -- can I make another season before tackling the transom problem? How much weight is actually on the transom with an I/O? The wood supporting the engine (underneath) is dry and solid.
 

Attachments

  • wet rotten floorboards passenger side.jpg
    wet rotten floorboards passenger side.jpg
    151.8 KB · Views: 1
  • wet rotten floorboards driver side.jpg
    wet rotten floorboards driver side.jpg
    146.2 KB · Views: 1
  • 3 holes in transom 1.jpg
    3 holes in transom 1.jpg
    114.2 KB · Views: 0
  • Transom 1.jpg
    Transom 1.jpg
    145.4 KB · Views: 0
Last edited:

Bondo

Moderator
Staff member
Joined
Apr 17, 2002
Messages
70,525
Re: 1986 Sea Ray Seville Restoration

My question is -- can I make another season before tackling the transom problem? How much weight is actually on the transom with an I/O? The wood supporting the engine (underneath) is dry and solid.

Ayuh,.. If there's ANY flex in the transom, it'll cause the Coupler to go Bad...
As motor to drive Alignment will shift...

You're going to have enough Motor problems with that old 470, Anyways...
No need to make it worse...
 

SDSeville

Lieutenant
Joined
Mar 19, 2010
Messages
1,481
Re: 1986 Sea Ray Seville Restoration

No flex at all.

What should I know about this engine?
 

Bondo

Moderator
Staff member
Joined
Apr 17, 2002
Messages
70,525
Re: 1986 Sea Ray Seville Restoration

No flex at all.

What should I know about this engine?

Ayuh,... Search the I/O forum for "470",... You'll be readin' for Days, maybe Weeks...

Btw,... If the wood in the transom is 1/3 Rotten,..
Under a Full throttle launch, it WILL flex...
 

SDSeville

Lieutenant
Joined
Mar 19, 2010
Messages
1,481
Re: 1986 Sea Ray Seville Restoration

Thanks. I just checked by trying to move it up and down myself.
 

tinkeringwackyone

Chief Petty Officer
Joined
May 2, 2008
Messages
415
Re: 1986 Sea Ray Seville Restoration

I'm rebuilding my 87 ray 17 footer, same symptoms as you have, my stringers were rotten clear to the front. lower half of the transom was rotten. long story short, its gutted and is getting a complete restore. I probably won't be on the water until next year.

There are a couple of rays being done right now of the same vintage.
I agree with bondo, better fix it now before you have worse problems.:D
Best advice I can give, read the forums, and if you feel up to it, start tearing apart. sawzall, 4 1/2 grinder with a 60 grit flapper wheel, tyvek suit and mask, lots of time and patience. document and lots of pictures help.

welcome the forum. tink
 

osborn159

Petty Officer 1st Class
Joined
Feb 27, 2010
Messages
383
Re: 1986 Sea Ray Seville Restoration

dont know much about i/o's i think the transom the first repair under the deck.
thats how i am doing mine since stringers tie to it, demo the junk 1st take a look, b4 you formulate a rebuild plan. first things first, and take your time especially if your taking your kids w/ you, you dont want to miss something and something crazy happen.
good luck, great place for help, just ask, someone here knows im sure,D
 

lrcustom

Petty Officer 2nd Class
Joined
Mar 2, 2010
Messages
172
Re: 1986 Sea Ray Seville Restoration

SDSeville,
Welcome to the wonderful world of restore. I too have an 87 Sea Ray BR 170 I/O. I am fortunate that my transom is ok but I suspect in a few years I will have to rebuild. The wood is only at the raised portion you see looking at the inside. The rest to the sides is solid glass. You can as a temp fix reinforce the transom from the inside but with the outdrive it makes it dificult to cut a piece that would be strong enough. Anyway that would only be a temporary fix. Be sure to check all the stringers for rot. From the pics it looks like you got a bit. I am rebuilding bow to stern. I got a great hull and motor not much else was usable.
Glad to see another Sea Ray on the forum. I qaurantee you will find the answers to most everything you need right here.
 

SDSeville

Lieutenant
Joined
Mar 19, 2010
Messages
1,481
Re: 1986 Sea Ray Seville Restoration

Thanks LR. What is the temp fix you mentioned? I was hoping to tackle the floors and paint before this summer and limp through the season then tackle the transom replacement next winter.

Also, what did you do with the foam under the floorboards?
 

lrcustom

Petty Officer 2nd Class
Joined
Mar 2, 2010
Messages
172
Re: 1986 Sea Ray Seville Restoration

SD,
At the raised portion of the transom you would need to cut a piece of at least 3/4" exterior grade (really good solid stuff) plywood that is just slightly smaller than the current transom except at the bottom which should flush up with the hull. If you are not removing the outdrive and flange then it must be done in 2 pieces so it can be installed flush againt the ols transom. Dowel or screw this to the old at the top to hold in place and glass this in to the old transom. You will need to remove the old paint and expose the old glass. Certainly use roven woven glass mat. this is going to be as much work as replacing the old wood but can be done without removing the outdrive. I would say that this might get a couple or more years out of the boat but if you really want to fix correct then replace the old wood with new and glass this in.
I have heard of but not on this forum, using heavey aluminum angle and bolting to the transom above and below the outdrive. I get the engineering with this but I do not know if this is a real fix. Maybe some others with better knowledge will pipe in here.
Hope this helps.
 

Bondo

Moderator
Staff member
Joined
Apr 17, 2002
Messages
70,525
Re: 1986 Sea Ray Seville Restoration

SD,
At the raised portion of the transom you would need to cut a piece of at least 3/4" exterior grade (really good solid stuff) plywood that is just slightly smaller than the current transom except at the bottom which should flush up with the hull. If you are not removing the outdrive and flange then it must be done in 2 pieces so it can be installed flush againt the ols transom. Dowel or screw this to the old at the top to hold in place and glass this in to the old transom. You will need to remove the old paint and expose the old glass. Certainly use roven woven glass mat. this is going to be as much work as replacing the old wood but can be done without removing the outdrive. I would say that this might get a couple or more years out of the boat but if you really want to fix correct then replace the old wood with new and glass this in.
I have heard of but not on this forum, using heavey aluminum angle and bolting to the transom above and below the outdrive. I get the engineering with this but I do not know if this is a real fix. Maybe some others with better knowledge will pipe in here.
Hope this helps.

Ayuh,... The Cobb Job you describe will Absolutely, Positively, Guaranteed to cause Coupler Failure...
The motor to drive relationship is Extremely Important...
 

lrcustom

Petty Officer 2nd Class
Joined
Mar 2, 2010
Messages
172
Re: 1986 Sea Ray Seville Restoration

I agree if you remount the outdrive transome assembly to the new work you will have problems. My suggestion is a fix that is intended to trengthen the existing transom without any outdrive changes. Again it's a temporary fix and the right way is to rebuild the tansom. Sorry if I miss led the intent of the fix.
 

erikgreen

Captain
Joined
Jan 8, 2007
Messages
3,105
Re: 1986 Sea Ray Seville Restoration

If you are not removing the outdrive and flange then it must be done in 2 pieces so it can be installed flush againt the ols transom. Dowel or screw this to the old at the top to hold in place and glass this in to the old transom.


Don't do this on a transom ever, unless it's for a sailboat.

I/Os and outboards (especially) need a one piece transom of the appropriate thickness (for a Mercruiser I/O it's about 2 inches) and it must be as stiff as possible... no 2 piece jobs, no aluminum reinforcement for strength.. either fiberglass over a rigid core or a poured in place cast core (like seacast).

You MUST remove the engine and drive to do it, and you MUST install a new one piece core and cover it in an appropriate amount of glass... you can use less layers if you use biaxial than woven roving and mat, but that's up to you.

It's up to you when you do this, or if you do it... that 470 is ok if it's running, and if you maintain it, but it's going to be a nightmare if it ever needs repair. If you're willing to risk ruining a coupler and potentially the input shaft of the sterndrive due to flex, then you can get by for now.

If it was me I'd probably try to get by for a season or two, monitor the transom for any more flex, maybe even inject some antifreeze to slow the rot. If the engine dies repairing the transom at that point won't make economic sense unless you're really fond of the boat... just get a different boat.

If the engine holds out but shows its age, or if you love the boat but want more power, then a drivetrain change and transom restore would be good. At the same time consider changing from Sea Ray's squarish transom "bump" to a full width transom.

If the engine is still running strong in a couple seasons, buy a lottery ticket because you're a lucky man, and take time to re-core the transom, duplicating the original layout.

Erik


PS: $1200 for a 1986 Sea Ray with a working trailer that looks nice is an ok deal.. the 470 makes it a little less so though. Post a pic of how the boat looks overall if you get a chance....
 

SDSeville

Lieutenant
Joined
Mar 19, 2010
Messages
1,481
Re: 1986 Sea Ray Seville Restoration

Do both the outdrive and engine need to be removed when using Seacast?
 

SDSeville

Lieutenant
Joined
Mar 19, 2010
Messages
1,481
Re: 1986 Sea Ray Seville Restoration

MORE POSSIBLE WATER DAMAGE?? -- Just thought of something. I owned this boat until 2005. It started to have some reliability issues, so I bought a new boat and sold this one to a friend of mine. My friend, who is a motorcycle mechanic, put some work into the motor got it running great. When I got rid of my 2005, I bought this one back from my friend for $1,200.

When I backed the boat over the curb into my side yard, I noticed it sat several inches lower than when I had owned it. I actually had to make a ramp to get the trailer up the curb, while it cleared the same curb easily when I had it in 2005.

Could waterlogged flooring and transom have added that much weight or can there be water somewhere else? My friend said he will take it back if I don't want it. Is there any way to check what else might be filled with water without tearing this thing down to the hull?
 
Last edited:

Bondo

Moderator
Staff member
Joined
Apr 17, 2002
Messages
70,525
Re: 1986 Sea Ray Seville Restoration

Could waterlogged flooring and transom have added that much weight

Ayuh,... At 8lbs. per gallon, it adds up Fast...
 

SDSeville

Lieutenant
Joined
Mar 19, 2010
Messages
1,481
Re: 1986 Sea Ray Seville Restoration

OK. Ready to gut this thing, but wanted to make sure everything works OK first. Engine fires right up as usual, but the trim does not work. It worked a few weeks ago, but now I get nothing, not even a sound. Anyone have any advice on how to troubleshoot this?
 

avimgod

Petty Officer 3rd Class
Joined
Nov 22, 2008
Messages
90
Re: 1986 Sea Ray Seville Restoration

OK. Ready to gut this thing, but wanted to make sure everything works OK first. Engine fires right up as usual, but the trim does not work. It worked a few weeks ago, but now I get nothing, not even a sound. Anyone have any advice on how to troubleshoot this?

Check the fuses...
 
Top