Restoring 1986 Sea Nymph SS155 (pics)

ezmobee

Supreme Mariner
Joined
Mar 26, 2007
Messages
23,767
Re: Restoring 1986 Sea Nymph SS155 (pics)

If you insist :p add a can of Sea Foam to 6 gallons of fresh gas.

You can run it would the trim tab. Just remember, how these darn things run in the driveway seems to have little bearing to how they do on the water (other than you can be reasonably sure it will start if it does so on land).
 

Piece715

Senior Chief Petty Officer
Joined
Jan 26, 2009
Messages
757
Re: Restoring 1986 Sea Nymph SS155 (pics)

If you insist :p add a can of Sea Foam to 6 gallons of fresh gas.

You can run it would the trim tab. Just remember, how these darn things run in the driveway seems to have little bearing to how they do on the water (other than you can be reasonably sure it will start if it does so on land).

It's the OCD in me... I cant help it :redface:... Thanks for the heads up... and ya runnin on muffs is nothing like the open water under load. Here's to keepin the fingers crossed. I'll post a vid of her purring like a kitten or performing an ultimate fail... :confused:
 

mark1961

Ensign
Joined
Apr 30, 2007
Messages
940
Re: Restoring 1986 Sea Nymph SS155 (pics)

So I was doing some reading and read that the trim tab is an anode as well. Is this correct? Do I need to strip and sand it like the anode on the other side of the motor?

Nope, not correct in this case.....the anodes are #77 and #80 in the diagram up there ^^^^^^ the trim tab comes painted (primed) new so cannot be an anode.....it probably would be an anode if it was a Mercury.
 

Piece715

Senior Chief Petty Officer
Joined
Jan 26, 2009
Messages
757
Re: Restoring 1986 Sea Nymph SS155 (pics)

Nope, not correct in this case.....the anodes are #77 and #80 in the diagram up there ^^^^^^ the trim tab comes painted (primed) new so cannot be an anode.....it probably would be an anode if it was a Mercury.

Thanks for the clarification Mark! That makes sense... but I went to sanding both the trim tab and the anode #80 last night :redface:. Guess I'll repaint the trim tab black or something :rolleyes: and add the #77 to my list to sand.


Ok... now for an up date... I removed the mystery wire from the whole system as it was spliced into the overheat sensor wire from the throttle plug. Used a heat shrink butt connector to connect it back to factory wiring according to the diagrams that I have. The only question is why the PO spliced the wire like that. Is it because the alarm horn is broke in the throttle control and PO had it attached to external horn or was he/she using that over heat horn has an actual horn?! those are the only possible scenarios I can come up with of why someone would splice into that wire... any ideas?

I sanded done the #80 anode and stared on the trim tab which as Mark corrected is not an anode in my motor... so will have to repaint that puppy, but I do need to add #77 anode to the to-do list. (Numbers refer to diagram in post #504) I also started to soak the sheared trim tab bolt with PB blaster creeping catalyst... will do some more applications today with some light tapping before attempting the EZ out extractor.

Now for the fun part... I put the motor and lower unit back together... reconnected the shift shaft, reinstalled the starter, and reattached the lower unit. I'm just gonna come out and say whoever designed the motor the way they did with the starter needing to be removed to get to the shift shaft screw did not take ease of task into mind. I can BARELY get my hand on the shift shaft screw... it's so far tucked under the power-head even with the starter removed... end rant! :D

Well motor reassembled... went and picked up ethanol free 87 from the station that is 1/4 mile from my house.... mixed a nice 50:1 batch, added 6oz of Sea Foam to help clean out the gunk. Me and my buddy wheeled the boat out of the garage attached the hose and the muffs, hopped into the boat to connect the tank and WAM! connecter won't fit on tank. So we try the brass fitting on the other tank and same scenario but the brass fitting is slightly different. So the official motor start up was a FAIL :facepalm:. When cleaning up the garage I found the packaging for the brass fittings and somehow I bought one fitting for a mercury/mercruiser, and the other fitting is for a Yamaha while my gas lines on the motor are Johnson/Evinrude.... FAIL FAIL FAIL... I must not have been sober when I bought these things... ITS ALL DIFFERENT... anyways doing a bunch of returns today and should have the correct parts for start up this evening. Hopefully we'll have a movie of the ole 'Rude purring like a kitten... Will keep ya updated!
 

ezmobee

Supreme Mariner
Joined
Mar 26, 2007
Messages
23,767
Re: Restoring 1986 Sea Nymph SS155 (pics)

Been there done that. The damn Yamaha connector looks JUST LIKE the OMC one but the one "stud" is much fatter so it won't fit.

Perhaps the PO tapped into that wire to add a visual overheat indicator (light bulb) in addition to the horn.
 

Piece715

Senior Chief Petty Officer
Joined
Jan 26, 2009
Messages
757
Re: Restoring 1986 Sea Nymph SS155 (pics)

Been there done that. The damn Yamaha connector looks JUST LIKE the OMC one but the one "stud" is much fatter so it won't fit.

Perhaps the PO tapped into that wire to add a visual overheat indicator (light bulb) in addition to the horn.

Good call on the light bulb... definite possibility. I i know what ya mean with the fatter stud... I pushed and pushed and just wouldn't go!
 

64osby

Admiral
Joined
Jul 28, 2009
Messages
6,799
Re: Restoring 1986 Sea Nymph SS155 (pics)

If you can get a direct fit to the fuel pump, you can just run a gas line into your tank, top off. No need for fittings to do a test. Just a thought. You won't be able to prime it, but it will let you know if your pump is working. Makes it easier if you get the tank up at motor height.
 

Todd4

Petty Officer 2nd Class
Joined
Feb 11, 2012
Messages
111
Re: Restoring 1986 Sea Nymph SS155 (pics)

Well, sorry Piece, that I steered you wrong on the trim tab anode. Both of my outboards use the trim tab as an anode - guess I shouldn't have assumed.:redface: Sounds like you're getting closer though to firing her up! :) Good luck.

Todd
 

Piece715

Senior Chief Petty Officer
Joined
Jan 26, 2009
Messages
757
Re: Restoring 1986 Sea Nymph SS155 (pics)

If you can get a direct fit to the fuel pump, you can just run a gas line into your tank, top off. No need for fittings to do a test. Just a thought. You won't be able to prime it, but it will let you know if your pump is working. Makes it easier if you get the tank up at motor height.

Thanks for the tip 64... if i can't find the right parts today ill definitely take this for a spin... Gotta get her started!

Well, sorry Piece, that I steered you wrong on the trim tab anode. Both of my outboards use the trim tab as an anode - guess I shouldn't have assumed.:redface: Sounds like you're getting closer though to firing her up! :) Good luck.

Todd

No prob Todd... I found it doing research before ya chimed in soooo apparently I didn't read enough... No harm no foul... it had to be cleaned anyway.... found a mud dauber nest in the water inlet hole... wouldn't have done much prop hub cooling if I hadn't taken a look at it when sanding :rolleyes: As a quick fix may just give it a good coating of some black Plasti-dip
 

Huron Angler

Admiral
Joined
Apr 7, 2009
Messages
6,025
Re: Restoring 1986 Sea Nymph SS155 (pics)

Piece, I had to laugh when I read your post on the 3 types of non-working fuel line parts.:D

Glad you are able to get past all this bad luck and keep after it. You will really enjoy the boat after all this is sorted out.:)

Looking forward to seeing her on the water in a couple weeks:)
 

Piece715

Senior Chief Petty Officer
Joined
Jan 26, 2009
Messages
757
Re: Restoring 1986 Sea Nymph SS155 (pics)

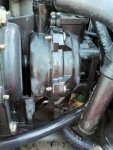
Ok and I just went out and tried to test fire the motor. When pumping the bulb there is a gas leak in the engine. I know where the leak is but not sure if that should be doing that (guessing not) and not sure how to fix it. We had the motor running for about 10 sec before it died.. Started again and prob 5-8 sec run and can't get it started again. Im guessing where that leak is happening is putting too much air into the system. Take a look at the vid and see if this is something i can fix.


I'M SOOO CLOSE!!! PLEASE HELP!!!
 

Piece715

Senior Chief Petty Officer
Joined
Jan 26, 2009
Messages
757
Re: Restoring 1986 Sea Nymph SS155 (pics)

Piece, I had to laugh when I read your post on the 3 types of non-working fuel line parts.:D

Glad you are able to get past all this bad luck and keep after it. You will really enjoy the boat after all this is sorted out.:)

Looking forward to seeing her on the water in a couple weeks:)

Hey there HA... Been a while! Ya i don't know what i was thinking when i bought those parts... definite face plant on desk!! :eek:

I am bound and determined to get her on the water ASAP!!! Having trouble getting the motor started now... It pees strong so my job on the impeller change is good but just can't get her started. I'm pretty sure the gas leak in the video (post #531) is prob the issue. Got it running for 10 sec before it died... not real sputtering either was purring nice and then just quit so i dont think its the carbs but then again i did buy 3 different fuel line parts:facepalm:
 

Piece715

Senior Chief Petty Officer
Joined
Jan 26, 2009
Messages
757
Re: Restoring 1986 Sea Nymph SS155 (pics)

The motor has been running on premixed since before I owned her. The oil inlet is currently plugged and it wasn't me that did the bypassing. The oil tank was still in the boat... i thought it was a reserve gas tank, held about a gallon ish... I didn't know much on VRO post I figured it was post my motor but apparently it came out in 1984. Here is a great link to some info on the VRO pump

The VRO story

One thing that is bugging me is the housing of the VRO. It doesn't even look like the two halves are meant to go together. They don't lined up at all. The green tub at the bottom of the pump is the plug for the oil inlet. If anyone has any info or help they can throw at me PLEASE DO! I'm tired of the set backs but not gonna let it get me down... I WILL BE ON THE WATER THIS SUMMER!!!!

VRO pump.jpg

(this was posted under my mysterious wire thread in the motor section; if i don't get much action I'll be making a new thread dedicated to VRO troubleshooting/repair/replacement)
 

Todd4

Petty Officer 2nd Class
Joined
Feb 11, 2012
Messages
111
Re: Restoring 1986 Sea Nymph SS155 (pics)

OK - I'll venture a guess (and wager a beer on it): A broken fuel diaphram in the VRO. BTW - I like Miller Lite.;)

Todd
 

Piece715

Senior Chief Petty Officer
Joined
Jan 26, 2009
Messages
757
Re: Restoring 1986 Sea Nymph SS155 (pics)

OK - I'll venture a guess (and wager a beer on it): A broken fuel diaphragm in the VRO. BTW - I like Miller Lite.;)

Todd

Well sir you are in luck because Miller Lite is the everyday beverage of choice for this fellow... and the new punch cap makes it seem like ur drinking from a glass... although its NO WHERE NEAR as easy to punch as the commercials make it out to be but love it all the same.

A little update on the boat. I have all the parts that i need ordered... i think... The inner exhaust gasket, the retaining trunnion, and the trim tab bolt will be here on Saturday. I ordered a new fuel pump assembly for the VRO as the Evinrude gurus recommended it seeing as my motor was still sporting the original VRO which were known to self destruct. It was the cheapest route costing $72 before shipping. The only thing I'm not certain of is if the current hoses for the fuel pump will work with new pump. If not the splash will be delayed further waiting on new hoses but lets keep our fingers crossed that it works our for me. Here is a link to the VRO thread: VRO Fail... I think we have a problem...

SOOOOO in short my splash for memorial day was a FAIL... :facepalm:.... I tried just didn't foresee the VRO crapping out on me
 

Todd4

Petty Officer 2nd Class
Joined
Feb 11, 2012
Messages
111
Re: Restoring 1986 Sea Nymph SS155 (pics)

Ummmmmmmmmmm, I think "you still have a problem".

If I'm following your thoughts correctly, you want to convert your current VRO into a simple pulse style fuel pump. Correct? I would have just replaced the rubber gas diaphram in your current VRO with the updated, ethanol resistant, rubber one and been done with it ('cause you're not using the oil side anyways), but let's continue down your chosen path. It's not that I have a problem with your chosen path - it'll work, but........... What you ordered was just the pump assembly. That would've been just fine to fix your current problem if you were fixing that style of pulse pump already installed on your motor. But you're not! Your are converting from a VRO to a pulse pump. So, all of your VRO housings, gaskets, mounting hardware, screens, CAP, etc are all different and cannot be swapped from your old VRO over to your new pulse pump assembly. You need to buy all that ancillary crap to fit your new (on order) pulse pump assembly (and throw away all that crap that fits your existing VRO pump, including the VRO pump assembly).

Now you'll need at least Reference No. parts 2 through 7(2 pcs) from your linked post parts list.

Since at least one of your hoses WILL mount in a different configuration I'd go ahead and look at your current configuration and see what parts 8(?) through 12 you can use to make your install easier (than running down to the auto parts store and trying to make up hoses).

Gotta run. Ask questions and I'll check back in when I have time. Good luck.

Todd
 

Piece715

Senior Chief Petty Officer
Joined
Jan 26, 2009
Messages
757
Re: Restoring 1986 Sea Nymph SS155 (pics)

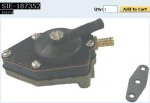
Ok now I'm really confused. According to the site i ordered the part from... i found this at the top of the screen - Item [BRP-0395713] has been superseded with item [BRP-0438556]. but yet the site let me order the item... it lists this Sierra SIE-187352 fuel pump.jpgas an alternative for the pump, which looks like the whole kit and kabootle... soooo maybe the site is going to be sending me the sierra... its cheaper... would this be a better alternative or again just the diaphragm?
 

Todd4

Petty Officer 2nd Class
Joined
Feb 11, 2012
Messages
111
Re: Restoring 1986 Sea Nymph SS155 (pics)

OK my reply was based on the link in your ".... I think we have a problem" thread. In that thread a site was listed where the Evenrude part # 0395713 is only Refernce No. 1, the pump assmbly - not the entire conversion needed. The pic in the post immediately above shows everything you need to make the conversion (except mayby a fuel hose and the mounting screws?). I'm not sure what you ordered, but if it looks like the pic - you're good to go. :D

Todd

EDIT: As for the diaphram question: The entire pump kit shown above would probably be easier for you to install. Fuel pump diaphrams go out pretty regularly so I have some experience with replacing them. It's basically like sandwiching a gasket into the assembly housing halves. But since you're going to be using fuel/oil mix..... might as well use the pump for it (since it's ordered anyway).;)
 
Top