66 Starcraft Sunchief Re-Build

Status
Not open for further replies.

jcsercsa

Captain
Joined
May 21, 2007
Messages
3,401
Re: 66 Starcraft Sunchief Re-Build

Hi there North Beach , man she looks great , really nice work !!

I not the expert on poly, But I think you need to add matt even if it is a thin coat !! that what i have read , poly is really week if you dont.

Your jusy try to get her smooth right ?? If so add the matt and then I think you got to grind !!

Your pants now will stand on there own for the next 20000 years !! unless you put them in the sun then only 2000 years !!hahah and in the washer your going to hear a klink , klink , klink !!! hahahaha

Great Job !!! John
 

North Beach

Commander
Joined
Sep 29, 2008
Messages
2,022
Re: 66 Starcraft Sunchief Re-Build

John, I'm just glassin for waterproofing and to add strength. We're gonna cover it with Marine Vinyl.
 

92excel

Chief Petty Officer
Joined
Oct 6, 2008
Messages
477
Re: 66 Starcraft Sunchief Re-Build

From the pictures i dont see you wearing a respirator..

You should really invest in one!!!
 

North Beach

Commander
Joined
Sep 29, 2008
Messages
2,022
Re: 66 Starcraft Sunchief Re-Build

92, I have one. I just didn't think about the small amount of epoxy resin I was grinding off and my orbital sander has a bagger. Good lookin out and don't tell my wife :D
 

58hydraglide

Seaman
Joined
Nov 9, 2008
Messages
71
Re: 66 Starcraft Sunchief Re-Build

North beach,
Nice work, looking good! If your just looking to fill in the cloth and make the "texture" smoother roll on another coat of resin. That will also make it more waterproof. I wouldn't sand it until you have another coat of resin on it as you could get into the glass. If you catch it before it's fully cured you can roll on another coat without any prep. If it's cured then you want to make sure your remove any amine blush before the next coat. (most say to use water and a scotchbrite pad to remove amine blush.) If your gonna cover the floor with vinyl and you dont have any "high spots" that could leave air pockets in the flooring then I'd say roll on another coat for waterproofin and go. I've had some experience on my boat but am no expert, so maybe somebody else will chime in and back this up or set it straight! :)
 

jcsercsa

Captain
Joined
May 21, 2007
Messages
3,401
Re: 66 Starcraft Sunchief Re-Build

OHHH your useing epoxy , then just pour it over it !! then smooth it out , epoxy is great suff, I thought you were using poly !! John
 

North Beach

Commander
Joined
Sep 29, 2008
Messages
2,022
Re: 66 Starcraft Sunchief Re-Build

Thanks for all the input folks! I have to work this evening so I shot out to the garage to check on things. The epoxy is pretty much cured but the surface was still just a tad tacky. I could walk on it without leaving marks. So I mixed up another batch of 24 oz of resin and 12 oz of hardener and rolled on another thin coat with a medium roller. We'll see what that looks like when I get back around midnight.
 

92excel

Chief Petty Officer
Joined
Oct 6, 2008
Messages
477
Re: 66 Starcraft Sunchief Re-Build

92, I have one. I just didn't think about the small amount of epoxy resin I was grinding off and my orbital sander has a bagger. Good lookin out and don't tell my wife :D

i was actually refering to the photo of you applying the resin.. i dunno about epoxy.. but poly resin will mess with your head if you forget the respirator...
just looking out for ya.
 

North Beach

Commander
Joined
Sep 29, 2008
Messages
2,022
Re: 66 Starcraft Sunchief Re-Build

92, I've never used the poly but this stuff didn't even have an odor. No fumes to deal with so I figured I didn't need one. Thanks just the same. I had an issue a couple of years ago with my jointer and some pacific yew in the wood shop. That was a bad one :(

Just checked on the rollover coat and everything looks good, I'm just gonna let it set in the warm garage for a couple of days. The weather is supposed to be really nice this weekend, so we're thinking about lifting it off the trailer and completing the sanding in preparation for bottom and topside paint. Now things are really gonna get interesting!!!!
 

North Beach

Commander
Joined
Sep 29, 2008
Messages
2,022
Re: 66 Starcraft Sunchief Re-Build

Well we got that upper 70's weather today so I drug the boat out of the garage and did some little stuff. We removed the homemade jack plate, the stern handles and the rubrails and inserts. Then I got all fired up and broke out the orbital sander and hit all the topside stuff and the stern in preparation for paint. I also gave the new fiberglass deck a pass with the sander to knock down the high spots from me spillin stuff when coating and the areas where the hairs stuck up at the seams. Also managed to trim all the excess fabric from the edges and blew it all off with the leaf blower and I got the outdrive hung in the Boatel to start preppin it for paint.

I'm running out of excuses not to hang this thing and buy some paint. We do still need to remove the dash and all the gauges, etc. but that's about it.

Man, it took a couple hours just to collect up all the trash and tools from the last couple of days :D:D

I'll have to post a couple new photos tomorrow.
 

North Beach

Commander
Joined
Sep 29, 2008
Messages
2,022
Re: 66 Starcraft Sunchief Re-Build

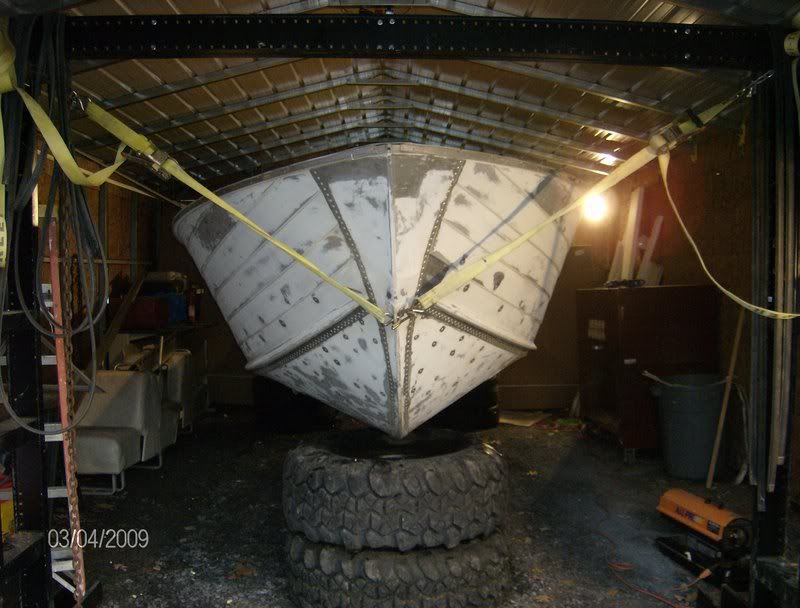
More really good weather today so I decided it?s off the trailer time. So I drug her out of the garage and backed her into the Boatel. I lifted the front with some of those huge Home Depot straps we use on the car trailer. Has anyone noticed how much crap I have from HD?? I practically live there it seems. I just hooked them to the bow eye and ran one to each side of the Hillbilly Gantry.
Off1.jpg

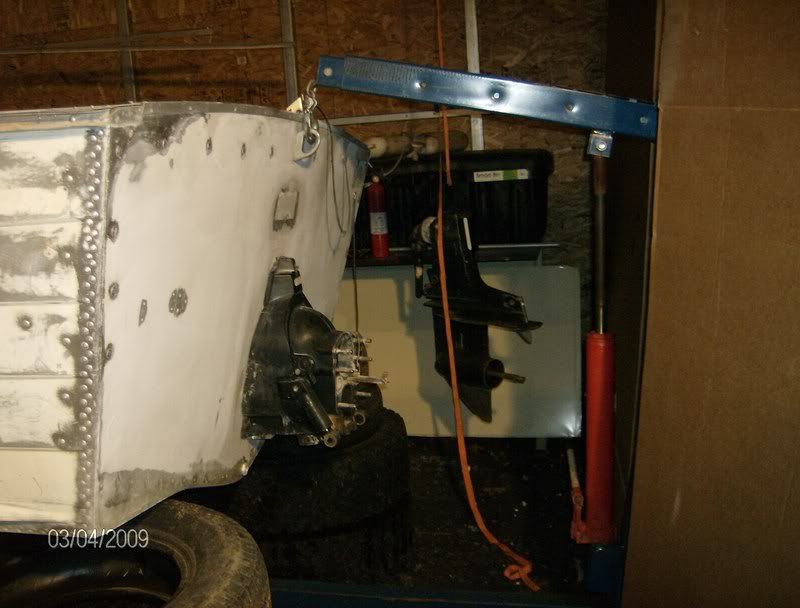
For the stern I broke out the engine hoist we used to use for pulling motors from my son?s race car. I knew that thing would come in handy again!
Off2.jpg

The hoist is rated for 4100 pounds and each of the straps are rated for 5000. The 66 brochure lists my boat fully rigged at 1750 pounds so I think we?re good. I stacked up the old tires just in case:eek:
Off3.jpg


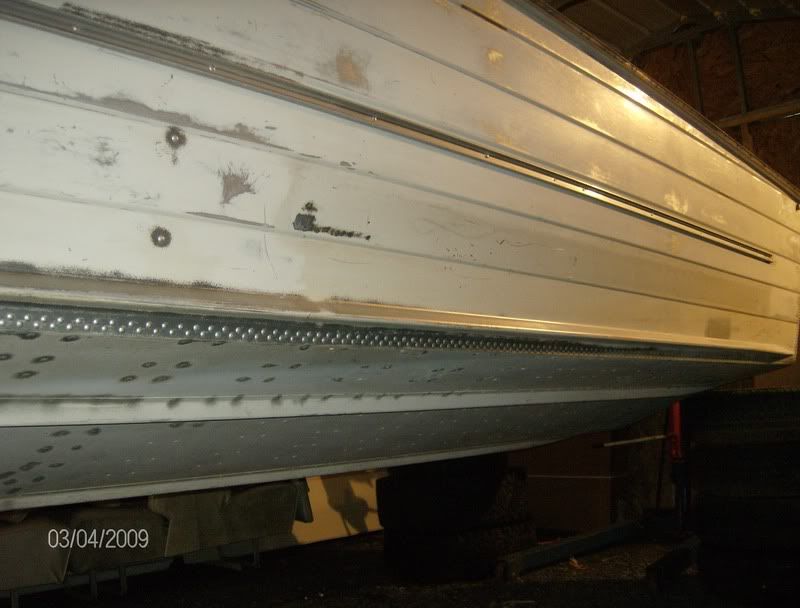
Now I can finish sanding the bottom and get some paint on!!!! This photo also shows what things look like after you remove the rub rail and rubber insert. The rub rail was just thru bolted with a lock nut on the inside.
Rub.jpg


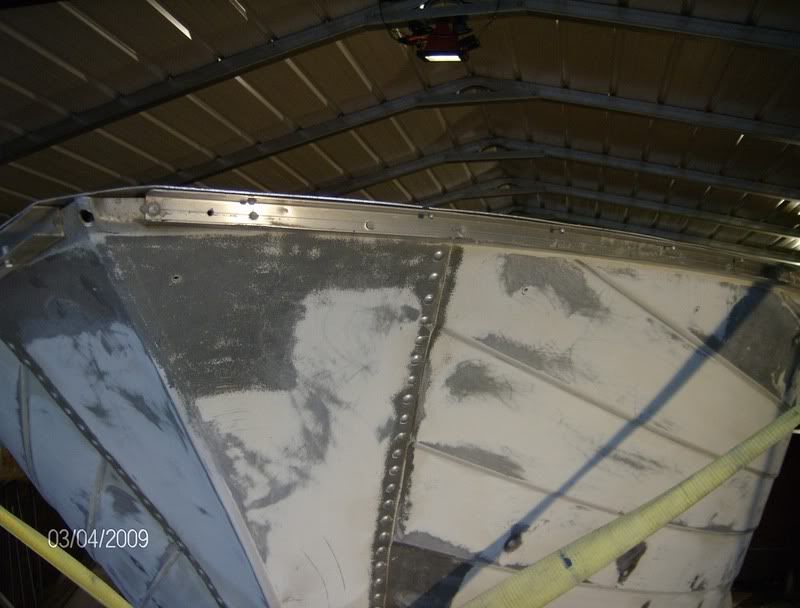
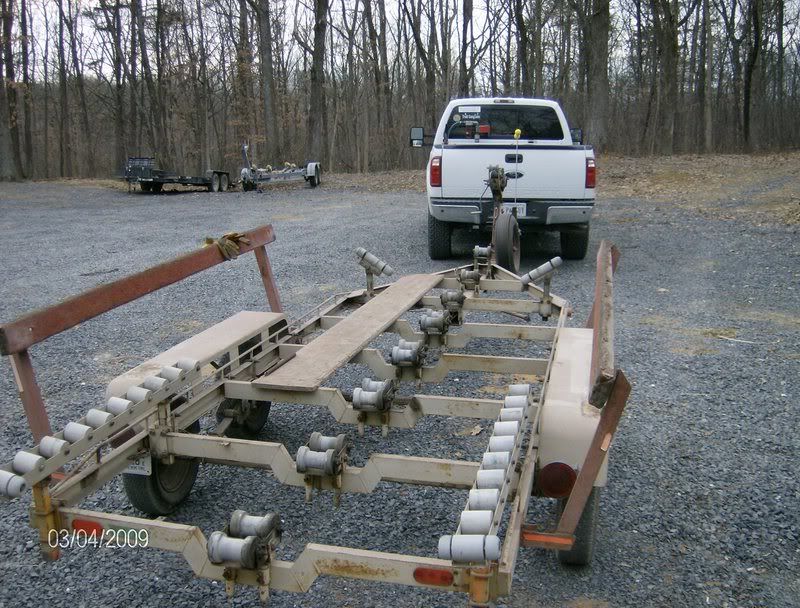
Here?s a shot of the 72 Cox trailer. I bought a newer (80ish) trailer but this one is really starting to grow on me. I wonder if I could swap out the bigger axles and wheels to this unit?
Off4.jpg
 

sschefer

Rear Admiral
Joined
Nov 13, 2008
Messages
4,530
Re: 66 Starcraft Sunchief Re-Build

Nice lift idea.. Mines comming off the trailer this next week. I am NOT looking forward to sanding the bottom.

On your rub rails, mine were the same way. I used 1-1/2" Stainless #10 screws to put it back on. I drilled 1/8" pilot holes and then 3/16 just through the rub rail. Up around the bow I used 1-1/2" #12's. I doubled the number of original screws also. I did break a couple when I hit rivets but other than that it was a lot easier than using rubber cement to keep the nut in the endwrench. I did a little research with a 10lb slde hammer and the shear strength is nearly identical either way. The heads of both screws broke off before they pulled out.
 

reelfishin

Captain
Joined
Mar 19, 2007
Messages
3,043
Re: 66 Starcraft Sunchief Re-Build

..........
Here?s a shot of the 72 Cox trailer. I bought a newer (80ish) trailer but this one is really starting to grow on me. I wonder if I could swap out the bigger axles and wheels to this unit?
Off4.jpg

Cool looking old trailer, I just got done reading though the 4 pages of posts here. Great job! I own 5 of these hulls now, and am about to begin a complete repaint of a '68 Starchief which was repainted 30 years ago and has a bad case of shark skin and peeling going on.

Any idea what brand that old trailer is?

I've been messing with old boats and trailers for years now, and have always been intrigued by the some of the odd trailer designs of yesteryear.

I'm thinking that maybe a vintage trailer section may be an idea here. If nothing else just a data base of some sort to ID some of the odd older trailer designs. Some of those old trailers worked great, others were nightmares to deal with. Info on old trailers is sketchy at best right now.
 

North Beach

Commander
Joined
Sep 29, 2008
Messages
2,022
Re: 66 Starcraft Sunchief Re-Build

SS, I hear ya on the sanding!! I guess it's a necessary evil. I just keep tellin my self it's gotta get done:D I can't wait to paint even though it's scarin the hell out of me.

RF, that's a 72 Cox with a tilt bed. I'm really thinkin hard about re-doing it. I just don't like those teeny wheels and tires. That and the thing is about 5 feet longer than a newer one.
 

sschefer

Rear Admiral
Joined
Nov 13, 2008
Messages
4,530
Re: 66 Starcraft Sunchief Re-Build

LOL, I couldn't wait either so I started on the inside, splashwell and transom. From what I understand it's best to treat them as a separate paint job so that's what I'm doing.

I got to feeling like a chemist after mixing up the Interlux etch and the 2 part epoxy primer. I did make one mistake when I tried to tip out the first coat of primer. It didn't take me more than a couple of swipes before I realized it wasn't working. I rolled the rest out and on the second coat I tipped it and it came out smooth as silk. My brother came by and complemented me on the paint job and was amazed when I told him that it was only the primer.
I have 30 days to get paint on the primer so for the rest of the week I'll be sanding the sides and when I get primer on them I'll head down under.
 

reelfishin

Captain
Joined
Mar 19, 2007
Messages
3,043
Re: 66 Starcraft Sunchief Re-Build

SS, .......
RF, that's a 72 Cox with a tilt bed. I'm really thinkin hard about re-doing it. I just don't like those teeny wheels and tires. That and the thing is about 5 feet longer than a newer one.

I'd probably opt for the one that sets the boat the lowest. I've been slowly moving all of mine over to roller trailers, which has been mostly driven by the fact that all of the ramps here are super shallow. I just sold two of my older tandem trailers with those same small wheels, while they sat the boat much lower, I still had to back in farther than was comfortable to float the boat off, with the roller trailer, I can winch it on and roll it off without getting the truck in too deep. What I found with my 18 cuddy cabin was that I'd be in over my knees and the truck in to the front wheels and the boat still wasn't anywhere near floating off the trailer. One ramp only has 18" of water at high tide at the end of the ramp. Try launching there in 34 degree water.

I must say though that most of those older trailers were light, and towed great compared to some of the newer full roller trailers. My old twin axle tandem weighed in under 500lbs, while my new single axle roller trailer is nearly 900lbs. That makes a big difference with a small truck.

I must say though that the new Load Rite trailer is much more rigid and doesn't flex all over like the old trailer did. I believe mine was a Gator, but my 16' boats all came on Tee Nee brand trailers. I still have the one single axle from my 1974, which I use as my painting trailer for right now. I will most likely restore it when that boat is done and keep it around as a project go getter.
 

North Beach

Commander
Joined
Sep 29, 2008
Messages
2,022
Re: 66 Starcraft Sunchief Re-Build

RF, that's the approach I was taking in buying the newer trailer. I wanted to try and get the boat a little lower. However, it appears as if the original trailer is gonna be lower than the new one.

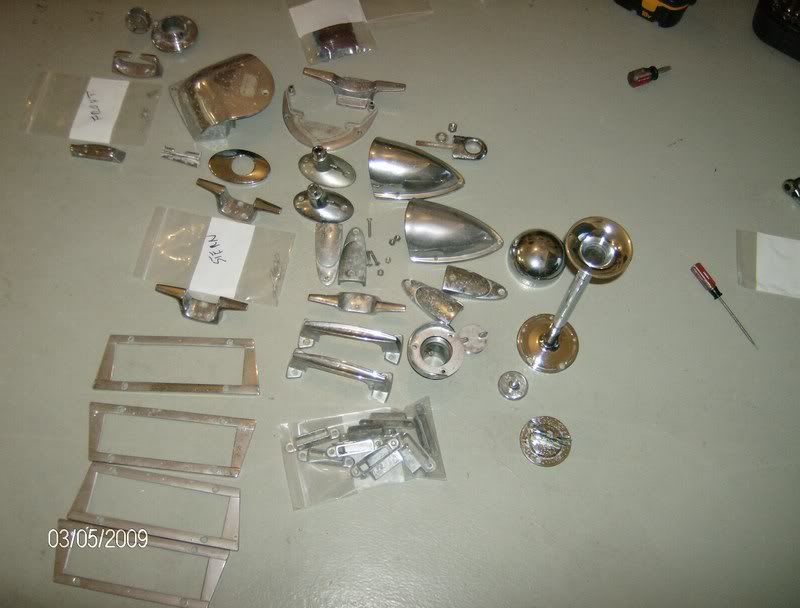
So I had to work today and didn't accomplish much on the project. I have to do a site visit on a project that will put me near the chromer's place so I gathered everything up that I want to make shiney and I'll drop it off tomorrow. Wonder what this pile is gonna set me back? And I'm hoping their prep will take care of the pitting:D

Chrome.jpg
 

reelfishin

Captain
Joined
Mar 19, 2007
Messages
3,043
Re: 66 Starcraft Sunchief Re-Build

Chrome itself won't fill in the pits, that will take lots of extra prep work. You may be shocked at what they charge to do that lot of items. I tried to get two small pieces done a while back around here and they wanted $200 plus prep time, which seemed to be the norm no matter where I went.

Chrome plating and surface prep is very labor intensive, the plating is actually the easiest part. It's all the filling and buffing that is needed to get the metal ready to plate. Most shops will only buff and plate, not many do any serious restoration work. It will most likely be far cheaper to find good used parts than to get those replated. If not, look for good stainless aftermarket parts to use.

Many of the original parts weren't proprietary, many were off the shelf parts from companies like Perko. Also, some parts may already be stainless or bare aluminum, those can be polished and made to look like new with some good metal polish.

The only proprietary parts I see there are the rub rail end caps, the step plate frames, and any hull specific trim parts.
The cleats, and other hardware can all be had far cheaper brand new, preferably in stainless steel.

I have a few buddies that were put off by the cost of trim parts and simply glass beaded all their trim and epoxy painted it all in white. It actually came out great.

Mine will get all stainless, I am short a set of those rub rail ends but may try to mold some out of resin or hard rubber, as maybe a set of side emblems.

One option to chrome plating may be to look at other states as well, not all states restrict plating as bad as others do. I have had luck getting other items plated out of state, but it's still not cheaper than new parts.
I got lucky and found several of those huge bow lights online cheap so that totally eliminated my need for rechroming.
 

North Beach

Commander
Joined
Sep 29, 2008
Messages
2,022
Re: 66 Starcraft Sunchief Re-Build

Yeah I hear you on all of that. I plan on going over all that with those folks today. I'm kinda set on the bow light though!
 

cnr2003

Seaman
Joined
Jul 8, 2007
Messages
56
Re: 66 Starcraft Sunchief Re-Build

For the parts that are stainless, you can go over them with a piece of steel wool and then hit it with some metal polish. I did this with my bow light, cleats, intake covers, pretty much everything you have there and I was amazed at how it turned out. It won't remove any scratches or pitting, but it will sure make it shine.

I also noticed you have two different style gas caps. Mine was the same way, but I opted to replace both of those with new matching ones.
 
Status
Not open for further replies.
Top