slickcraft reseal,, well repower..... well reglass etc. etc.

Bondo

Moderator
Staff member
Joined
Apr 17, 2002
Messages
70,513
Re: slickcraft reseal,, well repower..... well reglass etc. etc.

I would name the company that I got it from, bt I'm not quite sure about the etiquette or protocol allowed here! It's not one of the big three. Much less expensive.

Ayuh,....

Go ahead,+ Blurt it Out.....

It sounds like you were working with Larry at raka.com...
 

maxum247

Lieutenant
Joined
Sep 18, 2007
Messages
1,363
Re: slickcraft reseal,, well repower..... well reglass etc. etc.

Work got your project on hold? :(
 

58hydraglide

Seaman
Joined
Nov 9, 2008
Messages
71
Re: slickcraft reseal,, well repower..... well reglass etc. etc.

Progress has slowed a bit but is still steady. I'm in the process of glassing in the stringers. I've installed and laminated the transom once the stringers are glassed I'll have to pull it out of the garage and sand everything in prep for the remaining bulkheads and the engine stringers and transom glass. Just kind of taking mt time with it.
 

maxum247

Lieutenant
Joined
Sep 18, 2007
Messages
1,363
Re: slickcraft reseal,, well repower..... well reglass etc. etc.

Your doing better with your project than I am with mine, haven't worked on the boat in a month now, weather and other things just got in the way, probably be spring before I get back at it!
 

58hydraglide

Seaman
Joined
Nov 9, 2008
Messages
71
Re: slickcraft reseal,, well repower..... well reglass etc. etc.

Well, I have made a little more progress. A little more glassing and then ground and sanded everything I've glassed so far. I've cut my limber holes, vent holes and fuel tank line holes through the stringers. I have also cut the outdrive hole. I have one more layer to glass on the stringers before I install the remaining components. I thought i would seal the holes up with a couple of coats of resin before I finish the final layer. I need to order more resin, so in the meantime Im going to form my foam molds and pour those while I wait.

I'veposted pics of the work thus far below. I have a couple of questions that I really need some opinions on. The fuel tank is a 50 gallon galvanized tank. I pressure tested it during removal and it checks out ok. BUT... it's a 35 year old tank. There is a teak grate that sets in the floor above the tank and I can gain full access to it, but the tank is 1/2 wider than the floor opening. The tank can't be removed without cutting the floor. Why they did that I'm not sure. I'm concerned about putting that old tank in the boat and having it fail. I cant find a replacement tank that will fitt without sacrificing capacity. My one thought is adding one strip to the teak decking and widening the floor opening. Then in the event of a tank failure I can remove it and install a new one without damaging the floor. At that point I could spend a little extra dough and have a tank built to fit. Am I being over concerned about this old tank or should I replace it now? This has been nagging me for awhile and I will be addressing it soon.

The second question I have is regarding the transom.I built it upwith 1 layer of 3/4 AC and 2 layers of 1/2 AC. This duplicates the thickness of the transom of the boat the outdrive came from. Iit runs the entire beam of the boat whiich is about 7 1/2' wide and about 42" tall. The transom of the donor boat has clipped corners and the transom is much narrower (pics below) with my NEW transom being so flat and wide do a need to add any more support to it or will it suffice? (this boat came with an OMC stringer drive and the original transom was single ply 3/4. I researched the specs for this boat with the mercruiser outdrives but found nothing). What do you all think??
 

Attachments

  • 001-2.JPG
    001-2.JPG
    29.2 KB · Views: 0
  • 003-1.JPG
    003-1.JPG
    28 KB · Views: 0
  • 004-1.JPG
    004-1.JPG
    28.8 KB · Views: 0
  • 005-1.JPG
    005-1.JPG
    30.8 KB · Views: 0
  • 006-1.JPG
    006-1.JPG
    27 KB · Views: 0

58hydraglide

Seaman
Joined
Nov 9, 2008
Messages
71
Re: slickcraft reseal,, well repower..... well reglass etc. etc.

Startin' to get back in the game now. Work slowed up a bit and so did the cash flow. Not out of the woods yet but things are looking up. PLus this damn winter's been draggin me down! I've gotten most all of the drive assy reads to install. gotta wait for a few drive outdrive seals and I can paint it up and get her ready. Here's a few pics of what's been goin on lately. I've got the transom plate and flywheel cover installed for the mock up to determine my engine stringer height etc. I will be working on that next.

Mike
 

Attachments

  • IM000687.JPG
    IM000687.JPG
    66 KB · Views: 0
  • IM000692-1.JPG
    IM000692-1.JPG
    59.2 KB · Views: 0
  • IM000689.JPG
    IM000689.JPG
    69 KB · Views: 0
  • IM000699.JPG
    IM000699.JPG
    58.9 KB · Views: 0
  • IM000697.JPG
    IM000697.JPG
    49.5 KB · Views: 0

maxum247

Lieutenant
Joined
Sep 18, 2007
Messages
1,363
Re: slickcraft reseal,, well repower..... well reglass etc. etc.

Nice work on the mock up Mike. Great looking motor!
Did you use the old gas tank or did you get a new one?

max!:)
 

58hydraglide

Seaman
Joined
Nov 9, 2008
Messages
71
Re: slickcraft reseal,, well repower..... well reglass etc. etc.

Hey Max, good to hear from ya!

I'm going to re use the old tankbut before I install it I'm going to make the hole 1 teak strip wider and add one to the teak grate that covers the tank. Then if and when it fails I can remove with cutting into the glass again. I just can't give up the cash to have a tank made to fit the original hole right now.Since the floor and hole opening braces are all new and yet to be installed, i figured why not. I gotta tell ya too, I checked out the outdrive and ordered a few seals etc , new bellows. I really like the design of the volvo penta's. Very simple setup and gotta be damn near bulletproof. I'm really looking forward to getting her in the water.

Mike.
 

maxum247

Lieutenant
Joined
Sep 18, 2007
Messages
1,363
Re: slickcraft reseal,, well repower..... well reglass etc. etc.

What about bracing the stern, what did you decide to do there?

My 30 gallon tank has become a big headache. I wish now I would have pulled it and had it professionally cleaned and pressure tested while redoing the deck.
My problem is not leaks but trash. The gas evaporated over about a dozen years to about a 1/3rd of a tank and now I have to clean it every year because as the year goes by the fresh gas breaks down the old crude in the tank so it's like talcom powder, what a pain every year having to clean that thing. I bet I've removed a half gallon of stuff from the tank in the last five years. At this point I'm really thinking about switching to a remote 12 gallon tank for my outboard. max!:redface:
 

Attachments

  • Picture 510.jpg
    Picture 510.jpg
    52.6 KB · Views: 0
  • Picture 498.jpg
    Picture 498.jpg
    53.6 KB · Views: 0

58hydraglide

Seaman
Joined
Nov 9, 2008
Messages
71
Re: slickcraft reseal,, well repower..... well reglass etc. etc.

Max,
I did some research at the local marine and looked at any i/o I could get access to. I determined that due to the proximity of my transom openig to the stringers (39" o.c. and the tope of the stringers are 2" higher than the crankshaft centerline) that I will have plenty of strength. I still have to install the engine stringers, which will run to the transom and be about 24" o.c. and 7 " away from the transom hole. The other thing is that the thickness of my transom is throughout the entinre transom. Most of the others had the extra ply only around the transom opening and wherever hardware was attached. I may have added a little weight but not much.

As far as the tank is concerned I'm going to have i tcleaned out and pressure tested by the local radiator shop and reuse it. At least when it fails I wont have to cut into any glass to replace it.

That bites about your's though. There has GOT to be something you can put into the tank to dissolve the varnish and flush it out. Maybe not on the first or second (or third try), but enought where you could add an auxilary spin on or cartridge type fuel filter unitl your sure it's clean.My guess is your tank is plastic so you might be limited as to what you could use but that tank looks like it's in a mother of a place and I'd hate to have to replace it. Especially after all the work you've done. If your boat's like mine, I'd hate to lose the precious deck space for an auxilary 12 gal. tank.
 

maxum247

Lieutenant
Joined
Sep 18, 2007
Messages
1,363
Re: slickcraft reseal,, well repower..... well reglass etc. etc.

Aluminum 30 gallon, if I decided to pull the tank I'd probably cut the section of deck around the tank, then all I'd have to replace would be a small
section of deck that I removed. Easier said than done though!

Anyway back to your project as it should be, looking forward to seeing the next steps in your project take shape. Have a great day!:):):)
 

Attachments

  • Picture 075.jpg
    Picture 075.jpg
    53.6 KB · Views: 0

58hydraglide

Seaman
Joined
Nov 9, 2008
Messages
71
Re: slickcraft reseal,, well repower..... well reglass etc. etc.

After much deliberation and searching as many threads as I could, I decided how to build my engine mount stringers. The originals were 2) 1x oak laminated together with a single 3/4 plywood top. This created a box and the top 3/4 ply ran outboard to the main stringer. (very similar to what oops described his original mounts as). Mind you, this was a stringer mounted omc drive and the entire drive system was lag bolted through the SINGLE layer of ply! Not one of the mount lags went into the oak. The inside of the mount "boxes" were totally rotted.

I searched all last week on engine mount stringers trying to find a better mousetrap and this is what I decided to do.

My new mounts are based on the similar design of the boxed in stringer, but I sandwiched 1 3/4" LVL beam material between 3/4" a/c plywood. In effect creating a laminated stringer. I am still topping it off with a layer of 3/4" a/c, but I have vented it fore and aft instead of sealing it.

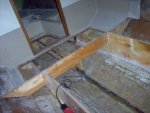
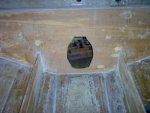
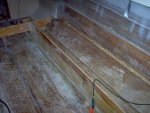
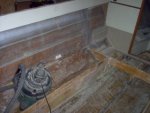
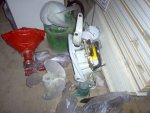
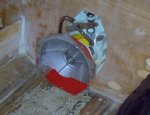
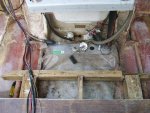
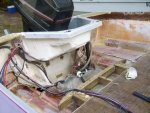
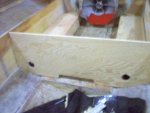
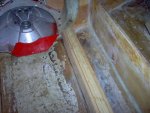
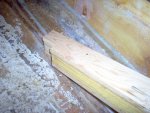
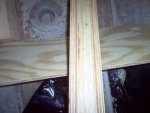
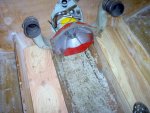
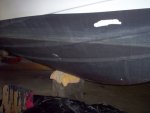
Today was just cutting the components. I am going to saturate them with CPES and wrap them individually with 4 oz cloth before installing them. I was thinking about installing them individually in the boat. First installing the inner 3/4 ply and bedding it in. then glueing and clamping the LVL and bedding it in, Then the last 3/4 ply layer and doing the same. Being that they are 3 1/4" wide stringers I figured this would create a better bond without any air pockets. then I will tab the completed stringer to the hull with 24 oz. roving and wrap them with another layer of 24 oz. Once that is set then I will install the 3/4 cap and lay 2 more layers of 24 oz. over the entire mount. I was really concerned about getting moiture inside the cavity, but the underside of the original cap didn't even have a layer of resin, and the cavity wasn't vented. The pictures below show holes in the bulkhead right below the bottom side of the cap to allow venting. In between the holes and below I notched the bulkhead for bilge drainage. In the picture of the side of the stringer, you can see I notched the bottom of the rear to allow for drainage from the engine mount cavity to the bilge. The reason for laminating the LVL between 2 layers of ply is so that the engine mount lags will run down into the direct center of the LVL, not running through the cap into the cavity as was the original design. once I drill the lag holes I will fill with CPES. once cured I will use 3m 4200 in the lag bolt holes before I run them in.

Took quite a bit longer than I thought, but even after a week of thinking on it, it was still "design as you go" (but I was armed with a lot of info from you all), man I hate doing searches here! Too Much INFO!!!!:D
 

Attachments

  • IM000703.JPG
    IM000703.JPG
    44.3 KB · Views: 0
  • IM000705.JPG
    IM000705.JPG
    64.4 KB · Views: 0
  • IM000706-1.JPG
    IM000706-1.JPG
    67.2 KB · Views: 0
  • IM000707.JPG
    IM000707.JPG
    48.4 KB · Views: 0
  • IM000708.JPG
    IM000708.JPG
    69.8 KB · Views: 0

83mulligan

Senior Chief Petty Officer
Joined
Feb 7, 2009
Messages
687
Re: slickcraft reseal,, well repower..... well reglass etc. etc.

looking real good, mike!
 

maxum247

Lieutenant
Joined
Sep 18, 2007
Messages
1,363
Re: slickcraft reseal,, well repower..... well reglass etc. etc.

Lookin nice Mike. I had planned to work on my boat today after I raked the front yard but my son came in with car problems. By the time I was finished with his car repairs the day was done. max!:(
 

58hydraglide

Seaman
Joined
Nov 9, 2008
Messages
71
Re: slickcraft reseal,, well repower..... well reglass etc. etc.

I decided to tackle a job that I have been putting off for too long. Stripping the bottom paint. Its got about 47 coats on it and was nasty. Awhile back I tried the sanding method and got on all my garb, my respirator, I even attached the shopvac to the DA. Let me tell you, it was way too slow and way too messy for me! I got a little inspiration from 300sflyer the other day and decided to try a stripper. After finding out what it would take to sand it, I found the stripper is the way to go. I did some research and I chose Zinsser's Power Stripper. It took 2 applications with about a 20 minute wait time for the stripper to work. Then I scrubbed it with a brush and hot soapy water. to remove the residue. What is left can be sanded off. It looks like it had a coat of brushed on gelcoat prior to the first coat of bottom paint so I've got some sanding with 600 grit to smooth it out.It's a bit nasty to use the stripper, but unfortunately the PO was religous about bottom paint on the boat, and it beats sanding!
 

Attachments

  • IM000709.JPG
    IM000709.JPG
    36.4 KB · Views: 0
  • IM000711.JPG
    IM000711.JPG
    40.2 KB · Views: 0

maxum247

Lieutenant
Joined
Sep 18, 2007
Messages
1,363
Re: slickcraft reseal,, well repower..... well reglass etc. etc.

Looks like the stripper worked pretty well, does it say how many coats you can use? Another words does it mention if there's a point where too many coats would be bad for the gelcoat? I don't like sanding bottom paint at all.
 

58hydraglide

Seaman
Joined
Nov 9, 2008
Messages
71
Re: slickcraft reseal,, well repower..... well reglass etc. etc.

Max,
It did not specify. There were about 4 different types of Zinsser strippers available. A couple specified NOT to use on fiberglass. The Power stripper did not specify that. It claims to remove 5 layers of paint at a time, marine paint included. It also removes EPOXY so be carefull if your glassing with epoxy.

After I did 2 applications I used the hot soapy water to remove the remaining residue. It took some elbow grease because a lot of it was softened paint that isn't very water soluble (what was left after the remaining stripper evaporated). I'm not completely done, and on the remainder I am going to use alittle bit of stripper and a scotchbrite pad to remove the residue, before I wash.(less elbow grease)

To answer your question about the gelcoat. I scraped with a plastic scraper and once the paint was off I could see where gelcoat was hand applied to the original to fill and repair the hull. (there are brush marks and a few runs in it.) They remained hard as a rock during the process. I tested a few and they are sanding like any other gelcoat.

I left the stripper on for about 20 minutes before stripping to allow it to work. they recommended 10 min or longer for thicker layers.

I was pleased because let me tell you, there is a LOT of PAINT on this hull!

Check 300sflyers post, he pressure washed his to remove the paint, instead of scraping but that would make a holy $h!t mess in my garage, I layed some heavy poly sheeting under the hull before I started.
 

maxum247

Lieutenant
Joined
Sep 18, 2007
Messages
1,363
Re: slickcraft reseal,, well repower..... well reglass etc. etc.

58! Thanks for the info, as I mentioned earlier I have walked away from a couple of nice boats because of bottom paint. I'll have to check out paint removal methods a little closer.
Have a great day and thanks again!:)

max!
 
Top