How to increase Epoxy curing time?

frastorno

Cadet
Joined
Jul 31, 2007
Messages
23
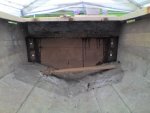
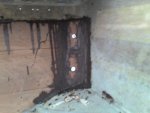
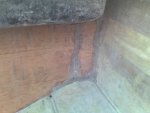
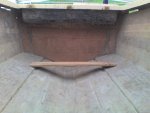
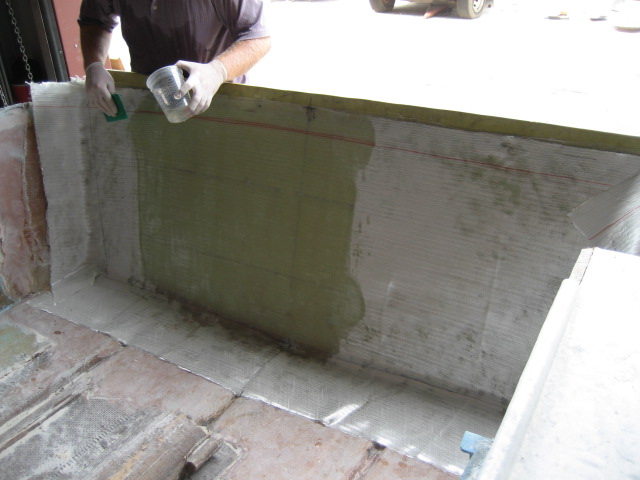
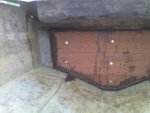
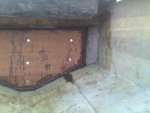
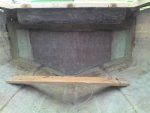
I'm rebuilding the transom and I'm going to paste the first layer of wood to the hull using thickened epoxy (then fiberglass wood and more fiberglass).
I calculated how much it takes to set the transom in place and screw it to the hull, aroud 10 mins. I also tested how much working time I have with the WS 105 epoxy (around 15 mins) that means I only have 5 mins to mix epoxy and wood flour and spread it on the surfaces.. not enough!
I'm looking for way to gain 10-15 more mins, I read about using biggger pots to better dissipate the heat and I'll have a little AC system pointing against the pot while mixing as well.

I was also thinking (and this is my question) of using a big plastic bowl, put some ice in it, put another smaller bowl in it and mix the epoxy in there to keep it more cold.. does it make sense? Could I have any prob with condense of water from hot air around the cold bowl?
 

Boomyal

Supreme Mariner
Joined
Aug 16, 2003
Messages
12,072
Re: How to increase Epoxy curing time?

Just get it out of the mixing bowl ASAP and get it troweled out. It will take a lot longer to start setting that way. All mixed up in the container it will start to generate heat rapidly. Not so when spread out. If it is cool/cold outside, all the better.

You don't need to go thru all those special manuevers.
 

KnottyBuoyz

Senior Chief Petty Officer
Joined
Mar 6, 2006
Messages
712
Re: How to increase Epoxy curing time?

Keep your resin and hardener in the fridge until just before you mix. As soon as you get it mixed up spread it out on one piece of your ply right away. As Boom said this will prevent it from heating up too quickly. Do this first thing in the morning when it's cooler.

Using a notched trowel like those used for laying tiles works well when laminating two sheets of ply together. Helps prevent pockets of air getting trapped.

An extra pair of hands sounds essential for this job.
 

KRS

Banned
Joined
May 15, 2004
Messages
2,383
Re: How to increase Epoxy curing time?

Get the slower hardener.
 

frastorno

Cadet
Joined
Jul 31, 2007
Messages
23
Re: How to increase Epoxy curing time?

thank you all for the your quick replies!
I'm starting the job tomorrow early in the morning and I'll leave the ice in the fridge for now.

Can I mix the resin+hardener in the bowl and then mix it with the wooflour directly on the piece of wood I need to paste to the transom?

206 is the only hardener availiable here, an WS the only epoxy brand,
 

Chinewalker

Fleet Admiral
Joined
Aug 19, 2001
Messages
8,902
Re: How to increase Epoxy curing time?

206 is the slow hardener. Work it on a cool day or early AM and you'll have plenty of time to do it. Have all your tools and pieces at the ready and you'll be fine...
- Scott
 

frastorno

Cadet
Joined
Jul 31, 2007
Messages
23
Did it!!

Did it!!

It worked out great! I was able to do all the work in 20 mins with the help of a friend but I had a working time of over 1 and 1/2 hours from the epoxy before it started hardening! I couldn't get up early this morning (was 28C by the time I started working!) so I decided to try using the ice as well (the bowl where i mixed the stuff on top of another one with ice in it), I also left the resin and the hardener in the fridge over night and quickly spreaded as soon as mixed with the trowel as suggested by Knotty and Boomyal (2 and 1/2 quarts of gallons of epoxy plus 2 and 1/2 of wood flour).

Thank you all for your inputs and suggestions, quick and effective. To all the newbies living at the tropic and looking for more working time like me: just do the 3 things above and you will have plenty of it!
 

KnottyBuoyz

Senior Chief Petty Officer
Joined
Mar 6, 2006
Messages
712
Re: How to increase Epoxy curing time?

Glad to have helped frastorno. Post some pics of your project if you can. Now it's your turn to pass on some experience when the next newbie comes along! ;-)
 

bigboneli

Seaman Apprentice
Joined
Sep 22, 2007
Messages
31
Re: How to increase Epoxy curing time?

I've used little plastic bowls that the kids cereal comes in (kinda like we used to get the boxes you'de cut open to eat whilst camping ;)

Have used actual Mahogany sawdust with the WS epoxy, and had it (about 3 pumps of each, plus sawdust) actually burn/blow a hole in the side of the container ;)

Seen you had success, that's great...I've never mixed as much as once as I see you were using...This spring though, did see a fellow lose about 300$ of WS in the yard...Was on top of his sailboat, had a BIG bowl of the 2 parts mixed up, then went to add the shredded glass...It blew about everywhere but the bowl...Later, there was a bowl of resin about 5" thick on the ground by his boat, actually broke in the fall .... or toss... :)
 

frastorno

Cadet
Joined
Jul 31, 2007
Messages
23
Re: How to increase Epoxy curing time?

I actually did 1 quart per time, mixed the cold hardener in the big plastic bowl on top of a bigger one with ice and then added the wood flour and mixed again (lot of melted ice!).. the good thing is that you can then easily "peal" the residual of the thickened epoxy out of the bowl and re-use it.. will start posting some pictures ;-)
 

frastorno

Cadet
Joined
Jul 31, 2007
Messages
23
Re: How to increase Epoxy curing time?

Still behind but atleast it's started, in the pictures you have the first layer of wood (balsamo) installed, this weekend I added the 2 lateral supports.
My plan for what's next is:
1 layer of the combined tissue mat/wr
1 layer of woven roving
another layer of wood (like the one in the picture)
than another layer of the combined
and the final woven roving on top of everithing.

Is it ok? any suggestions?
 

Attachments

  • 20-10-07_1735.jpg
    20-10-07_1735.jpg
    41.6 KB · Views: 0
  • 20-10-07_1737.jpg
    20-10-07_1737.jpg
    67.3 KB · Views: 0
  • 20-10-07_1739.jpg
    20-10-07_1739.jpg
    57.6 KB · Views: 0
  • 20-10-07_1741.jpg
    20-10-07_1741.jpg
    71.5 KB · Views: 0

frastorno

Cadet
Joined
Jul 31, 2007
Messages
23
Transom: first layer

Transom: first layer

Slowly but safely! Here is the first wood layer of the transom grinded and ready for the two fiberglass layers ... no feedbacks yet, I guess I'm doing fine.. :rolleyes:
 

Attachments

  • 27-10-07_1339.jpg
    27-10-07_1339.jpg
    70.4 KB · Views: 0
  • 27-10-07_1338.jpg
    27-10-07_1338.jpg
    67.5 KB · Views: 0

KnottyBuoyz

Senior Chief Petty Officer
Joined
Mar 6, 2006
Messages
712
Re: Transom: first layer

Re: Transom: first layer

Slowly but safely! Here is the first wood layer of the transom grinded and ready for the two fiberglass layers ... no feedbacks yet, I guess I'm doing fine.. :rolleyes:
Looks good so far. Make sure our fillets are nice and rounded so your glass tape flows without kinking or having to make any sharp corners. Stagger your layers of tape so you get a good overlap.

Otherwise carry on. We're watching!
icon12.gif
 

frastorno

Cadet
Joined
Jul 31, 2007
Messages
23
Re: How to increase Epoxy curing time?

Thx Knotty! 3 more questions and I'm ready to go:

How big the pieces of woven/mat have to be? Am I supposed to do it in one sigle piece? Would stripes of 1 ft wide from the top to the bottom do the job?

Being a vertical surface do I need to add any filler to the epoxy to make sure it stays on the glass? (only have talc or woodflour here)

Do I still have to put some tape over the corner/fillets or I can go straight with the glass layers even over the corners if fillets are rounded enought?
 

KnottyBuoyz

Senior Chief Petty Officer
Joined
Mar 6, 2006
Messages
712
Re: How to increase Epoxy curing time?

How big the pieces of woven/mat have to be? Am I supposed to do it in one sigle piece? Would stripes of 1 ft wide from the top to the bottom do the job?

I would say 1 piece. The strength that you get from the glass comes from the fibers and when you cut them shorter you'll have to overlap considerably to get that strength back in your part. You're probably going to end up with something that looks like this:

normal_August18%20004.jpg


Notice the wide overlaps from the transom to the hull!

Being a vertical surface do I need to add any filler to the epoxy to make sure it stays on the glass? (only have talc or woodflour here)

Probably not. I think you're using a pretty heavy glass so you don't want anything in your resin that'll inhibit it totally wetting out the glass.

Do I still have to put some tape over the corner/fillets or I can go straight with the glass layers even over the corners if fillets are rounded enought?

I would tape them first. If your main reinforcement is glass roving it's not going to add as much structural strength as you think. Biaxial tapes are best for taping fillets & seams IMHO.

Hope that helps.

Rick
 

frastorno

Cadet
Joined
Jul 31, 2007
Messages
23
Re: How to increase Epoxy curing time?

Ouch.. only one layer! Never fiberglassed such a pice of glass.. well, I guess I can do it.
Was wondering, with epoxy resin: do I have to use 1 layer of woven/mat + 1 layer of woven glass as I'm planning to do or I can go straight with 2 woven layers.. I would save a lot of resin with the 2nd solution.
Thx again for your info Rick, always clear and detailed!
 

KnottyBuoyz

Senior Chief Petty Officer
Joined
Mar 6, 2006
Messages
712
Re: How to increase Epoxy curing time?

I'm just a little unclear when you say "woven" cloth. Is that a woven roving? Very heavy weave? Or you mention woven + mat is that all in one piece?

Woven fabrics aren't quite as strong as a biaxial fabric which have the tows of the fabric running in straight lines (not woven together) and is stitched with a binder to a mat backing. This way your fibers always run in straight lines with no kinks. Can you post a pic of your fabric?

You can do two layers separately if you like. Depending on your epoxy type you'll have a couple of hours before it completely hardens. After it kicks off there's a good period where you can still get a chemical bond as the resin stays "green". You can usually tell if you can push your thumbnail into the resin and it leaves a small impression. This is ok. If you wait a day or so after the first coat you'll have to sand and wipe it down to get a mechanical bond (not quite as good as a chemical bond). Plus it's dirtier! ;-)
 

frastorno

Cadet
Joined
Jul 31, 2007
Messages
23
Fiberglass type

Fiberglass type

I think "woven" was my mistake.. just "roving" is the right name. I'll do a summary with photos of the materials, it may helps other people like me to understand name and uses:

Basically the material I have availiable here are:

  • 24oz Roving: the one I was thinking to use to save some epoxy (instead of fat mat)

  • 24oz Fat Mat: (mat and roving together) the one I was initially thinking of using to ensure proper adherence to the wood

  • Mat: just for poly.. I guess

  • 6oz cloth: my understanding is that it's just for finishing surfaces, not much structural strenght

  • tape: made of 6oz cloth (same material listed above) availiable in 3 and 5inches wide stripes.

You have photos of each material on the bottom, you can refer to the name of the pictures.

Assuming I'm now right on the name, my plan is as follow:

  • apply rounded fillets where needed
  • 3 inch tape in all corners (is 3' enough?)
  • 2 layers of roving ( 1 single pice each with 1 ft extra on bottom and sides)
  • wood (with epoxy+woodflour on the side against the fresh fiberglass)
  • screw everithing against the existing transom (1st layer of wood+hull's transom)
  • 2 more layers of roving

Is this ok?
 

Attachments

  • Roving 24oz.jpg
    Roving 24oz.jpg
    45.1 KB · Views: 0
  • Fatmat 24oz.jpg
    Fatmat 24oz.jpg
    69.6 KB · Views: 0
  • Math.jpg
    Math.jpg
    38.6 KB · Views: 0
  • Cloth 6oz.jpg
    Cloth 6oz.jpg
    70.4 KB · Views: 0
  • tape (cloth).jpg
    tape (cloth).jpg
    71.1 KB · Views: 0

frastorno

Cadet
Joined
Jul 31, 2007
Messages
23
Some progress

Some progress

Ok, I'll keep going with some updates, I finished the transom and starting the stringers... on top of the wood in the picture in the previous post (1st layer) I added two layers of roving (only one piece each!) with +- 1 feet of overlap on borders and bottom. Then I pasted another 3/4 layer of wood on top of the fresh fiberglass with thickened epoxy (wood flour) and let everithing hardner. here are the pictures..
 

Attachments

  • transom 2nd layer  front.jpg
    transom 2nd layer front.jpg
    68.2 KB · Views: 0
  • transom 2nd layer left.jpg
    transom 2nd layer left.jpg
    39 KB · Views: 0
  • transom 2nd layer right.jpg
    transom 2nd layer right.jpg
    66.4 KB · Views: 0

frastorno

Cadet
Joined
Jul 31, 2007
Messages
23
Some more progress

Some more progress

.. during the following weekend I grinded all the fillets and new fiberglass and pasted 5 pieces of fat mat in each corner, one on top of the other (10 in total) to reinforce the corners, some overlap on border, bottom, top and transom wood. In the picture are the clearer part of the transom (the sides) due to all the layer added there.
Then fillets plus tape and added 2 more layers of roving on top off everithing, again, one single peace each layer and same overlapping as the 2 previous layers.
Added epoxy and squeezed it with all kind of tools like creasy that day but still some bubbles here and there, I guess it can't be perfect the first time!
here are the photos.. and I'm done with the transom!:D
(3 gallons of epoxy in total)
 

Attachments

  • finished transom front.jpg
    finished transom front.jpg
    67.8 KB · Views: 0
  • finished transom left.jpg
    finished transom left.jpg
    46.6 KB · Views: 0
  • finished transom right.jpg
    finished transom right.jpg
    39.8 KB · Views: 0
Top