60's/70's Glastron Resto - What did I haul home?

Joined
Aug 12, 2020
Messages
14
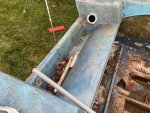
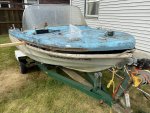
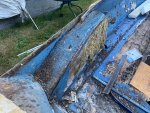
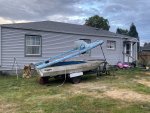
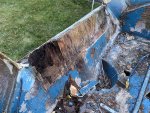
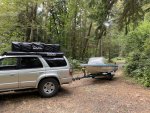
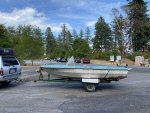
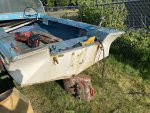
Picked this boat up from my grandpa. It's been sitting at his place on Harstine Island (Washington State) for the past 15-20 years, on the ground, without cover and it shows. It's free and I'd love to get it back on the water. The bottom looks okay, windscreen is intact and should clean up. Will probably need all new wiring and lighting, along with the hardware.

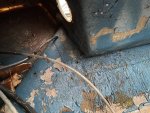
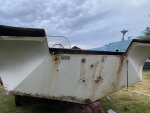
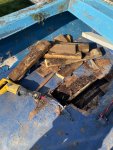
The stringers and floor don't really scare me. The transom, that scares me. Any advice on this project? Should I haul it to the landfill? Is this a waste of time? I've never had a boat, but do a have a little experience with standup jetskis and did some glass work with those.

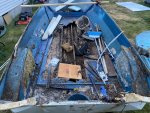
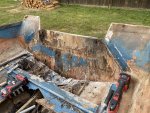
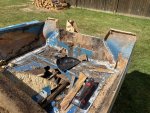
My first order of business is to get the floor completely out and the outer stringers removed and down to nothing. Hoping in that time, I can get a game plan for the transom...
 

Attachments

  • photo337631.jpg
    photo337631.jpg
    2 MB · Views: 3
  • photo337633.jpg
    photo337633.jpg
    1.1 MB · Views: 3
  • photo337634.jpg
    photo337634.jpg
    1.1 MB · Views: 3
  • photo337635.jpg
    photo337635.jpg
    1.2 MB · Views: 3
  • photo337636.jpg
    photo337636.jpg
    1.3 MB · Views: 3
  • photo337637.jpg
    photo337637.jpg
    1.3 MB · Views: 3

GSPLures

Chief Petty Officer
Joined
Sep 3, 2019
Messages
564
I'm doing a resto on a 73 sea ray. This place is a wealth of information as well as some of the most knowledgeable members I have seen. From what I have seen if one piece of wood is bad usually it is all bad.

As for restoration or landfill that is a choice you have to make. Is the boat worth it to you? (Nobody else's opinion matters when it comes to that answer) . If you do restore you will know it was built better than the factory and will outlast how long you want the boat. More than likely you will never recoup the money or time you spend on the boat. With that said you will not get a better built boat for the price of restoration if you do the work.
 

Tassie 1

Chief Petty Officer
Joined
Apr 13, 2018
Messages
582
Was it Grandpa Zero Hecks pride and joy at one stage or was it just left there for storage etc etc?

Either way there's a LOT of work coming whenever the words " free boat " are used,

If it really has little to do with Gramps run...don't walk away.
Even if it does consider doing it anyway.
 

tpenfield

Moderator
Staff member
Joined
Jul 18, 2011
Messages
17,705
Looks early 60's . . .

Easy peasey :D 
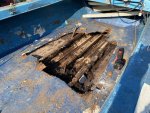
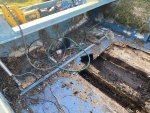
. . . In order to get good access to the transom, you may want to remove the 'cap'. The stringers and the floor should be straight forward, and if you did remove the cap you can easily get access to the stringers all the way forward.

I would add flotation foam during your rebuild, it does not have to be structural, but you don't want to rebuild it as a 'sinker'. Got power / controls/ steering for this boat?
 

vandentr

Petty Officer 3rd Class
Joined
Jul 26, 2010
Messages
88
The key to any of these restorations is taking your time, if you're in a hurry it'll just become a mountain of frustration.

The transom doesn't look any scarier than the stringers.That oscillating saw you have is the ticket to getting the fiberglass skin off of it.

Once that's done it's "just" a matter of chiseling out the wood and firing up the grinder to clean up the glass.

I hate grinding with a passion, and you will too.
 
Joined
Aug 12, 2020
Messages
14
To answer a few questions..

1) I don't think it was his pride and joy, but I do have a memory of being out on the water with him in the boat.

2) I've seen pics and videos of boats with the top off. I didn't think I'd need to, but, even with the limited digging I've done, it might be a good idea. It does have controls, though they'll probably need some maintenance. Also, there was foam under the floor, so I do plan to add that back in. I'm sure it's at least slightly different than what was put in, but I'll figure that out down the road a bit.

3)I had hoped to get this back on the water, this summer, but I'm realizing this will be a longer term project and actually looking forward to digging into some of this stuff.


I've got some more research to do and will be looking to see what it takes to get the cap off and move from there. I'll be starting from the bottom up, so work will start with those stringers. I'll post some updates here shortly.

Thanks everyone!
 

Willyclay

Captain
Joined
Sep 8, 2006
Messages
3,240
Welcome to the forum! The members here are great and can help you with any boat, motor or trailer questions. My first boat was a 1970 Glastron V-153 Ski-Flite that looked very much like yours when I pulled it out of a ditch where Mother Nature was trying to reclaim it. I knew nothing about fiberglass repairs but, fortunately, had a neighbor who did and would work for beer. It was made serviceable for the first summer and just kept getting better during the next ten years we had it. FYI, I have never owned a new boat and have received much pleasure from each of my five project boats. Good luck!
 
Last edited:
Joined
Aug 12, 2020
Messages
14
Writing to you from the comfort of my living room, AC on max! It's supposed to hit 100 today in Western Washington and as of 3:30, I think we're there for sure, lol. Not used to triple digits and all the more reason to keep the stoke and motivation high on this lil glastron. Posting some quick updates, along with a little walkaround video I shot.

1) I got the title. It's a '68 Glastron Skiflite.

2) I got the 25hp Evinrude and boy is it in rough shape. I'm not even really sure if it's something I want to get into. I'll get it off the ground and in a safe place until I have more time to investigate, but as of right now, just planning to find something when the day comes that I actually need a motor. Also will be nice to be on the lookout during the winter when the prices hopefully come back down a little. I'll share some pictures of it down the road.

3) The boat has made it to it's long term home in my backyard. So things should begin to progress. As suggested, I will be taking the cap off. Makes way more sense, thank you for the suggestion. I'm tracking down a tyvek suit and a respirator this week for once I get myself to the grinding everyone speaks so highly of.

4) Walkaround video. Ignore all the random stuff in the backyard, since I know I'm the only one with a messy backyard, haha.


sphelps

Supreme Mariner
Joined
Nov 16, 2011
Messages
11,435
Cool Glaston ! Should be a fairly easy restoration .. After the grinding that is Lol !
A nice vintage merc would look great on there ..
Welcome aboard !
 
Joined
Aug 12, 2020
Messages
14
Cap Removal Update

So removing the cap went super easy, until the very last 3 feet or so. So in this first pic, you can see the rear tray where the motor will go. The problem I'm having is the area touching the transom appears to have been glassed in.
fetch


After looking at a few photos from the underside, it may just be glassed in along the edges, but wondering if anyone has any advice? I'm going to pick up a rounded "blade" for my multi-tool and see if I can cut through it, but wondering if trying to peel back the edges of the fiberglass is the safer bet? I won't be able to get to it for a few days, so if anyone has anything, let me know. Otherwise, cap is nearly removed, getting excited!

fetch


fetch
 

Attachments

  • photo337970.jpg
    photo337970.jpg
    1.3 MB · Views: 2
  • photo337971.jpg
    photo337971.jpg
    1.1 MB · Views: 2
  • photo337972.jpg
    photo337972.jpg
    1.6 MB · Views: 2

Original Thor

Seaman
Joined
Jun 11, 2020
Messages
61
I ran into the same thing on my glastron and what I did was cut straight into the transom to remove the old tabbing. Then ran my multi tool up as high as a could then took a flat bar and beat it up there a few times and it finally let go.

I couldn't believe how well it was on there. It took probably about a hour to accomplish and a couple of beer. Once the cap was off it took two cuts on either side of the transom and in 5 minutes its was out. Lol
 

racerone

Supreme Mariner
Joined
Dec 28, 2013
Messages
36,287
You may have to build a support / jig of some type for the hull.-----This thing may twist when every thing is cut out of the hull.-----When you glass in new composite material you want it to cure and keep the true shape of the hull.------And if you remember using it with granpa you have to fix it !!!
 
Joined
Aug 12, 2020
Messages
14
I ran into the same thing on my glastron and what I did was cut straight into the transom to remove the old tabbing. Then ran my multi tool up as high as a could then took a flat bar and beat it up there a few times and it finally let go.

I couldn't believe how well it was on there. It took probably about a hour to accomplish and a couple of beer. Once the cap was off it took two cuts on either side of the transom and in 5 minutes its was out. Lol

That makes sense. I'll give that a go this evening if the weather has cooled down a bit, I think we're good on beers too, lol.


racerone - I do need to do something, I didn't think I would worry about it too much, but looking at it today, it bulges out a bit with the cap off. I've taken some measurements and will figure something out. I guess it wouldn't be too difficult to at least put a couple of braces on either side. Thanks!
 
Joined
Aug 12, 2020
Messages
14
It's been a few days, but I haven't given up. I took the advice from Original Thor and started working at the transom from the inside, broke away the wood and then lifted up the front of the cap and was able to break it free. FINALLY!!! I was hoping for an hour, was probably into it two over the course of three days.
So, now the fun stuff right? I've got all the PPE on order, but of course the filters for my respirator are like 1-2 weeks out, damn you covid! While I wait for that stuff to show up, I'm going to shore up the hull somehow and dial that in. Also going to setup a dust trap for my vacuum to save on filters. Ummmm, yeah, that's my update for now. Still in this, still motivated! Here are some pictures I took today.
Oh, one question, on those boxes in the back corners, they were left with the tops open from the factory. Is that something I should seal now? Similar to what the floors will be, filled with 2 part foam, etc...

fetch

fetch

fetch

fetch

fetch

fetch
 

Attachments

  • photo338160.jpg
    photo338160.jpg
    1 MB · Views: 3
  • photo338161.jpg
    photo338161.jpg
    1.3 MB · Views: 2
  • photo338162.jpg
    photo338162.jpg
    1.4 MB · Views: 3
  • photo338163.jpg
    photo338163.jpg
    1.4 MB · Views: 3
  • photo338164.jpg
    photo338164.jpg
    1.5 MB · Views: 3
  • photo338165.jpg
    photo338165.jpg
    1.6 MB · Views: 3

sphelps

Supreme Mariner
Joined
Nov 16, 2011
Messages
11,435
Congrats on the successful de-cap !
Yep if it was me I would seal the boxes up after new foam .
Just make sure when you rebuild that it’s low enough so it don’t
interfere with with the cap going back on
 
Joined
Aug 12, 2020
Messages
14
Congrats on the successful de-cap !
Yep if it was me I would seal the boxes up after new foam .
Just make sure when you rebuild that it’s low enough so it don’t
interfere with with the cap going back on

Awesome, I'm going to take some measurements, but also try to deconstruct them intact so I can more or less use them as templates. I was toying with the idea of turning them into small storage compartments, but I don't need to add complexity to my first project and I'm assuming if the foam was there to begin with, it's probably worth having the same amount once it's rebuilt, heh.
Thanks for the feedback :)
 
Joined
Aug 12, 2020
Messages
14
Hey everyone! I'm back! It's been a whole three days, I know y'all were waiting. I feel like I might just do these updates to keep the stoke alive and to keep me moving.
So what's new? Well, the transom is up first, so I've been working at getting access to all sides of it before digging in. I obviously had hoped it would come out in one piece, but it quickly became clear that wouldn't be an option.
But first, I made a DIY cyclone dust collector. From the videos and pictures I've seen of the grinding ahead, I wanted to try and take it easy on the ole vacuum and also make it easy to dispose of the ensuing dust storm. So I googled cyclone collectors and found a video and made it. Was about $40 and it seems to be working well. Basically all the dust and debris will go into the buckets instead of the vacuum.
fetch


Up next. I removed the boxes to the rear. The starboard one came out mostly intact and I'll be able to use that for measurements once I get to rebuilding them. I will use the advice posted to seal them as they were pretty waterlogged at the bottom. Silly design. The Milwaukee Multi-tool I picked up a few months ago has been HUGE in working through these cuts.
fetch


Up next was removing the floor and stringers connected to the transom. I used the multi-tool, hammer and crow bar to chip away at it and eventually got it mostly clear.
fetch


Then, I couldn't help myself but to start attacking the transom. It was very waterlogged, so, good thing I decided to just do it all. I got a ways into it, but other aspects of life are calling at me and I need to remember not to get overwhelmed or too far ahead of myself. So I put the tools away and will get back at it when I can.
fetch


So, what's next? I need to get all of the transom removed. I took some measurements and shouldn't have any issues recreating the exact size. The cool thing is the hull is pretty simple in the back and should be pretty easy to get dialed in with some cardboard before going into double thick 3/4" wood. Looks like I need to get some resin ordered. My plan is to get the transom glassed in before grinding out the stringers. If anyone is reading this, is that fine? The grind out the floor and stringers and front portion.
 

Attachments

  • photo338435.jpg
    photo338435.jpg
    1.8 MB · Views: 3
  • photo338436.jpg
    photo338436.jpg
    1.9 MB · Views: 3
  • photo338437.jpg
    photo338437.jpg
    2 MB · Views: 3
  • photo338438.jpg
    photo338438.jpg
    2 MB · Views: 3

GSPLures

Chief Petty Officer
Joined
Sep 3, 2019
Messages
564
Nice job! That is what I am doing with my restore, I cut the stringers about 12" back from the transom cut the skin out then used a pry bar, hammer, and oscillating tool with a scraper to remove all the wood (lucky for me one good sneeze and most of the wood fell out).

After lots of grinding to clean everything up I am installing the transom and then removing and
replacing one stringer at a time.
 
Top