73 Sea Ray restoration

GSPLures

Chief Petty Officer
Joined
Sep 3, 2019
Messages
564
Go for it! Pics Pics Pics.

Thank you for the encouragement! Every part of me keeps saying to call in a dumpster and fire up the chainsaw but on the other side I know eventually it will start looking better.

Tomorrow I plan on tearing the rest of the floor and foam out from under the enclosed bow (not looking forward to that) then I plan on cutting the stringers back away from the transom and getting all the old wood out. Once that is done I will deal with the crack in the hull.
 

GSPLures

Chief Petty Officer
Joined
Sep 3, 2019
Messages
564
Looking at the layout of the stringers and bulkheads they seem to me to be inadequate. The Yellow lines are pieces of 2x4 that went across the stringers to support where the floor ended. It looks like at some point the previous owner moved it back because there are 2 of these behind the bulkhead for the ski locker. The green line is the location of my front motor mount. There may be some more forward of the seat reinforcements but i do not have that part of the floor out yet.
Boat Blue Prints.jpg
I plan on moving the side braces back and making one solid bulkhead that will span the width of the boat where the ski locker ends. Adding some more side braces to stiffen up the floor and give a little more strength to the stringers. I plan on also making the front bulkhead span from side to side at the front of the ski locker. Here is my lay out so far.
Boat Blue Prints New.jpg
Is there any reason that this would be a bad idea? Or possibly a layout that would be better?
 

GSPLures

Chief Petty Officer
Joined
Sep 3, 2019
Messages
564
make alowances for your fuel tank if it is inder floor.

I thought originally the previous owner moved the tank above deck but came across a guy that has the same boat but 1 model year earlier that has the fuel tank in the same position on top of the floor under the enclosed bow.
 

GSPLures

Chief Petty Officer
Joined
Sep 3, 2019
Messages
564
I haven't got the chance to tear out the floor yet I had some things to do around the house (gotta keep the captain happy). The crack in my hull is because of weak bunks and bad stringers so I jacked the boat up and slid in some 2x6x10's over the existing bunks. I noticed where the bunk sagged the hull sagged and so far this seems to have corrected the issue. Once I had them in place i used some decking screws to hold the new wood to the bunk.

This is only temporary until I get my stringers redone then I will be rehabbing the trailer. With that said is there any issues from doing this? I also plan on adding some more reinforcement around the boat to keep its shape.

20200818_160450_compress9.jpg20200818_160523_compress45.jpg These are pictures of each side.
 

kcassells

Fleet Admiral
Joined
Oct 16, 2012
Messages
8,596
Nope! Not at all. You are a great animal instinct rehabber! Obviously you will need to reinforce that area inside and make
the repairs on the outside.
 

GSPLures

Chief Petty Officer
Joined
Sep 3, 2019
Messages
564
Nope! Not at all. You are a great animal instinct rehabber! Obviously you will need to reinforce that area inside and make
the repairs on the outside.

Thank you. The way I planned on fixing the crack is in post #15. I got that from doing a search on hull repair. I was going to fix the inside continue with the transom and stringers then once completed repair the crack on the outside.
 

GSPLures

Chief Petty Officer
Joined
Sep 3, 2019
Messages
564
Last night I did some more demo under the enclosed bow. What a nightmare! I wasnt sure what was under the floor there so I am slowly tunneling my way through the center. To my surprise there is nothing but foam. Where the floor angled was 2 blocks stapled to the underside of the floor and resting on nothing.

I thought the stringers would atleast be taller to make contact with the floor but not even close. They are about 6 inches below the floor and not even glassed.

I am about half way through the center and not looking forward to the rest.
20200818_181303_compress62.jpg20200818_181329_compress32.jpg
20200818_181345_compress15.jpg
 

GSPLures

Chief Petty Officer
Joined
Sep 3, 2019
Messages
564
Well I got the rest of the bow gutted. Removing foam sucks! It still needs cleaning up but now I feel more accomplished.

For what it's worth using a 4in grinder with a cupped wire wheel made removal of the foam easier but man what a mess. I wish I remember what thread I read it on so I can give a proper thank you!
20200819_135730_compress26.jpg
 

KJM

Lieutenant Junior Grade
Joined
Jul 31, 2016
Messages
1,188
I recently removed my foam. I started with a pocket knife, quickly moved to a machette and finally found that an ice chopper worked best! The machette worked good for scraping the remainders off the fiberglass. Just about finished the new transom on my boat and now thinking about new stringers and floor. Used coosa for the transom and probably for the stringers too but its too expensive to do the floor with it too. I'm doing an experiment today on a sheet of polyisocyanate foam for strength but i'm a bit doubtful. Its a bit discouraging when you first start tearing everything out but once that is done you have a clean slate to make it the way you want it to be and it gets more enjoyable. keep up the good work. The advice you get here is priceless.
 

GSPLures

Chief Petty Officer
Joined
Sep 3, 2019
Messages
564
I recently removed my foam. I started with a pocket knife, quickly moved to a machette and finally found that an ice chopper worked best! The machette worked good for scraping the remainders off the fiberglass. Just about finished the new transom on my boat and now thinking about new stringers and floor. Used coosa for the transom and probably for the stringers too but its too expensive to do the floor with it too. I'm doing an experiment today on a sheet of polyisocyanate foam for strength but i'm a bit doubtful. Its a bit discouraging when you first start tearing everything out but once that is done you have a clean slate to make it the way you want it to be and it gets more enjoyable. keep up the good work. The advice you get here is priceless.

Yeah I was using a pry bar and a hammer to get most of it out then to get to clean hull the grinder with a wire wheel works wonders but super messy as it turns it to powder. I have 3 weeks off right now the one benefit to working in the auto industry. Tomorrow my plan is to cut the stringers about 12" back and gutting the transom wood then get it prepped for the new wood. After I will be doing 1 stringer at a time unfortunately I do not have the room for a cradle and do not want to take chances
 

GSPLures

Chief Petty Officer
Joined
Sep 3, 2019
Messages
564
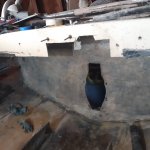
I got the transom wood out today and ground down most of the lips down until smooth. I do have a few questions that I am hoping someone can clear up for me.

The bilge area is about 1/4in thick can I just bevel these edges and when I put the stringers back fillet then glass as normal or does this whole area need to be ground down to the hull.
20200820_163946_compress21.jpg

I did a little bit of grinding of the outer transom skin but I am not seeing pink glass it is a grayish color but I can see strands of CSM in the glass. Am I just not grinding enough or are some boats just different colors of resin?
 

kcassells

Fleet Admiral
Joined
Oct 16, 2012
Messages
8,596
Looks like you have some wood structure creating that raised area under the glass. I would talke all that out then see where
you have to go. it's rotted. Uhhh sorry.
 

GSPLures

Chief Petty Officer
Joined
Sep 3, 2019
Messages
564
Looks like you have some wood structure creating that raised area under the glass. I would talke all that out then see where
you have to go. it's rotted. Uhhh sorry.

Good eye! I feel dumb, I didn't even notice that in the picture or the boat. I was covered in fiberglass and took the picture and ran off to the shower. I guess tomorrow I have some more cutting to do before I finish grinding. Thank you for catching that.
 

GSPLures

Chief Petty Officer
Joined
Sep 3, 2019
Messages
564
Well I am back to grinding away at the transom :facepalm:. I thought the foam removal sucked. I ground the bilge area first. It turns out there is no wood under it. The piece of wood in the picture was a part of the stringer that I didnt dig out from under the lip I beveled about an inch back to make sure that it was only glass and I hit hull. I have it beveled nice and smooth so now I am working on grinding the area for tabbing and then the rest of the hull. I will post pictures later.
 

GSPLures

Chief Petty Officer
Joined
Sep 3, 2019
Messages
564
Well after alot of grinding and a shower I am left with this. I tried to hit all pink but for some reason I cannot. A few of the darker areas I purposely gouged with the grinder to see if I could get down to pink and it was still a darker color (I will be filling these areas with pb so I have a smooth surface). Every part is down to good solid glass so I think I will consider this part done. I also grinded around the sides bottom top about 8in for my tabbing. At some point somebody laid a couple layers of roving over the hull I got down until it was all solid and smooth.
20200821_132302_compress42.jpg
 
Top