(Somewhat) New to boating, New to the forum.

sphelps

Supreme Mariner
Joined
Nov 16, 2011
Messages
11,432
I’ve never used vinylester so not sure how it acts .. Sounds like you have worked out ..
Cover with plastic if laying up in the late evening maybe ? I would follow Teds lead on it..
 

das_army_life_yah

Petty Officer 2nd Class
Joined
Apr 3, 2020
Messages
122
sphelps Im definitely starting to wish I would have gone with vinylester for everything instead of just the exterior. Stuff is turning out to be pretty easy to work with and still much cheaper than epoxy. I’m thinking of just covering everything up with wax paper. Easier to remove in the morning and helps cure as well.
 

das_army_life_yah

Petty Officer 2nd Class
Joined
Apr 3, 2020
Messages
122
Made some more progress before I made a whoopsie daisy. Had about 4 oz of resin ready to go, was reaching over to grab the CSM and start cutting pieces out, and managed to spill the resin all over my pants and my shoe. Needless to say, I took it as a sign from the boat gods that it was time to call it quits for the day. Got a decent bit done. I’d say I’m about 1/3 to 1/2 the way through building the blisters back up. Gonna do my best to hammer out the rest tomorrow, but idk if that’s gonna happen. Lol. It’s a decent pain with the wind blowing my cut-outs all over. I’d tape it, but the CSM is a bit too thin and it just tears the crap out of it. Oh well. Patience is a fine skill I’ve picked up with this project. Lol.
 

Attachments

  • photo337032.jpg
    photo337032.jpg
    522.2 KB · Views: 0

tpenfield

Moderator
Staff member
Joined
Jul 18, 2011
Messages
17,698
I used VE resin on my structural repairs and to build my swim platform. It seems like the prices went up in the past 1-2 years. I was paying upwards of $60/gallon at one point . . . not sure what it is now or how it compares to poly resin.

The worst part about VE is the fumes are like chemical warfare :eek: So, a chemical respirator is a must if working in enclosed spaces within a boat. VE has adhesion and water resistant qualities similar to epoxy, so many of the high-end builders use it instead of poly, yet you can still use a poly gelcoat with good results.
 

archbuilder

Vice Admiral
Joined
Sep 12, 2009
Messages
5,697
Looks like you are making good progress. If you don't have patience when you start a boat project.....you will if you get it done lol!
 

das_army_life_yah

Petty Officer 2nd Class
Joined
Apr 3, 2020
Messages
122
tpenfield ya it’s not super cheap. The place near me is around $85/gal for VE. Poly is like $172/5gal. I’ve been working outside so I haven’t really been wearing the respirator, mainly bc mine has a busted strap. I just get the MEKP ready, and then throw it in while I’m in the garage and run outside and mix it. Been holding it downwind of me while I’m working so I don’t get gassed out. Lol. Definitely liking the working time and it doesn’t seem to heat up as it kicks like poly does.

archbuilder Aint it the truth. This project has definitely made a difference in how much tolerance/patience I have for my toddlers now. LOL.
 

das_army_life_yah

Petty Officer 2nd Class
Joined
Apr 3, 2020
Messages
122
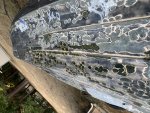
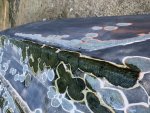
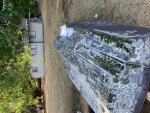
Well I’m not moving as fast I’d like to be, but any progress is still progress. LOL. The wind is making my life a nightmare right now and work isn’t helping either. Still, I’m almost done with one side now after deciding to hit the larger, less tedious areas first. I’m also almost 3/4 gallon into my VE resin. I forgot how much resin CSM can soak up. LOL. The one area that was a decent pain in the rear was the outer edges of the hull. I laid a thin layer of resin and let it start gelling up a bit, then wet out the glass and laid it down so it’d be a bit more willing to stick for me. Seems to have worked ok.

I have noticed a few spots where I can see a some air bubbles, mainly around the edges of the fresh glass. Even soaking the crap out of it with resin and filling in the deeper pits, it just didn’t want to lay down on the edges in some spots. I’m thinking it should be fine to just sand out the air bubbles and then fill them in with fairing compound. My reasoning is that the strength is already there from the new layup, so sanding a few bubbles out shouldn’t weaken it by any large amount. What do you guys think?
 

Attachments

  • photo337351.jpg
    photo337351.jpg
    421.3 KB · Views: 0
  • photo337352.jpg
    photo337352.jpg
    547.6 KB · Views: 0

tpenfield

Moderator
Staff member
Joined
Jul 18, 2011
Messages
17,698
Filling in a few air pockets here and there would not be a problem. You can use a small piece of clear plastic drop cloth to hold the glass tight to corners while curing.

Also, with the amount of grinding you did I suspect you will have an uneven surface and probably require a filler layer to fair smooth before you go to a gelcoat layer. Not sure you have covered that in your postings, but wanted to mention it . . .
 

das_army_life_yah

Petty Officer 2nd Class
Joined
Apr 3, 2020
Messages
122
tpenfield Ya that’s what I planned on. Once all this stuff gets laid up and cures for about a week in the sun, I’m going to sand all of the patches with 60-grit to get the shine off and whatnot. Planned to remove the bubbles as well. I got a ton of fairing compound for the job. Lol
 

kcassells

Fleet Admiral
Joined
Oct 16, 2012
Messages
8,596
Well thats alot of work you have going on their! You are doing great by the way.
Some days just feel like this;

20-of-the-funniest-boat-name-fails-ever.jpg
 

tpenfield

Moderator
Staff member
Joined
Jul 18, 2011
Messages
17,698
Just be sure to use a fairing/filler compound that is spec'd for below the waterline. Many fillers are not . . .
 

das_army_life_yah

Petty Officer 2nd Class
Joined
Apr 3, 2020
Messages
122
tpenfield For sure. I chose to go with Alexseal for paint. I’m using their whole system (primer, fairing compound, etc.). From everything I’ve read, the stuff is almost bullet-proof. LOL. I know for sure that the primer is epoxy-based, so everything should get sealed up pretty well. That, and she’s gonna be a trailer queen.

kcassells That pic had me rolling. LOL. I swear that’s truth sometimes. I felt the same way when I was grinding. Seemed like the work would never end and that I wasn’t going anywhere. That’s why I like taking a ton of pics. Helps pick me to pick myself up and dust myself off when I feel like I’m going nowhere. I know I’ll feel this same way when I’m on my second or third pass with the fairing compound. LOL.

So, I’m finally nearing the finish line of part 1 in the blister repairs. I think I got maybe an afternoon or two left before I get it all patched in. After that, it’s getting sprayed down with some PVA and I’m gonna let it cook in the sun for about a week before I start sanding everything. I’m happy the majority of the glass work I have left after this is just the deck, transom, and core. Big layups are looking like heaven after doing this all week. LOL.
 

Attachments

  • photo337478.jpg
    photo337478.jpg
    499.3 KB · Views: 0
  • photo337479.jpg
    photo337479.jpg
    552.8 KB · Views: 0

sphelps

Supreme Mariner
Joined
Nov 16, 2011
Messages
11,432
Ehh , it’s just that the original ones were so much more sturdy and had flip out vent section in the middle . My brother was not paying attention years ago with the tide coming in and got the boat hung under the dock and destroyed the original ..
 

das_army_life_yah

Petty Officer 2nd Class
Joined
Apr 3, 2020
Messages
122
sphelps That sucks. What’s the year/make/model? I’ll take a peek in my area and see what they got around. I’m in a land of boats out here in WA. Lol
 

sphelps

Supreme Mariner
Joined
Nov 16, 2011
Messages
11,432
Yes it does ..The vent in the middle may have been replaced with plastic .. Just looks different .
I think it’s in Detroit area .. Nice Westfield ! The only thing that is wood structurally that’s in that boat is the transom ..
‘The floor and stringers are all fiberglass ..
 
Top