(Somewhat) New to boating, New to the forum.

das_army_life_yah

Petty Officer 2nd Class
Joined
Apr 3, 2020
Messages
122
Hey everyone! I'm somewhat new to boating and brand new to the forum, so I figured I'd introduce myself and get to know some of you guys. I apologize in advance for the long-winded post, but I am very excited about what I've got myself into.

I'm active-duty Army, recently stationed in Washington state. I have been serving for about 4.5 years. I love everything to do with the great outdoors, so I really appreciate the Army stationing me in such a beautiful place. I am not entirely new to boating, I've just never owned a "real" boat. I have owned many kayaks, my current one being a 12' fishing kayak. The only down-side of the thing is that I can't fit my wife and kids on it.

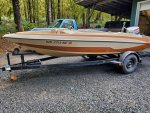
I have combined-type adult ADHD, so I am constantly seeking projects to expend my energy on. I decided to find something I could fix up over time, eventually getting to a point that my family could enjoy it. So, I started scouring craigslist for something that fits my needs. After days of searching, I finally found something that piqued my interest. It was an ad for a 1979 Glastron SSV-167 with a trailer for $600. After contacting the gentleman, I learned that he had the titles for both the boat and the trailer with tags that are current through June 2020. These were the major things I had been looking for in the ads.

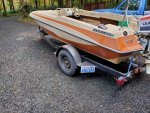
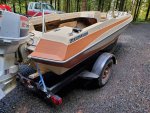
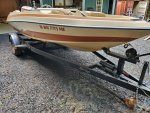
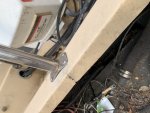
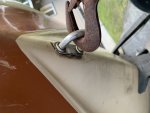
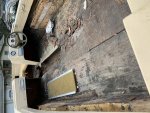
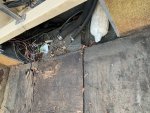
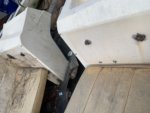
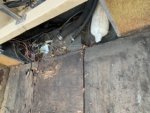
From the pictures, the exterior of the hull looked to be in phenomenal shape. The paint looked as if it was just painted. The interior is where it gets to be more of a "fixer-upper." The carpet had been removed, exposing severe rot in the flooring with the plyboard missing in places. I'm assuming that the missing material is from someone inspecting the stringers and such. There were no seats or mounts except for some severely weathered cushions in the bow-rider portion of the boat. Seeing all of this, my heart sank. I knew it was going to cost way more to fix up than the boat was worth. There turned out to be a silver lining in the ad that I had yet to see.

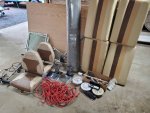
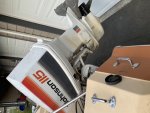
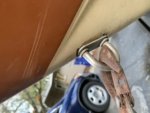
Though it hadn't been ran in two years, there was a 115HP Johnson SeaHorse strapped to the back. All the gauges, wiring, and controls were still intact. Further reading revealed that the gentleman was also including brand-new captain/co-captains chairs and swivel mounts, multiple sheets of marine-grade plyboard, new marine carpeting, all necessary beacons/lights, marine-grade speakers and stereo, new glass for the windscreen, and a trolling motor. It all seemed way too good to be true, but I pressed on.

I met up with the gentleman to take a look at the boat. The registration was current and the titles were in his name and matched the numbers on the trailer and boat. The outer hull was indeed in spectacular shape, but as I expected it was going to need the entire interior redone, stringers/core rebuilt, and new ply for the transom. Aside from tires, the trailer was in decent shape overall with the lighting and everything working as it should. Everything that he listed as being included in the sale was all there, and was indeed being included. It was just as he stated on the phone and in the ad. I began thinking, "What's the catch?" It turns out that he has had the boat for nearly 10 years. He had purchased much of what he needed to get it all repaired, in hopes of restoring it to usable condition. He said that he was nearing retirement and that at his age, he didn't see himself ever getting around to it. He got tired of it taking up space in his barn and decided to put it up for sale.

I wound up purchasing the whole lot for $500. With everything that was included, I figured I got a spectacular deal and a big head-start on a very work-intensive project.
 

JASinIL2006

Vice Admiral
Joined
Feb 10, 2012
Messages
5,545
Sounds like you have a project ahead of you! You came to the right place for help with a restoration. If you haven’t looked yet, you should search here in the Resto forum for similar or identical boats. You might get lucky and find some detailed descriptions that can guide you.

Welcome!
 

das_army_life_yah

Petty Officer 2nd Class
Joined
Apr 3, 2020
Messages
122
Since I didn't want to make a long post even longer, I decided to put my plans going forward in a separate box. I have been doing a ton of research since I started looking for a boat and I am dying to get started. I am a highly-driven person when I get into something and have a tendency to tackle projects with a force. So, I plan on tackling some big tasks this weekend.

I'm going to be removing the motor, rub rail, and cap and putting them aside. After those are out of the way, I'm going to attempt to rip out all of the old flooring, cap supports, core, etc. I plan on taking very thorough measurements and notes about the layout. If they aren't rotted through, I'm going to try to keep the old stringers and transom intact so I can use them as a stencil for the new ones. After this, I plan on giving the entire inside of the hull a light pressure-washing to clean it up. If I have enough time left over this weekend and the hull is dry, I plan on removing all of the old resin from where the core and transom were and prepping the surfaces for the new material.

Throughout the next week, I plan on mocking up the new core and transom with foam board while I wait for the new fuel tank and my fiberglass materials to get here. I have the tank measurements already, so I'm going to modify the layout of everything as necessary to ensure it fits when it gets here. I'm hoping to get the mock-up as close to perfect as I can so I can use the foam to stencil everything out onto the plyboard. I figured that doing this would get me pretty close to what I needed, and that I could just make small tweaks as necessary to the wood when I go to mock it up and seat it.

My goal is to be able to cut out the new core pieces and transom next weekend and to get the wood pre-treated with laminating resin. I'm hoping that at the very least, I can get the new ply on the transom by the end of next weekend and get the core seated and tabbed in throughout the week.

Ideally, I would love to be able to get this thing in the water by the 4th of July. REALISTICALLY, I know that this is a very lofty goal given some of the cure times of resin, foam, and whatnot. Thing is, if I set the bar extremely high I will be more determined to meet my goals and will dedicate much more time to the project.

I would love your guys' feedback. If there's a better order to things done in or any pointers you may have for me, I would love your input. It is my goal to tackle this efficiently and get it done right the first time. I don't want to scar my kids on its maiden voyage and make their first time on a boat their last time on one as well. LOL
 

kcassells

Fleet Admiral
Joined
Oct 16, 2012
Messages
8,600
All good their it looks likd. So the next part as you do the demo is start posting pics...lots. When you decap have a frame built around the hull to keep its shape.
 

das_army_life_yah

Petty Officer 2nd Class
Joined
Apr 3, 2020
Messages
122
Kcassells, do you think I can just cut some 2x4’s to the inner hull’s width and just brace the sides of the hull from the inside before I lift the cap?

Also, I got a bit of an update. I took out some of the flooring in the midline and gave the stringers a real good knock from the bow towards the stern. I got to about 4’ from the rear, just before I got to the fuel tank. The stringers sound like they’re good, They give a nice firm knock, not dull or “echoey” in any way. I also didn’t see any breaks in the fiberglass they used to seat them, but I’m only looking at the inner sides of the stringers. The transom also seems very firm. Knocked around all holes and worked it over good, had a nice clean knock. I’m gonna pull the motor and drain when I get the chance to see if I notice any rot or moisture in the holes.

If the last 4 feet of the stringers towards the stern are the only pieces that are bad, you think it’d be ok to just find where the good wood starts and just cut out and patch in those sections, like a partial replacement? Anything negative that can come of it? Same question again for the transom, only if the bottom half is starting to rot. I couldn’t realistically see just half of them rotted, but still.
 

kcassells

Fleet Admiral
Joined
Oct 16, 2012
Messages
8,600
You can leave the boat on the trailer and build a cradle on the outside around the hull for support. Go to the top and go over the "stickys" good read.
 

das_army_life_yah

Petty Officer 2nd Class
Joined
Apr 3, 2020
Messages
122
Kcassells, what about the strings and transom? Is partial replacement of either a good idea?
 

das_army_life_yah

Petty Officer 2nd Class
Joined
Apr 3, 2020
Messages
122
[No message]
 

Attachments

  • photo327401.jpg
    photo327401.jpg
    76.3 KB · Views: 1
  • photo327402.jpg
    photo327402.jpg
    64.6 KB · Views: 1
  • photo327403.jpg
    photo327403.jpg
    42.1 KB · Views: 1
  • photo327404.jpg
    photo327404.jpg
    259.1 KB · Views: 1
  • photo327405.jpg
    photo327405.jpg
    289.2 KB · Views: 1

das_army_life_yah

Petty Officer 2nd Class
Joined
Apr 3, 2020
Messages
122
[No message]
 

Attachments

  • photo327406.jpg
    photo327406.jpg
    102.1 KB · Views: 1
  • photo327407.jpg
    photo327407.jpg
    97.4 KB · Views: 1
  • photo327408.jpg
    photo327408.jpg
    71 KB · Views: 1
  • photo327409.jpg
    photo327409.jpg
    97.3 KB · Views: 1
  • photo327410.jpg
    photo327410.jpg
    72.3 KB · Views: 1
  • photo327411.jpg
    photo327411.jpg
    70 KB · Views: 1
  • photo327412.jpg
    photo327412.jpg
    139.2 KB · Views: 1
  • photo327413.jpg
    photo327413.jpg
    100 KB · Views: 1
  • photo327414.jpg
    photo327414.jpg
    147.7 KB · Views: 1

das_army_life_yah

Petty Officer 2nd Class
Joined
Apr 3, 2020
Messages
122
[No message]
 

Attachments

  • photo327416.jpg
    photo327416.jpg
    20.5 KB · Views: 1
  • photo327417.jpg
    photo327417.jpg
    21.7 KB · Views: 1
  • photo327418.jpg
    photo327418.jpg
    32.3 KB · Views: 1
  • photo327419.jpg
    photo327419.jpg
    23.7 KB · Views: 1
  • photo327420.jpg
    photo327420.jpg
    32.4 KB · Views: 1

sphelps

Supreme Mariner
Joined
Nov 16, 2011
Messages
11,435
First thing is THANK YOU ! So very much for your service ! Yes your in need of a gut job on the structure but all in all as long as the motor is a runner I think you did ok on the purchase ...
While the top is off and the floor is out . Drill some holes down low on the stringers and transom . Don’t go all the way through your hull though . LOL!
Look at the shavings for anything wet or dark and mushy ... My bet is your gunna need to go ahead and replace all the stringers and transom .. There’s no way to do a have transom replacement . That’s a big heavy motor and I wouldn’t take the chance with just a patch .
 

das_army_life_yah

Petty Officer 2nd Class
Joined
Apr 3, 2020
Messages
122
Sphelps thanks for your support. Without the Army I would have never been able to even dream of doing something like this. As well as removing the rotted flooring, I planned on removing the motor tomorrow for a short time to inspect and feel around the mounting holes in the transom for any rot. If they look good, I’ll go ahead and drill some holes to see how it’s looking. I was planning on drilling into the stringers anyways. Gotta get full access before I can do anything. I pray that the stringers and transom were sealed up tight and are still in great shape. Knock on wood (pun intended). It would make this whole project a ton easier.
 

kcassells

Fleet Admiral
Joined
Oct 16, 2012
Messages
8,600
Oy yea...go up top again and search " glastron" on the forum. You'll be able to back to other peoples rehabs. Search, read, ask, pics.
Look on you tube for vids.
 

das_army_life_yah

Petty Officer 2nd Class
Joined
Apr 3, 2020
Messages
122
Oy yea...go up top again and search " glastron" on the forum. You'll be able to back to other peoples rehabs. Search, read, ask, pics.
Look on you tube for vids.

Kcassells I actually joined another forum dedicated to classic Glastrons and found someone who rehab’d the exact same boat, it just a had a different outboard. I’m gonna use his build as a bit of a step-by-step guide. I’ve also learned so much from YouTube and this forum already that I feel as though I can tackle this thing with my eyes closed. I’ve focused on learning as much as possible about the differences between types of fiberglass and resins, how to replace stringers/bulkheads/transoms/flooring, and fixing damage to the exterior of the hull. I figured since my current goal is to fix all the rot/damage and get the flooring down, that these were the primary things to focus on.

I also got a bit of an update on the project. I decided that even if the stringers seem to be structurally sound after drilling, I’m just going to replace them. I figured it’s better to know they’re going to last than to risk its. I am a very tedious person, so I’m sure if I redo them myself that they’re gonna last a very long time.

I had so much going on today that I didn’t get started on the boat project until around 6 in the evening. I managed to build the motor stand from the DIY section for all of $45 and it looks awesome. I have to wait until Monday to remove the motor though. I don’t have an engine hoist nor do I know anyone who has one. I plan on getting a cheap 1-ton from harbor freight on Monday. Since I’m not gonna use it all the time I figure it should last me a while.

For tomorrow, I plan on removing the rub rail and any of the flooring/foam I can get to since I can’t remove the cap. I’m going to do my best to rip as much of the stringers out that I have access to and get the hull smoothed out. If I have the time, I also plan on separating as much of the cap from the bottom that I can with the motor still attached. I’m hoping to get the hoist first thing on Monday so I can get the cap propped up and start tearing out the old transom.
 

Attachments

  • photo327464.jpg
    photo327464.jpg
    345.4 KB · Views: 0

das_army_life_yah

Petty Officer 2nd Class
Joined
Apr 3, 2020
Messages
122
Side note, can you guys see the pictures I’m posting? I’m uploading them straight from my iPhone so idk if they’re showing up right or at all.
 

das_army_life_yah

Petty Officer 2nd Class
Joined
Apr 3, 2020
Messages
122
So I got a couple questions for you guys. I've scoured the forums and youtube for hours searching for information regarding a few of my questions, but I'm getting a bit confused because everybody seems to have a different preference or way of doing things. Since I'm a newbie to boat-building/restoration, I'm totally lost in the sauce.

First:
I want to see what you guys think of my plan for the transom and if there is anything you might change. It's 1.5" thick, so I plan on gluing two sheets of 3/4" marine ply together. I'm going to cut the 4x8 into 2 square sheets that are just bigger than the transom. I planned on hitting the sides that will be glued with some 80 grit to give it a nice, rough surface to make a stronger bond. I'm going to give the sheet a good layer of PL glue and run a fine-toothed grout trow over it. From there I'm going to place the two pieces together, and use a few 2x10 boards on either side to clamp them tight. Once the glue cures, I plan to trace my template and cut it to shape, drilling the holes for the outboard, drains, etc. I'm then going to pre-treat the new transom with a few layers of resin, putting a layer or two of csm on the side that bonds with the hull with the intention of adding a grittier surface for the adhesive to grip to. Once the resin cures for a while, I plan on running a thick, chop strand-rich peanut butter along the bottom of the back of the hull where the transom will sit and setting it in place (I'm going to get the PL glue on the new transom before I lay the PB). I plan on using the holes I drilled for the motor and drains to clamp the new transom to the hull. Once the glue is cured, I'm going to fillet the edges and tab in the transom as well as treat the holes I drilled with resin. I'm then going to glass it in fully.

Second Question/Decision
The cores of my stringer are about 1" thick and about 6-7" in height (including the glass) depending on which side of them you measure. They are cut at an angle on the bottom edge to match the angle of the hull. I'm planning on bedding them with a similar mixture to the one I plan on using with the transom. One of the major problems I'm having is deciding how far out I should tab the stringers onto the bottom of the hull. I'm also trying to decide if I should alternate the kind of glass I'm using to tab them in as I'm adding layers.

Finally:
I'm having a real hard time deciding what glass to use. This is the topic I searched the most for regarding the project, but trying to decide what to use and why has me pretty confused. As far as using 1708 for tabbing in stringers/transom/etc, wouldn't it be better to use 4 layers of a thinner biax cloth (like a 6 oz) than to use just 2 layers of 1708? Maybe even alternating the two? Like two layers of 6 oz biax followed by two layers of 1708? As far as glassing in the top of the stringers, I'm having a hard time deciding what to use and how many layers to use. From what I understand, correct me if I'm wrong, the structural support of the stringers comes from tabbing them in and the glass on top is just to seal the core of the stringer. If that's the case, couldn't adequate coverage of the top be done with just a couple layers of CSM or 6 oz. biax? Or maybe run a layer or two of biax and then a final top layer of 1708? I'm wanting to keep the deck height the same, but I want this thing to be solid as a rock and sealed tight. I'm also trying to decide what to use to glass in the rest of the transom. I know it's under a good amount of stress from the weight of the 115 on the back, but I'm also concerned that if I put too much on, that I might not be able to get the topcap back on bc the transom is too thick. In your guys' experience, what do you think would be the best option/most durable for everything? And as far as that goes, the wholesaler I plan on using has weird descriptions, so if they have 1708 its certainly not labeled as such. I'm going to attach some pictures of their fiberglass selections and types in separate posts in the thread. If you guys could go through and give me the product numbers of what you would use or think I should use that would be awesome.
 

das_army_life_yah

Petty Officer 2nd Class
Joined
Apr 3, 2020
Messages
122
The wholesaler near me has prices comparable to U.S. Composites, but I don't have to worry about shipping since they're only an hour away so I'm going to be going through them. They have 3 options for fiberglass: fabric, knitted, and CSM. I'm having a hard time deciding on what to use because I'm inexperienced and their selection is fairly large. If ya'll can help me figure out what would be best to go with that would be awesome. Here's what they have listed under the "knitted section."
 

Attachments

  • photo327530.png
    photo327530.png
    8.9 KB · Views: 0
  • photo327531.png
    photo327531.png
    10.5 KB · Views: 0
  • photo327532.png
    photo327532.png
    10.5 KB · Views: 0
  • photo327533.png
    photo327533.png
    13.8 KB · Views: 0
  • photo327534.png
    photo327534.png
    10.9 KB · Views: 0
  • photo327535.png
    photo327535.png
    18 KB · Views: 0

das_army_life_yah

Petty Officer 2nd Class
Joined
Apr 3, 2020
Messages
122
This is what they have listed under the "Fabric" section.
 

Attachments

  • photo327536.png
    photo327536.png
    67.7 KB · Views: 0
  • photo327537.png
    photo327537.png
    21.4 KB · Views: 0
  • photo327538.png
    photo327538.png
    10.3 KB · Views: 0
Top