1987 Fourwinns Sundowner Transom repairs

solar7647

Lieutenant Junior Grade
Joined
Apr 23, 2009
Messages
1,218
Hi all!
Well its been at least 8 years since my last post on this forum, but once again the time has come for some boat repairs. My old Fourwinns has treated me well over the years, she has been with me through divorce, career change, a new wife, 2 more kids and most recently a move from a small hick town to the middle class verbs lol.

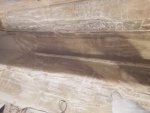
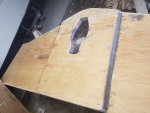
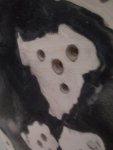
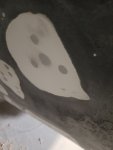
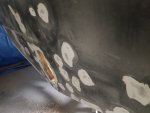
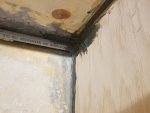
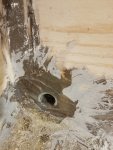
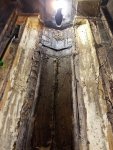
Through those years she has gained some bumps and bruises that need some much needed love, the biggest one being carpenter ants that took up residency after lack of options forced me to store the boat at a friends house during my divorce 5 years ago. It ended up under some old pine trees and even covered the aunts decided my boat was a better living situation then the trees. I tried all kinds of killers to extinguish the little SOBs but nothing worked and they set up shop in my transom that became very problematic when i noticed last season that some of the bolts holding my swim deck could be pulled out by hand and from the looks of it have been letting water in for some time.

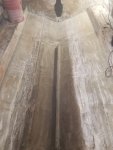
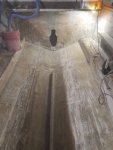
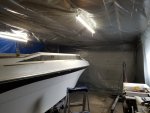
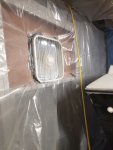
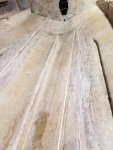
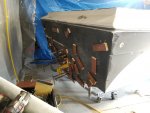
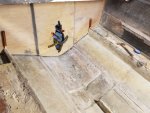
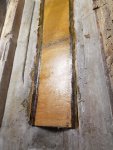
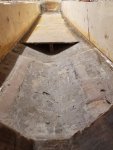
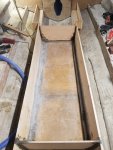
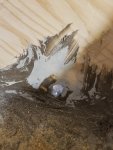
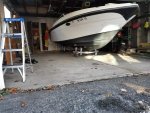
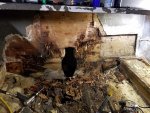
So away we go! Over the past couple months i have squeezed it into the garage, got the interior and engine pulled, the floor ripped out, fuel tank out, center stringers and foam ripped out and started ripping into the transom.

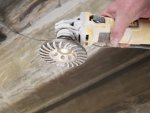
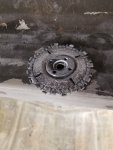
The collection of tools over the past 10 years has really made a difference in getting things done as well as holding on to some things over those years such as my dollies i purchased the first time i did work on the boat.. Right now i am in love with my air hammer, saving some time and defiantly saving the arms from hammer and chisel.

Thanks in advance for the tips and advice i will defiantly be seeking from the forum.
 

Attachments

  • photo324677.jpg
    photo324677.jpg
    88.4 KB · Views: 41
  • photo324678.jpg
    photo324678.jpg
    67.7 KB · Views: 42
  • photo324679.jpg
    photo324679.jpg
    273.2 KB · Views: 42
  • photo324680.jpg
    photo324680.jpg
    390.7 KB · Views: 43

solar7647

Lieutenant Junior Grade
Joined
Apr 23, 2009
Messages
1,218
Well I have not been able to put in to much time on the boat since the last post. Work has had me all over the country, Modesto Ca, Astoria Or, Minster Oh. But i got a good 6 hours in today and man did i make some great progress.

While I was on the road i put in alot of thinking of what will make things move quick. So i took a trip to Harbor Freight and got 2 attachments for the grinder. I got a chain saw blade thing that is scary AF but man it cuts through wood like butter. I also got a masonry wheel that holy crap rips through fiber glass and resin so good.

I however did not think dust control, so i will have to do some cleaning.
 

Attachments

  • photo324953.jpg
    photo324953.jpg
    897.4 KB · Views: 29
  • photo324954.jpg
    photo324954.jpg
    891.9 KB · Views: 29
  • photo324955.jpg
    photo324955.jpg
    702.4 KB · Views: 35
  • photo324956.jpg
    photo324956.jpg
    724.9 KB · Views: 35
  • photo324957.jpg
    photo324957.jpg
    882.6 KB · Views: 31

solar7647

Lieutenant Junior Grade
Joined
Apr 23, 2009
Messages
1,218
Me too, that blade really makes you pay attention! It really it easy and quick.
 

mickyryan

Rear Admiral
Joined
Apr 18, 2016
Messages
4,210
i personally found the best is the disks with a rubber backer 35 grit on a 4" grinder and it made quick work of whatever the oscillating tool left , oscillating tool leaves very little behind and is probably the best tool ever for this kind of work.
 

solar7647

Lieutenant Junior Grade
Joined
Apr 23, 2009
Messages
1,218
Well back home from another fun filled work trip to California and spent the weekend cleaning the garage of dust and getting all foam, wood and fiberglass ripped from the boat loaded up and off to the dump.

I also took the time to hang some plastic, something i should of did on day one,:facepalm: I still got, grinding sanding and painting to do so better late then never.

This week I have no work trips so my goal is to finish prep so its ready for new wood. I have a packed schedule for March and need this thing ready so on the few days i am home next month they can be spent cutting and placing wood and glassed in.
 

Attachments

  • photo325263.jpg
    photo325263.jpg
    742.6 KB · Views: 12

solar7647

Lieutenant Junior Grade
Joined
Apr 23, 2009
Messages
1,218
Been a week of lighting fires in the shop every night and with the help of an old box fan getting the heat into the garage, with the temps in the 30s or lower it sure is nice to have a warm work space. This week i mostly worked on getting detail things done, I had to cut away the trim left from the deck around the edges, removed carpet particles left on the walls as well as the glue. I am defiantly going to be avoiding putting any carpet back in. I found any high spots from the original tabbing and got it ground down smooth.

I am ready to get wood and start putting things back in! I got everything clean and sanded and i laid out my stringer locations to make stencils.

A few questions for ya, when laminating the transom together is there any significant difference between using PL glue vs peanut butter? It looks like its pretty much 50/50 on what people use. PL obviously has the bonus of ease of use. Also is there a preference of one over the other when setting the transom and stringers into place?

Thanks for any input.

I will be on a work trip for the next 2 weeks outside of Chicago so i will have a lot of time to research.

PS...this weeks lesson learned....keep your beer covered with grinding and sanding lol:facepalm::lol:
 

Attachments

  • photo325378.jpg
    photo325378.jpg
    1 MB · Views: 19
  • photo325379.jpg
    photo325379.jpg
    733.7 KB · Views: 19
  • photo325380.jpg
    photo325380.jpg
    753.6 KB · Views: 19
  • photo325381.jpg
    photo325381.jpg
    1.1 MB · Views: 20

kcassells

Fleet Admiral
Joined
Oct 16, 2012
Messages
8,600
I like to use PB with chopped glass. PL needs to gas off a couple of weeks at normal temps and promotes bubbles if glassed too soon.
Since I have all the goods already at hand I just go that way.
I believe I've read that using pl with stringers is a nightmare.
 

solar7647

Lieutenant Junior Grade
Joined
Apr 23, 2009
Messages
1,218
That's the info I was looking for right there. I don't have weeks to wait for it to fully set up.
 

solar7647

Lieutenant Junior Grade
Joined
Apr 23, 2009
Messages
1,218
After a month away for work i have finally been able to get back to work on the boat and have got a lot done. I am on leave until June so that i can handle my kids schooling since there school has been closed due to the COVID-19 craziness.

I got the Transom cut, laminated and in the boat. I used scrap wood screwed through the transom using existing holes from years of things being mounted to the transom to clamp it in place along with C clamps. Once it set up I removed the wood and clamps and using a Una-bit i drilled out every holes leaving a cone shaped hole, I then filled them with peanut butter and sanded them smooth so now the transom is nice and sealed up. I have found through the years that having the holes cone shaped results in a better filling with no voids.

Each side is covered in chop strand mat then biaxial mat 1700, the dark spots are peanut butter to fill and even the surface.
 

Attachments

  • photo328046.jpg
    photo328046.jpg
    915.2 KB · Views: 29
  • photo328047.jpg
    photo328047.jpg
    634.8 KB · Views: 28
  • photo328048.jpg
    photo328048.jpg
    1.5 MB · Views: 26
  • photo328049.jpg
    photo328049.jpg
    1,011.8 KB · Views: 29
Last edited:

solar7647

Lieutenant Junior Grade
Joined
Apr 23, 2009
Messages
1,218
A few shots of the holes in the transom that had to be filled.

All of the dark spots are areas that i added filler to even out the surface
 

Attachments

  • photo328050.jpg
    photo328050.jpg
    927.3 KB · Views: 16
  • photo328051.jpg
    photo328051.jpg
    720.8 KB · Views: 16
  • photo328052.jpg
    photo328052.jpg
    732.9 KB · Views: 16

solar7647

Lieutenant Junior Grade
Joined
Apr 23, 2009
Messages
1,218
I got the keel boards that the gas tank sits on and what becomes the floor of the cabin cut and in placed. I used peanut butter to attach them to the haul. I sanded it down so that i had a smooth transition too the haul to glass over. I also used peanut butter to glue the seams since it took 3 pieces to cover the length needed and filled any uneven spots. Once it was smooth and even to my satisfaction i glassed it in with chop-strand mat and did the seams with biaxial mat 1700.

Next on the list is the stringers
 

Attachments

  • photo328053.jpg
    photo328053.jpg
    1.4 MB · Views: 13

solar7647

Lieutenant Junior Grade
Joined
Apr 23, 2009
Messages
1,218
I almost forget, the new long block showed up too!! ordered it from JEGS, New 4.3L 205, no tins since all the tins on the old one are good. Cant wait to drop it in.
 

Attachments

  • photo328054.jpg
    photo328054.jpg
    373.5 KB · Views: 15

kcassells

Fleet Admiral
Joined
Oct 16, 2012
Messages
8,600
Very Nice! Take a notch out of the transom where it meets the hull. Fill back complete with pb. That is where your drain plug will go after you pick the type. Point being that the drain is no longer surrounded by wood. Just pb and glass.
Just another to do. Looking good.
 

solar7647

Lieutenant Junior Grade
Joined
Apr 23, 2009
Messages
1,218
Thanks for the input, i was looking at other projects that did that and was considering doing the sane.
 

solar7647

Lieutenant Junior Grade
Joined
Apr 23, 2009
Messages
1,218
Its been a busy 2 weeks, trying to keep up on posting but by the time i sit down at the end of the day Im just beat.

Last week i got the stringers cut, set and bedded into place.

I also got the bilge all done. The old design there was only one bump out on the left side, the origional engine was a 3.7l and the intake was on the left, since i changed the engine to a 4.3l it was tight on the right side so i decided add a bump out on the right side as well.

I also added drains, the old design had no way for water to get out of the area the gas tank sits nor the cabin floor. I used an old piece of schedule 80 i had and ran it from the cabin to the bilge and used some filler to hold it in place and seal it.
 

Attachments

  • photo329242.jpg
    photo329242.jpg
    310.4 KB · Views: 27
  • photo329243.jpg
    photo329243.jpg
    299.8 KB · Views: 26
  • photo329244.jpg
    photo329244.jpg
    200.1 KB · Views: 27
  • photo329245.jpg
    photo329245.jpg
    239.8 KB · Views: 26
  • photo329246.jpg
    photo329246.jpg
    267.3 KB · Views: 25
Top