Another Bayliner, 1986, 19'

yoboat

Cadet
Joined
Oct 13, 2019
Messages
24
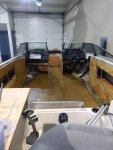
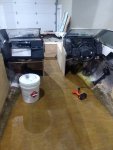
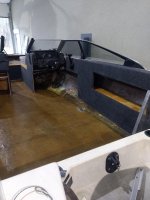
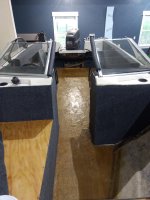
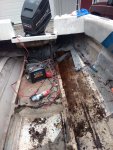
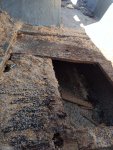
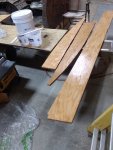
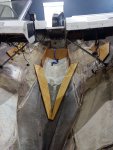
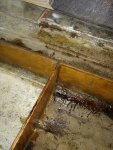
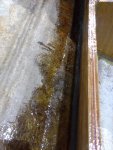
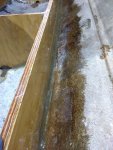
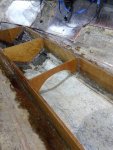
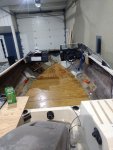
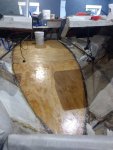
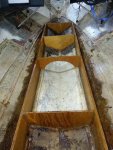
What a mess! Somebody added a new layer of floor and gel coat on top of all the old rot. I was hoping the stringers wouldn't have to be replaced but it looks like they need replaced as well, oh well. Might as well do it right if you're going to do it at all.
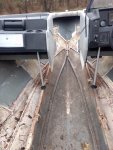
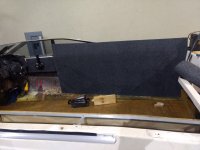
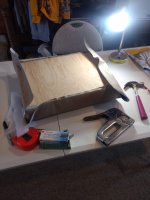
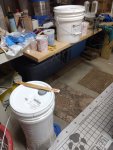
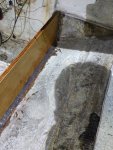
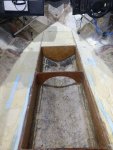
 

Attachments

  • photo323006.jpg
    photo323006.jpg
    1.3 MB · Views: 17
  • photo323007.jpg
    photo323007.jpg
    1.7 MB · Views: 17
  • photo323008.jpg
    photo323008.jpg
    1.7 MB · Views: 17
  • photo323009.jpg
    photo323009.jpg
    1.5 MB · Views: 18
  • photo323010.jpg
    photo323010.jpg
    2 MB · Views: 17

Scott Danforth

Grumpy Vintage Moderator still playing with boats
Staff member
Joined
Jul 23, 2011
Messages
47,499
the stringers were gone long before the original floor rotted, and about 10 years before the new floor rotted.

a 1986 bayliner would have been rotted over 20 years ago.

make sure to go thru all the links in the DIY sticky
 

yoboat

Cadet
Joined
Oct 13, 2019
Messages
24
Plywood question. The old floor seemed to be 1/2". I assumed it would be 3/4". Is 1/2" ok for the floor? Plan on using 3/4" for the stringers.
 

mickyryan

Rear Admiral
Joined
Apr 18, 2016
Messages
4,210
1/2 is fine for stringers, id go 3/4 on floor unless its well braced and only have skinny folks on boat :) you will be encapsulating it with a couple layers of glass on both sides and top so it will be strong as the better made boats once it is complete. make sure you totally seal floor wood top and bottom and esp ends so they cant wick moisture, friend used to work for sea ray he said they used paint to seal the ends because it would draw it in, either way just be sure its covered :)
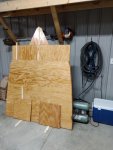
 

yoboat

Cadet
Joined
Oct 13, 2019
Messages
24
Slowly making progress. Time to put it back together.
 

Attachments

  • photo323824.jpg
    photo323824.jpg
    1.2 MB · Views: 12
  • photo323825.jpg
    photo323825.jpg
    1.3 MB · Views: 11
  • photo323826.jpg
    photo323826.jpg
    1.3 MB · Views: 12
  • photo323827.jpg
    photo323827.jpg
    1.5 MB · Views: 13
  • photo323828.jpg
    photo323828.jpg
    1.3 MB · Views: 12

Scott Danforth

Grumpy Vintage Moderator still playing with boats
Staff member
Joined
Jul 23, 2011
Messages
47,499
you are going to need to pull the motor. without the stringers, the weight of the motor has already pulled the transom back.
 

yoboat

Cadet
Joined
Oct 13, 2019
Messages
24
you are going to need to pull the motor. without the stringers, the weight of the motor has already pulled the transom back.

Thanks, I'm leaving the motor. I did support the outboard to take the weight off of the transom.
 

yoboat

Cadet
Joined
Oct 13, 2019
Messages
24
Glassing the stringers. The glass I put in the bottom to connect stringer to boat turned out pretty good. I had an awful time getting the glass to lay down on the top of the stringer though. Any tips or suggestions to help with that?
 

Attachments

  • photo324008.jpg
    photo324008.jpg
    1.4 MB · Views: 8
  • photo324009.jpg
    photo324009.jpg
    1.2 MB · Views: 9
  • photo324010.jpg
    photo324010.jpg
    1.3 MB · Views: 7
  • photo324011.jpg
    photo324011.jpg
    1.4 MB · Views: 8
  • photo324012.jpg
    photo324012.jpg
    1.3 MB · Views: 9

Davetowz

Petty Officer 1st Class
Joined
Sep 19, 2012
Messages
227
My first suggestion would be to read the forums, 2nd watch Frisco boaters stuff ( we all owe him a little I think) Get the load off the hull, as was already suggested. When folks on here give suggestions, saying, I supported the load and I am good, usually results in the suggestor just turning you off because you look like you are trying to shortcut a repair, like the previous owner of your boat did. Either do it right or buy a go cart. Good luck on the build, Hope it gives yu many safe hours of fun on the water!
 

yoboat

Cadet
Joined
Oct 13, 2019
Messages
24
Lots of foam and a little more progress! I used blue styrofoam as a filler to cut down on the amount of foam needed. Put peanut butter on the stringers and screwed down floor, also lots of peanut butter on edges and seams. Next is 2 layers of glass.
 

Attachments

  • photo325211.jpg
    photo325211.jpg
    1.3 MB · Views: 8
  • photo325212.jpg
    photo325212.jpg
    1.4 MB · Views: 8
  • photo325213.jpg
    photo325213.jpg
    1.5 MB · Views: 8
  • photo325214.jpg
    photo325214.jpg
    1.6 MB · Views: 8

yoboat

Cadet
Joined
Oct 13, 2019
Messages
24
It's starting to look like a boat again. I haven't forced myself to cut a hole for the ski locker yetšŸ˜¬.
 

Attachments

  • photo326719.jpg
    photo326719.jpg
    1.7 MB · Views: 4
  • photo326720.jpg
    photo326720.jpg
    1.8 MB · Views: 5

yoboat

Cadet
Joined
Oct 13, 2019
Messages
24
Thankful for this forum and the generous support in the group! I realize it's several years late but here's some more of the finishing photos.
 

Attachments

  • IMG_20200323_203202238_BURST000_COVER_TOP.jpg
    IMG_20200323_203202238_BURST000_COVER_TOP.jpg
    2 MB · Views: 17
  • IMG_20200327_181533555.jpg
    IMG_20200327_181533555.jpg
    1.6 MB · Views: 18
  • IMG_20200327_181656203.jpg
    IMG_20200327_181656203.jpg
    2.9 MB · Views: 18
  • IMG_20200414_191353148.jpg
    IMG_20200414_191353148.jpg
    2.1 MB · Views: 18
  • IMG_20200423_181451812.jpg
    IMG_20200423_181451812.jpg
    848.8 KB · Views: 17
  • IMG_20200424_211403032.jpg
    IMG_20200424_211403032.jpg
    2.1 MB · Views: 16
  • IMG_20200926_185214126.jpg
    IMG_20200926_185214126.jpg
    341.6 KB · Views: 17
  • IMG_20201031_182022393.jpg
    IMG_20201031_182022393.jpg
    780.4 KB · Views: 18

sopwithcamel74

Petty Officer 1st Class
Joined
Aug 15, 2018
Messages
203
Congrats on getting back out on the water! Nice to see that you persisted and got her buttoned up. Really appreciate you sharing your adventure.
 
Top