Hull fire damage repair

crashtcs

Cadet
Joined
Sep 4, 2019
Messages
23
I have an 84 Dusky 233FAC that was damaged by my garage fire, as the boat was parked beside the garage. I have decided to try and repair it myself, although I have no past experience with fiberglass work. I have learned a bit via FB groups, local resources and Internet resources. I am hoping this forum is better suited to post my questions and progress of this endeavor.
 

Attachments

  • photo320218.jpg
    photo320218.jpg
    908.1 KB · Views: 0
  • photo320220.jpg
    photo320220.jpg
    1.5 MB · Views: 0

crashtcs

Cadet
Joined
Sep 4, 2019
Messages
23
Here is a picture of what I decided to do, based on my zero knowledge of this type of problem -- I removed the delaminated sections of fiberglass I could feel by pushing against the hull.
 

Attachments

  • photo320219.jpg
    photo320219.jpg
    1.3 MB · Views: 0

crashtcs

Cadet
Joined
Sep 4, 2019
Messages
23
After getting a quote of nearly $9,000 to repair the damage, and gelcoat this side of the boat, I decided to try it myself. So, I proceeded to take off the gelcoat, in preparation for fixing the delaminated areas I cut out.
 

Attachments

  • photo320221.jpg
    photo320221.jpg
    1.6 MB · Views: 0
  • photo320222.jpg
    photo320222.jpg
    1.5 MB · Views: 0

crashtcs

Cadet
Joined
Sep 4, 2019
Messages
23
Hopefully I have done the right thing so far! As I grinded off the blistered gelcoat towards the stern of the hull, I noticed the fiberglass was wasn't freckled far beyond the blistered area. Also, there are larger round light spots then the freckles, and I could feel that those are delamination spots -- not as bad as the sections I cut out. So I decided to take down these larger areas, and not mess with the freckled stuff. As I was feathering down the edges of the cut out areas, I noticed even the small freckles were delaminated. So, what the heck, I am already this deep into it, why not take down the freckles.
 

Attachments

  • photo320224.jpg
    photo320224.jpg
    681.6 KB · Views: 0
  • photo320225.jpg
    photo320225.jpg
    709.3 KB · Views: 0
  • photo320228.jpg
    photo320228.jpg
    1.6 MB · Views: 0

crashtcs

Cadet
Joined
Sep 4, 2019
Messages
23
As I was trying to take down what I thought was delamination, I created a hole! Is this an existing repair based on the white material on the backside, considering there is the inside liner back there?
 

Attachments

  • photo320226.jpg
    photo320226.jpg
    497.3 KB · Views: 0
  • photo320227.jpg
    photo320227.jpg
    761.9 KB · Views: 0
Last edited:

crashtcs

Cadet
Joined
Sep 4, 2019
Messages
23
I feel like I am close the point of putting material back on. This is where I am looking for advice now!

Should I continue trying to grind out any freckles first?

There are some little pits where freckles were. Do those need to be ground down too? I recall Fiberglass Florida saying I will be needing a fairing compound at some point.

The surface is very wavy from my grinding. Should I try to take down the existing material to smooth out areas, or can/should I use mat (local co. said I should start with 1.5 oz mat), or the fairing compound?

Should I use 1708, as recommended by a few?
 
Last edited:

crashtcs

Cadet
Joined
Sep 4, 2019
Messages
23
Hmm, maybe this isn't a good forum for getting answer to questions, or I need to learn how to asking properly. Anyhow, I add one layer of 1708 as a test. Definitely a learning experience, and glad I made the decision to have one person there to help.
 

froggy1150

Master Chief Petty Officer
Joined
Nov 3, 2017
Messages
803
I think that most of the people have not dealt with fire damage and are not sure how to guide. I never have. But.... as for the hole. Can you get to the back side? To fix it right you should lay glass from both sides.frim inside lay progressively larger patches down. 1-2" bigger each time. You want every layer to cover the smaller one and get good contact with original hull.i assume you are using poly. If so you need csm between hull woven glass. Csm is like a primer for the woven. It fills all the nooks, crannies and voids so you don't have pockets of poly. Then the woven glass is for strength. Lay wet on wet. 1708 has csm in it so I will throw down 1.5 oz csm then stack the 1708 layers making sure it's always mat to woven to match to woven. Same for outside of hull. After all repairs are made then you fair for flatness. If it's real wavy end with 1 oz csm and block sand that then fair. That's only if it's real wavy cus it will be tough sanding. As far as how much damaged glass to remove........ dunno. Must use poly for gel coat. For Epoxy use no csm and 1700. No gel coat either. Paint only
 

Scott Danforth

Grumpy Vintage Moderator still playing with boats
Staff member
Joined
Jul 23, 2011
Messages
47,547
first, this is the best forum for DIY help

second, the answers to 90% of your questions are going to be found in the stickies at the top of the forum

third, go thru links in this sticky...... https://forums.iboats.com/forum/boa...r/295740-how-to-s-and-other-great-information specifically14, 15, 18, 2, 3, 4a, and 4b. watch every video, look at every picture. link 14 is also here https://www.youtube.com/channel/UCqz13HCBRHihm2L883-7UlA

the issue with fire/heat damage, is that it usually compromises so much more than just the gel coat.

fiberglass is a wonderful material for temperatures from -20F to about 170F for poly resin (300F if it was epoxy resin)

based on the pic, the side of the boat was exposed to about 500F.....

at a minimum I would be taking off the gel off the whole side, and grinding into the hull a layer or two, then a minimum of 2 layers of 1708/poly and a few layers of CSM to grind to shape.

most insurance companies would have totaled the boat
 

crashtcs

Cadet
Joined
Sep 4, 2019
Messages
23
Thanks for the advice. I will look at the stickies, and see what I can learn from them. I watched a lot of FrsicoBoater's videos, and they have been helpful. Also, a lot of BoatWorksToday videos. Here is my progress since adding material finally. The first big section, a week ago. The rest today. I realized today my measurement for the hardener was very low, hence the issue getting the cloth to stick to the primed surface. Had to wet the mat side to get it up there long enough to apply more resin -- with two people.That was my virgin experience! Today I decided to add material to the other deep areas, and see how things look after taking down the edges. I assume I will need at least one more layer of 1708. I also applied a section of CSM to an area where I didn't remove beyond the existing woven, but was about an 1/8" ground out.
 

Attachments

  • photo320692.jpg
    photo320692.jpg
    942.5 KB · Views: 0
  • photo320693.jpg
    photo320693.jpg
    1,018.8 KB · Views: 0
  • photo320694.jpg
    photo320694.jpg
    1.8 MB · Views: 0
  • photo320696.jpg
    photo320696.jpg
    1.6 MB · Views: 0
Last edited:

crashtcs

Cadet
Joined
Sep 4, 2019
Messages
23
Another day of work. I smoothed out the small areas, and I added one more layer of 1708 over the smaller area that was completely delaminated -- there are now 3 layers of 1708. The largest area still has only one, and I will tackle that one next weekend. The smaller sections that I only used a grinder on got one layer of 1.5 mat today (in addition to the one 1708 I added yesterday).

My plan is to lay a couple 1.5 oz mat over the entire area once the sections are about the same level, then use fairing compound, then gelcoat.

I am thinking about using the TotalBoat TotalFair for the fairing. I read this in the description: IMPORTANT: TotalBoat Gelcoat should not be applied directly over TotalFair or the gelcoat will not cure properly. Instead, apply TotalBoat 2-Part Epoxy Primer or TotalProtect over TotalFair, before applying Gelcoat.
Would I be locking myself into their products?
 

Attachments

  • photo320735.jpg
    photo320735.jpg
    1 MB · Views: 0
  • photo320736.jpg
    photo320736.jpg
    1 MB · Views: 0
  • photo320737.jpg
    photo320737.jpg
    1.5 MB · Views: 0
Last edited:

Scott Danforth

Grumpy Vintage Moderator still playing with boats
Staff member
Joined
Jul 23, 2011
Messages
47,547
I would talk to the people you buy your resin and gel from.
 

emoney

Commander
Joined
Jul 19, 2010
Messages
2,551
+1 on what Scott recommended. There's several options for faring material. I mean adding a primer into the mix isn't the end of the world, that's for sure. Go with what you're comfortable using and is readily available.
 

Mad Props

Lieutenant Commander
Joined
Jul 8, 2016
Messages
1,766
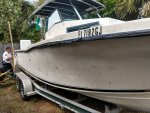
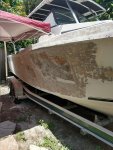
You're actually very lucky you still have a boat... Polyester resin is a thermoset plastic versus a thermoplastic... Difference being, thermoset doesn't melt, it just burns... If your boat got hot enough to actually ignite, you'd have nothing but a pile of ashes.

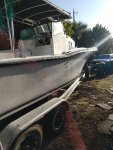
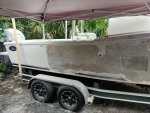
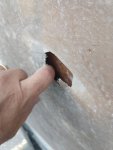
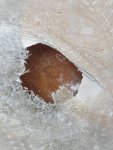
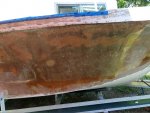
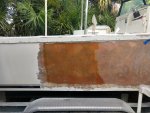
Your repair is going to be a tricky one and something that probably isn't documented too well here. My concern would be that the entire laminate on the one side of the boat has been structurally compromised. It would seem that the fix would be to grind down to "fresh glass", however, I'm not sure there is any "fresh glass". My first thought would be to grind down until you only have a layer or two of laminate left and basically rebuild that side of the boat, however, I would be concerned that if you grind too much off of the side of the boat along its whole length, you may risk the whole side of the hull collapsing or buckling under its own weight. It may not fail altogether, but you may end up with a wavy hull that dips and rises based on the underlying structure (stringers/bulkheads/deck/etc...).

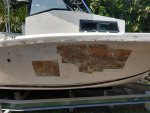
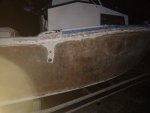
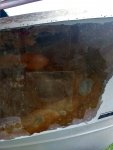
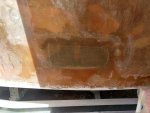
Another thought that crossed my mind was just grind off the gelcoat and any blisters or defects and just build on top of the existing laminate with the assumption that it is no good and build up several layers to the original thickness of the hull on top of the old.... That is not a good idea, because you are going to add a ton of weight to one side of the boat and it will never sit even-keeled in the water.

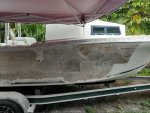
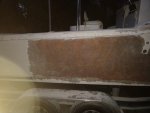
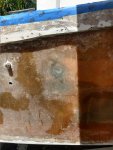
The best thing I could think of is to grind down to the last layer or two of the hull in sections and do sections at a time and then maybe do the last layer or two the full length to tie it all together.

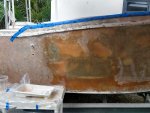
One other thing worth mentioning is, I would not be hell-bent on finishing the repairs with gelcoat. Planning to paint at this point is going to greatly open up the availability of what you can use in your repairs. If you want to finish with gelcoat, you will need to stick with all polyester based materials which eliminates a lot of fairing compounds. Not to mention, unless you plan to buy a dump gun setup and have a large air compressor, rolling or brushing gelcoat will leave you a years worth of sanding...

If you paint, you can use a good 2 part topside paint with rolling and tipping and have much much less sanding to do...

Hope some of that input was useful, do your research, decide what you want to do, and we will be here to guide you along the way. Good luck!
 

froggy1150

Master Chief Petty Officer
Joined
Nov 3, 2017
Messages
803
What about after building up a few layers on the outside with "new glass" grind from the inside thru the compromised old glass to get to good new glass. That would be a way to remove anything in question without loosing hull shape. This could put you close to original thickness with all new glass
 

Mad Props

Lieutenant Commander
Joined
Jul 8, 2016
Messages
1,766
What about after building up a few layers on the outside with "new glass" grind from the inside thru the compromised old glass to get to good new glass. That would be a way to remove anything in question without loosing hull shape. This could put you close to original thickness with all new glass

That's a great idea... my only concern would be, in the picture above where he ground thru, it looks like there is an inner hull structure, it may be a glassed in tub which means he has no access to the inside of the laminate without completely cutting out the inner tub... I could be totally wrong tho lol
 

kcassells

Fleet Admiral
Joined
Oct 16, 2012
Messages
8,600
Just dig it out and start slapping some glass in there.,,,,,,,,,,,,geeeezzz Forget the math.
 

crashtcs

Cadet
Joined
Sep 4, 2019
Messages
23
Thanks for the input from everyone.
I went to Florida Fiberglass, which is in my city, and talked their ear off! They said it is ultimately up to me about what product I use, but recommended I don't get caught up in the fairing process until I am ready to do it -- and don't over think it. Paint was recommended over gelcoat -- much higher cost, but many fewer hours of manual labor. I'll make that decision when the time comes.

Reading through the ideas and recommendations, I would conclude that my approach has been to remove with caution.

Other than cutting out the completely de-laminated areas, I used a 7 and 4.5 in grinder to take down most of the freckled areas so there was a consistent solid looking finish. Definitely resulted in high and low areas, and a few areas where I went through an 1/8 inch or more existing buildup. Those areas I used 1708 to build back up to meet other surface that has been removed. My plan is to replace any area that I took out cloth, to replace with 1708 up to meet surrounding area I didn't have to go that deep. I am almost done with this phase. Then I will use at least one layer of 1.5 CSM over the whole area, and guess how much is enough build up.
 

Attachments

  • photo320693.jpg
    photo320693.jpg
    1,018.8 KB · Views: 0
  • photo320735.jpg
    photo320735.jpg
    1 MB · Views: 0
  • photo320737.jpg
    photo320737.jpg
    1.5 MB · Views: 0

crashtcs

Cadet
Joined
Sep 4, 2019
Messages
23
This is a Dusky, and they use three piece construction -- one piece being the inner liner with the deck (tub), and that is glassed to the top cap. I don't see how I can get to the backside of the hull to reinforce without cutting out sections of the liner, which is an option. I do believe these 1708 layers will make it solid again. I use a push test, like testing a steak for cooked temperature. When all the areas flex the same (or don't flex), it is strong enough. Then I will use CSM to build up if needed.
 

Mad Props

Lieutenant Commander
Joined
Jul 8, 2016
Messages
1,766
The one close up picture doesn't look like 1708, it looks like maybe a 10oz cloth. Are you using poly resin or epoxy? If you're using poly resin, you have to use either 1708 or CSM between layers of cloth. I'll take your word for it that its 1708 but it just didn't look like it in the picture.
 
Top