91 sea ray 185 bow rider restoration

Joined
Dec 26, 2018
Messages
25
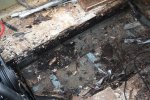
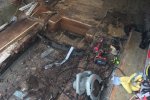
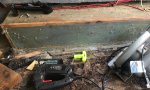
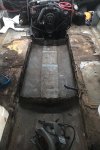
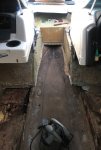
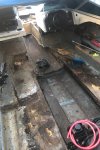
I’m new to iboats, so this is all new to me. I purchased a 91 sea ray 185 bow rider last year, knowing it had a few problems. Such as 8 screws through the hull in the back from a “new floor” being put in. I’ve never restored a boat, but figured I could seeing as I’m a skilled mechanic. I think I I’m in over my head now, seeing as I pulled the carpet and “new floor” up to fix the screws through the hull. Doing so, I found the “new floor” was plywood laid over the old rotten floor. So seeing that I started pulling sections of it up. It has fiberglass over it and it’s a pain in the butt to get up. But doing so I’ve found rotten floor and rotten stringers. I have yet to check the transom. I’ve watched several of friscoboaters videos and feel somewhat informed. But still looking for advice and answers. I’ll post more as I get into it, but now I’m in the process of tearing the floor up that is covered in fiberglass.
So I’m seeking advice on what is the easiest way to cut the fiberglass/plywood out of it?
also advice and opinions on sistering the stringers on both sides of rotten stringers glued in and glassed in with bolts through them, squeezing in on the rotten stringers. A guy at a local marina told me about that method of sistering them. It sounded crazy, and I just gave him a stupid look and walked away. Now it’s in the back of my mind, so I figured I’d ask.
I’ll post more updates the farther I get into it. Any advice and answers would be greatly appreciated. Taking it to someone else to do this is out of the question. My wife won’t let me spend that much money lol

also it wont let me upload pictures at this moment. Not sure why yet.
 

chevymaher

Commander
Joined
Mar 29, 2017
Messages
2,915
You got 3-4 post before it lets you upload pictures.

Forget sistering in anything Just take it all out and replace it. Fixing the screw holes is a peice of cake once you get that far. I had staple holes from the factory in mine.

I used a saws all and a whiz wheel blade on a grinder. Get the harbor freight grinders they are cheap and the glass dust destroys them.

Anyhow welcome to the little family here. Congrats on the boat. I know now it don't seem like it but once it is done you will love it and be glad you did it.
 

Scott Danforth

Grumpy Vintage Moderator still playing with boats
Staff member
Joined
Jul 23, 2011
Messages
47,499
welcome aboard

you bought a "deck-over" boat which is the same as a used car lot using 3 gallons of bondo over the funny pages to cover rust holes while putting rags under the valve covers to keep the valve train from clattering

go to the sticky at the top of the page, look thru every link, specifically reading link 14, 18, 2, 3, 4a, and 4b in that order

https://forums.iboats.com/forum/boa...r/295740-how-to-s-and-other-great-information

then plan on your restoration. it will cost you about $2-3k (not including interior or engine work)

step 1, photo document everything
step 2, remove everything from inside the boat
step 3, remove the motor and outdrive
step 4, build a craddle
step 5, uncap the boat as it makes life so much easier
step 6, cut out everything
step 7, grind down to good hull fiberglass
step 8, plan out the wood
step 9 execute the wood plan
step 10, PB and tabing
step 11, foaming and decking
step 12, finishing the deck
step 13, install the cap
step 14, install the motor and drive (make sure to align)
step 15, put everything back in the boat
step 16, enjoy
 

Mad Props

Lieutenant Commander
Joined
Jul 8, 2016
Messages
1,766
Yep, what Scott said...

Read all of those suggested items, and then read around on many of the restoration projects around here to see how everyone went about everything. Friscoboaters youtube series is good, but leaves out a lot of the info that is covered in the stickies that Scott mentioned.

Its a labor of love, and if you love labor than dive in...
 

oldrem

Commander
Joined
Nov 7, 2013
Messages
2,002
Best I found for cutting through fiberglass with a lot less dust was an oscillating multi tool with the fan style saw blade.
 

JASinIL2006

Vice Admiral
Joined
Feb 10, 2012
Messages
5,539
I cut my deck out using a circular saw with the depth set to the thickness of the decking. Then I cleaned up with a Sawzall and an oscillating mutitool saw. Followed up with a healthy dose of grinding, of course! It would have talen an eternity to get it all out with the oscillating tool.
 
Joined
Dec 26, 2018
Messages
25
Thanks for all of the input! I will keep updates on how it goes. Got some more of the floor cut out today and just ridiculous how much the wood is rotten and just falling apart. Can practically squeeze water out of the wood. It’s scary to think we were on the lake hitting hard wakes and the support system was this bad.
 

Mechanicalmike08

Petty Officer 1st Class
Joined
Aug 29, 2018
Messages
308
Yep, a lot of mine looked good from the outside but once you start cutting it's crazy how bad a factory boat is made. My motor mount had rotted so much the fiberglass was free floating and the wood had turned to mud.

the oscillating tool will be your best friend, I think a lot of people right it off as it's a little slower. But I was able to get so close to the hull and reduce my grinding time dramatically. Let the tool do the work don't force it forward that really slows it down.
 

Scott Danforth

Grumpy Vintage Moderator still playing with boats
Staff member
Joined
Jul 23, 2011
Messages
47,499
Thanks for all of the input! I will keep updates on how it goes. Got some more of the floor cut out today and just ridiculous how much the wood is rotten and just falling apart. Can practically squeeze water out of the wood. It’s scary to think we were on the lake hitting hard wakes and the support system was this bad.

its more common than you think. there are a few pics on iBoats over the years where an outboard simply rips the transom off

Make sure you go thru the sticky links
 
Joined
Dec 26, 2018
Messages
25
So some updates today. Still cutting floor out. Got all gas drained out, and tank removed. As well as side panels. Got a skill saw now. Cutting it out is going much better. Still having a hard time seeing where floor is and hull of boat due to all rotten crap and fiberglass everywhere. I did run into something really weird where a ski locker would be. New wood laid in for maybe a support in the floor. Not sure what their plan was but it’s horrible! I’m gonna try to post some pics ASAP. Also have these weird boxes I’ve never seen in any other boat that were beside the back to back seats that are of course fiberglassed in. So trying to get them out is fun too. Motor is still in. Haven’t gotten to taking it out yet. Plus gotta find somewhere to rent a motor hoist around me. Today has been the only nice day in the past 2 weeks. I would much rather be out on my motorcycle. But the boat is not going to do itself!
 

froggy1150

Master Chief Petty Officer
Joined
Nov 3, 2017
Messages
802
I do all my posting from my phone. I got an app (photo and picture resizer) and just shrink it down. I think it has to be under 2 meg
 

Mad Props

Lieutenant Commander
Joined
Jul 8, 2016
Messages
1,766
Yea.. if using your phone, download a photo resize app.. if your computer, use paint to resize .. I usually do 800x600 and jpeg format and never have a problem...
 
Joined
Dec 26, 2018
Messages
25
There’s also these weird boxes that were beside the back to back seats. Are a pain in the a** to remove. Never seen anything like this.
 

Attachments

  • photo306217.jpg
    photo306217.jpg
    1.8 MB · Views: 2
Joined
Dec 26, 2018
Messages
25
So it started getting dark. So I decided I was at a good stopping point and quit before it got dark. I feel like I got a lot done today. Gas tank removed, all these bs supports that we’re going across the middle, floor cut out of I’d say 90% of it, carpet removed from bow section, and alll the crap cleaned up. Still a long ways and realizing how rotten the stringers really are. Fingers crossed for the transom not being rotten. But my luck, it will be. Possibly tomorrow, planning on getting the rest of the floor out, whatever the box things beside where the seats were, and start cutting away on the stringers from in front of the motor up. Motor removal will be another day!
 

Attachments

  • photo306225.jpg
    photo306225.jpg
    1.8 MB · Views: 2
  • photo306226.jpg
    photo306226.jpg
    2.1 MB · Views: 2
  • photo306227.jpg
    photo306227.jpg
    2.1 MB · Views: 2

chevymaher

Commander
Joined
Mar 29, 2017
Messages
2,915
Acceptance is a peaceful thing. Just accept your doing it all and the stress is gone. Now you just got to get it done.

I opened up the transom long before I was ready to take it out. Just peeled the skin off at the bottom. Yep fried went back to work gutting the floors.
 

JASinIL2006

Vice Admiral
Joined
Feb 10, 2012
Messages
5,539
Hang in there! Demo always seems to bring unwelcome surprises... before you know it, you’ll be rebuilding it, better than before!
 
Top