1987 Larson DC-215 restoration

sms986

Petty Officer 1st Class
Joined
Sep 18, 2017
Messages
334
Got in last night and opened up shop for the week.

Last night I cut the lower deck out (up in the cabin) and laminated one side of it. The lower deck was completely sealed in on the underside and I'm going to redo it that way. The underside was filled with foam. I will not be doing drainage up here because if water can get out that means it can get in. I'm going to dehumidify the cavity then pour in foam. I already laminated the underside but I'm going to put a thin coat of flexible "through the roof" roof sealant on it so that if the lamination ever cracks or separates I'll have a flexible moisture barrier just in case.

I need some advice on the next part.

I'm gluing 4 slabs of 1/2" plywood together to make my 2" thick engine bunks. I have 3 options available: I can use PL premium, I can use thickened epoxy, or I can use a sheet of 17oz cloth in-between with epoxy. Which would you suggest as the best option?

Thanks!
 

sms986

Petty Officer 1st Class
Joined
Sep 18, 2017
Messages
334
Since I'm using epoxy, do I need a sheet of cloth in-between each or can I mix up some silica and resin and "glue" them together with just that?
 

kcassells

Fleet Admiral
Joined
Oct 16, 2012
Messages
8,596
Make sure you wet out the ply first so it is soaked in and dried. Then put together with pb and clamp it or screw it.Recess the screws to be filled later with pb or remove and fill holes with pb.
Also if counter sinking them dip the pips of the screws in pb to set.
 

sms986

Petty Officer 1st Class
Joined
Sep 18, 2017
Messages
334
I just finished another long weekend of work on the boat. I finally started laying some fiberglass down. Two of the three main bulkheads have been installed and I got the transom tabbed in and skinned. In addition, I cut out and laminated most of the stringers and bulkheads for the rear of the boat, motor mounts, etc. Also have the lower deck for the cabin cut, laminated, and water proofed on the underside with roof sealer. I also tabbed in the portions of the two bulkheads that are under the lower deck and gave them one layer of 17 oz skin. Here are some progress pictures.
 

Attachments

  • IMG_20190722_181826756.jpg
    IMG_20190722_181826756.jpg
    106.9 KB · Views: 11
  • IMG_20190722_181843811.jpg
    IMG_20190722_181843811.jpg
    111.3 KB · Views: 11
  • IMG_20190722_181814274.jpg
    IMG_20190722_181814274.jpg
    87.6 KB · Views: 10
  • IMG_20190722_181904007.jpg
    IMG_20190722_181904007.jpg
    97.4 KB · Views: 10
  • IMG_20190722_181821747.jpg
    IMG_20190722_181821747.jpg
    106.7 KB · Views: 10
  • IMG_20190722_182014422.jpg
    IMG_20190722_182014422.jpg
    107.6 KB · Views: 11

sms986

Petty Officer 1st Class
Joined
Sep 18, 2017
Messages
334
I have two questions at this point:

1. How big of an air bubble should I worry about? Here and there I have a few small (>5mm) bubbles. I've read a lot on bubbles and haven't learned much. They talk about strength and "microclimates" of humid air in these bubbles causing rot. I'm not buying that 3 square millimeters of humid air under a bubble will rot out my transom. My concern is with strength. I know this can cause loss of strength and possible delamination, but just how much risk do I run by leaving them? I put a picture below of a few bubbles, but it's hard to tell where the bubbles are because they're so small. Couldn't even positively identify any bubbles on the wood part of the transom.

2. I'm using colloidal silver right now to bed my wood. Am I going to lose significant strength by switching from West system 406 silica to system 3 fumed silica? It's getting pretty expensive. What characteristic changes can I expect?

Thanks!
 

Attachments

  • IMG_20190722_181854627.jpg
    IMG_20190722_181854627.jpg
    90.9 KB · Views: 6

kcassells

Fleet Admiral
Joined
Oct 16, 2012
Messages
8,596
I don't see any bubbles, at least to be concerned with. After the size of a quarter, US currency then quick repair is needed.
Fumed silica is the standard thickening product of choice.
 

sms986

Petty Officer 1st Class
Joined
Sep 18, 2017
Messages
334
Hey all, sorry it's been so long.

Long story short some things happened this summer and now I am planning a wedding.

But, I didn't give up on the boat. I have been working here and there over the past few months to build my engine mounts. I also installed the lower deck up front and the outer stringers. Here are some update pictures.

I will be able to work on the boat over Thanksgiving week and I plan to put the engine mounts and everything else up to the middle bulkhead in.
 

Attachments

  • IMG_20191108_220644818_01.jpg
    IMG_20191108_220644818_01.jpg
    69.3 KB · Views: 10
  • IMG_20191011_144421609.jpg
    IMG_20191011_144421609.jpg
    103.6 KB · Views: 10
  • IMG_20191108_220637758.jpg
    IMG_20191108_220637758.jpg
    70 KB · Views: 10
  • IMG_20191011_144318727.jpg
    IMG_20191011_144318727.jpg
    111.7 KB · Views: 10
  • IMG_20191011_144418337.jpg
    IMG_20191011_144418337.jpg
    105.9 KB · Views: 10

sms986

Petty Officer 1st Class
Joined
Sep 18, 2017
Messages
334
So this week I had a lot of time to work with the boat. I got my engine bay in place and also had time to cut the rest of the boards under the deck and test fit them all. I've got them loaded up so that I can laminate them over the next few weeks. Here are a few progress pictures. Happy Thanksgiving!
 

Attachments

  • IMG_20191201_092001685_02.jpg
    IMG_20191201_092001685_02.jpg
    263 KB · Views: 10
  • IMG_20191201_092010178.jpg
    IMG_20191201_092010178.jpg
    235 KB · Views: 10

sms986

Petty Officer 1st Class
Joined
Sep 18, 2017
Messages
334
Thanks!

I'm very happy with how everything fit like a glove. My deck height is perfect all around.

The subdeck components that I cut out were done in the boat (hence all of the sawdust that I have to clean up) and fit flush with the stringers and bulkheads.

When I started installing new wood in the boat, I thought that this was going to be a nightmare. The two bulkheads that I put in first as well as the outer stringers in the rear took me hours to get perfect. By perfect, I mean parallel/perpendicular to the centerline and flush with the old deck height. After that, getting the engine mounts perfect was still a pain. What I ended up doing was making a cradle to suspend them using the outer stringers. Once they were in, the work really picked up. It's so much easier once you've established some right angles and a deck height. Like I said, I have all of the wood cut out and ready to be laminated. All of this was done in a half day's work, and it was all test fitted perfectly. Moral of the story, for those who are starting to put new wood in your boats, it gets much much easier once you get the first few pieces in.
 

sms986

Petty Officer 1st Class
Joined
Sep 18, 2017
Messages
334
Thanks!

So I'll be doing my deck in January, and with the time I have off for Christmas I will have plenty of time to work with the boat. I'm reading about and tossing around ideas for capping and cleating my stringers and bulkheads. So far, my plan is this:

I'll tab in everything with my last tab going all the way up to about 1/4-1/8" from the top of each stringer and bulkhead.

My plan was to take a 2x2 of coosia board and basically glue a 2x2 section to each side of the top of each stringer/bulkhead at deck height, then pour in thickened epoxy over top to fill in the gaps. That way, I don't have to worry about the 45 degree angles at the top of the board by trying to wrap a piece of glass around the top, and I don't have to worry about waterproofing and glassing over the cleats. However, I haven't successfully found a composite 2x2 anywhere.

Any other ideas?

Thanks
 

sms986

Petty Officer 1st Class
Joined
Sep 18, 2017
Messages
334
So I could really use some help...

Good news and bad news.
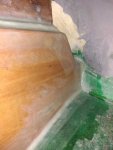
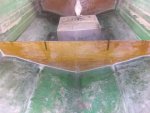
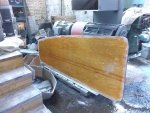
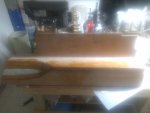
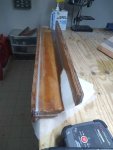
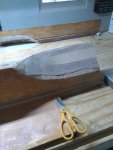
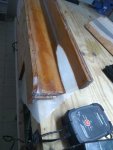
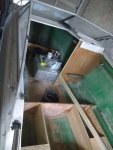
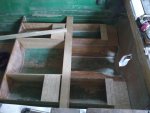
The good news is I got all of the wood cut and test fitted into the hull. All that's left to cut is the deck. I have the first side of all laminated and I just coated the other side and end grains. I also got some more wood out into the boat. Tomorrow, I should be able to put the rest in.

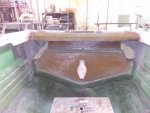
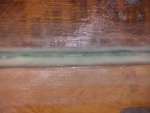
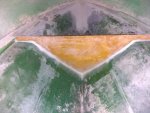
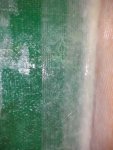
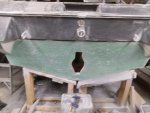
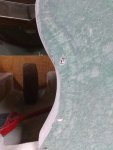
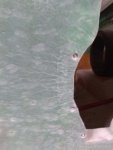
Bad news is, while I was waiting for things to set up, I fiddled with some finishing touches on my transom, and long story short I burned the midnight oil stripping the outer skin of the gelcoat. I found a bunch of small holes in the transom rear that I didn't notice before and after some investigation, I found it best to just shave off the gelcoat and put 2 layers of 1700 on the outside after filling these holes. After stripping the outer skin to bare glass, I found more issues-what looks like cracks all around the keyhole.

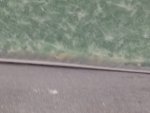
I also found two large voids at the bottom edge of the transom going about 2 inches up.

I have a few questions.

First, how can I pinpoint voids to the point where I can trace the whole thing? I know people have done it but I'm not sure how.

Second, will filling these voids with thickened resin be ok? They are not extending into the bellhousing area, and I am confident that even if it is slightly out of shape I can get it sanded down flat if need be.

Third, regarding the cracks, I think it would be ok to just encapsulate them in two extra outer skin layers. Would you agree?

Last, should I wrap my skin around the hull, or would it be ok to just go 1/2" from the outer perimeter of the transom on the first layer then 2" from the perimeter on the second layer? I'd rather not mess around with trying to wrap it around and making it un-noticeable later.

Thanks!
 

Attachments

  • IMG_20191223_003028363.jpg
    IMG_20191223_003028363.jpg
    102.8 KB · Views: 5
  • IMG_20191223_003023560.jpg
    IMG_20191223_003023560.jpg
    105.2 KB · Views: 5
  • IMG_20191223_003044163.jpg
    IMG_20191223_003044163.jpg
    99.3 KB · Views: 5
  • IMG_20191223_003103913_BURST001.jpg
    IMG_20191223_003103913_BURST001.jpg
    75.6 KB · Views: 5
  • IMG_20191223_003040947.jpg
    IMG_20191223_003040947.jpg
    88.3 KB · Views: 5

kcassells

Fleet Admiral
Joined
Oct 16, 2012
Messages
8,596
First, how can I pinpoint voids to the point where I can trace the whole thing? I know people have done it but I'm not sure how.

___ Not sure what you mean. I would counter sink the holes then fill with pb.

Second, will filling these voids with thickened resin be ok? They are not extending into the bellhousing area, and I am confident that even if it is slightly out of shape I can get it sanded down flat if need be.

___Sounds like you can fill the voids with PB then shape. Probably may need glassed to keep strength of the pb

Third, regarding the cracks, I think it would be ok to just encapsulate them in two extra outer skin layers. Would you agree?

___Cracks are like fractures. You will want to dremmel them clean like a small V groove and pb.

Last, should I wrap my skin around the hull, or would it be ok to just go 1/2" from the outer perimeter of the transom on the first layer then 2" from the perimeter on the second layer? I'd rather not mess around with trying to wrap it around and making it un-noticeable later.

___You may just glass the back transom complete to sides and top. All gelcoat off.
 
Top