1963 LoneStar El Dorado Restoration

Watermann

Starmada Splash of the Year 2014
Joined
Jan 12, 2013
Messages
13,753
Lookin good, nothing like having a dry boat that's for sure :thumb:
 

JSnooky

Seaman Apprentice
Joined
Nov 30, 2018
Messages
46
She fits in the garage on the trailer, barely. When I say no leaks, I mean, for now LOL! I know a riveted boat will always have a few. Now that the exterior is primed though, I can concentrate on putting gluvit down on all the rivets and seams and then prime and paint the bilge. That should help to seal her up a bit more don't ya think?
 

Watermann

Starmada Splash of the Year 2014
Joined
Jan 12, 2013
Messages
13,753
Yeah I use Gluvit on all my boats seams, rivets with special attention to the keel area. A leak test with water inside or the boat just sitting in the water won't reveal a leak that can occur when underway fully loaded.
 

JSnooky

Seaman Apprentice
Joined
Nov 30, 2018
Messages
46
Yeah I use Gluvit on all my boats seams, rivets with special attention to the keel area. A leak test with water inside or the boat just sitting in the water won't reveal a leak that can occur when underway fully loaded.

I one hundred percent agree. Once she starts bangin around and flexing, there are sure to be a few lol.
 

edgepa

Petty Officer 3rd Class
Joined
May 30, 2011
Messages
92
Great boat and good luck with your project. For the layout, I would stick with the controls outside the cabin. Most El Dorado's seem to be inside, but I had the model/option with it outside and it made sense to me. I was planning on keeping as original as possible with a few tweeks.

IM000521.JPG
 

JSnooky

Seaman Apprentice
Joined
Nov 30, 2018
Messages
46
Great boat and good luck with your project. For the layout, I would stick with the controls outside the cabin. Most El Dorado's seem to be inside, but I had the model/option with it outside and it made sense to me. I was planning on keeping as original as possible with a few tweeks.


Thanks for your input, I appreciate it. I am going to do exactly as you suggested. In fact, I have decided to tweak this old gal and give her more of a miniature sport-fisherman look. Making some really good progress now that we have 80 degree weather down here in Florida. Should be posting more photos soon.

Oh, here's how I solved my Portlight issue, let me know what you all think. They are only dry fitted at the moment, but I am happy with the outcome.
 

Attachments

  • photo308451.jpg
    photo308451.jpg
    1.1 MB · Views: 1
  • photo308452.jpg
    photo308452.jpg
    1.5 MB · Views: 1

JSnooky

Seaman Apprentice
Joined
Nov 30, 2018
Messages
46
Thanks Oldrem, they do give it a different look though. I'm starting to get pretty excited about this build. She is slowly but surely coming back to life.
 

kcassells

Fleet Admiral
Joined
Oct 16, 2012
Messages
8,596
Yea I saw that green grass in the background from yesterdays post.
Your rehab starting to look good. Following along. I like this tinny.

Waterman is a definite go to guy for help.
 

JSnooky

Seaman Apprentice
Joined
Nov 30, 2018
Messages
46
Sure is. As a matter of fact, the Strawberry Festival begins this week. I am personally surrounded by Strawberry fields, this year they smell amazing.
 

JSnooky

Seaman Apprentice
Joined
Nov 30, 2018
Messages
46
Okay, so it's been a while since I posted any updates.

I have cut and sealed all of the flooring, and am halfway through pouring the foam. I went with six pound density beneath the floor to stiffen things up, not sure if I am going to use pour foam or cut foam from sheets on the interior bulkheads, would love some input on that.

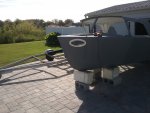
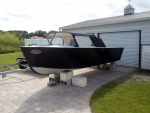
The new portlights have been dry fit and fit nicely. Oh and exterior painting has begun!

I know she might not look like much now, but give her a couple more weeks. I like to give each coat 72 to 96 hours of cure time before I wet sand and apply the next. I'm going with a good old Enamel Alkyd this time around, but will be stepping up the coats followed by a clear finish. Let me know what you think. Also, I will be getting more photos up soon, the weather has not been good the last few days, so I am at a stand still.

The vessel AlumiNaughty is coming back from the Dead, slowly but surely.
 

Attachments

  • photo309292.png
    photo309292.png
    719.2 KB · Views: 2

kcassells

Fleet Admiral
Joined
Oct 16, 2012
Messages
8,596
Welcome back. I like that boat! I heard/read clear coat is pia if you get a scratch and never matches repair.
 

Watermann

Starmada Splash of the Year 2014
Joined
Jan 12, 2013
Messages
13,753
My hats off to you guys that can paint outdoors, I think I'd loose it. :lol:

Are you using catalyst hardener in your alkyd enamel?
 

JSnooky

Seaman Apprentice
Joined
Nov 30, 2018
Messages
46
My hats off to you guys that can paint outdoors, I think I'd loose it. :lol:

Are you using catalyst hardener in your alkyd enamel?

Watermann,

we didn't have a choice in the Coast Guard, so we got real good at it lol. As for the catalyst hardener, I will only use that on the final coat. I do things a bit weird; I roll on three or four good wet films, sanding between coats, then shoot the final coat with an hvlp gun. I like to wet everything around the boat down thoroughly prior to painting too. I find this controls a lot of the dust. If I had the space to shoot inside, I would, but I don't. Thankfully I live in Florida, so the paint skins up pretty fast.

I have found Naptha to be a great thinner for Enamel Alkyd, never, ever, use Mineral Spirits, or the paint will never dry. I like to roll the paint on with a foam roller and then follow behind each section with a dry foam roller. Kind of like rolling and tipping, only better in my opinion.
 
Top