gm280
Supreme Mariner
- Joined
- Jun 26, 2011
- Messages
- 14,591
Okay, I have some more updated material.  eace:
eace:
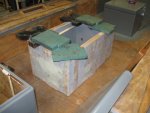
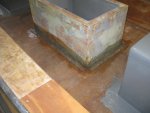
Today I installed the live well in the boat. It is there to stay since I "glued" it in place for the final install. However the "glue" I used was actually Polyester Resin, MEKP, Cabosil and 1/4" Chopped Strand Fiberglass.
My mixture started out with 300ml of Polyester Resin, then I added the MEKP to it and mixed it well for a couple minutes. Then I started adding Cabosil and 1/4" Chopped Strand Fiberglass until I got a glue/paste like mixture. I used that mixture to apply between the boat floor and the live well bottom. And I can tell you, you won't need nearly that much mixture unless you built a huge live well that is twice this size. I could of mixed half these amounts and had enough. I added some serious weights on top to hold it in place until the poly mixture cures.
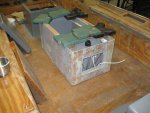
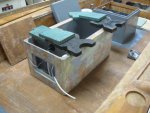
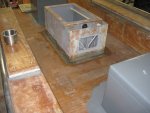
Of course I installed all the hoses and clamps before I installed the live well. It took 6 screw type stainless steel hose clamps just for the plumbing at the live well itself. And since the screw clamps were able to cover a large range of diameter sizes, I cut off the excess metal strips and smoothed out the ends so you won't get cut if you ever have to work on them later on. I installed each and marked how long they needed to be. Then I removed each one and cut the excess off and smoothed the ends, and reinstalled them for final. Way better idea to do that now and save all the cuts you would surely get if you go back in to them later on.
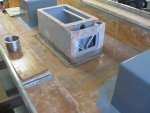
So with the exception of connecting up the live well pump at the transom, and tabbing in the live well sanding and painting it, and of course the top cushion cover, it is finished and I don't think I will have any problems from it. Of course getting fish in it will be the hardest problem I will have.
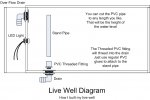
I will post the final picture(s) with everything done, but that is how I built my live well. Remember, this isn't the only way to build one, just the way I built mine. Sizes are determined by each person as they built theirs. And if you don't need live well pumps to aerate the fish, or even to fill it up, you can skip those options. Same for the lights option too. There is no one size only live well. That is the beauty of it.
Final pictures to come later... Thanks for tagging alone and post questions or ideas. We all learn from both! :encouragement:
And one final note, If I can do this, anybody can... :thumb:
eace:Today I installed the live well in the boat. It is there to stay since I "glued" it in place for the final install. However the "glue" I used was actually Polyester Resin, MEKP, Cabosil and 1/4" Chopped Strand Fiberglass.
My mixture started out with 300ml of Polyester Resin, then I added the MEKP to it and mixed it well for a couple minutes. Then I started adding Cabosil and 1/4" Chopped Strand Fiberglass until I got a glue/paste like mixture. I used that mixture to apply between the boat floor and the live well bottom. And I can tell you, you won't need nearly that much mixture unless you built a huge live well that is twice this size. I could of mixed half these amounts and had enough. I added some serious weights on top to hold it in place until the poly mixture cures.
Of course I installed all the hoses and clamps before I installed the live well. It took 6 screw type stainless steel hose clamps just for the plumbing at the live well itself. And since the screw clamps were able to cover a large range of diameter sizes, I cut off the excess metal strips and smoothed out the ends so you won't get cut if you ever have to work on them later on. I installed each and marked how long they needed to be. Then I removed each one and cut the excess off and smoothed the ends, and reinstalled them for final. Way better idea to do that now and save all the cuts you would surely get if you go back in to them later on.
So with the exception of connecting up the live well pump at the transom, and tabbing in the live well sanding and painting it, and of course the top cushion cover, it is finished and I don't think I will have any problems from it. Of course getting fish in it will be the hardest problem I will have.
I will post the final picture(s) with everything done, but that is how I built my live well. Remember, this isn't the only way to build one, just the way I built mine. Sizes are determined by each person as they built theirs. And if you don't need live well pumps to aerate the fish, or even to fill it up, you can skip those options. Same for the lights option too. There is no one size only live well. That is the beauty of it.
Final pictures to come later... Thanks for tagging alone and post questions or ideas. We all learn from both! :encouragement:
And one final note, If I can do this, anybody can... :thumb: