How I built my live well

gm280

Supreme Mariner
Joined
Jun 26, 2011
Messages
14,590
This thread is going to show you how I built my live well from initial idea to reality. And while it isn't the gospel or final word on building live wells, it is merely how I built mine.

I am presently refurbishing a 1976 Tom Boy Boat (tri-hull design) that was totally trashed. And while it did have something resembling a live well, I wanted something a little better.

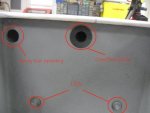
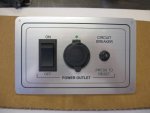
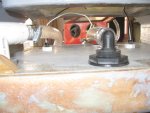
So I set out to come up with a simple design and started. My first attempt was to basically use a cooler. And that was for a few reasons. I could plug it in and plumb water to it and such to keep the fish (yea, like I really catch any) alive. And I went and bought a nice size cooler that I though would work. It was cheap and I thought my live well issues were covered. NOT SO FAST!

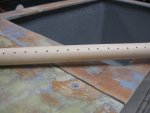
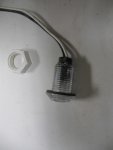
As I was drilling the cooler out to fit the spray bar and drain holes, I made the royal mistake to drill one hole from the outside in. :nono:
Never ever do that if you want the inside to stay intact. When the Forstner bit broke though the inside, it tore the inside plastic instantly. The plastic on the inside was a lot thinner then the plastic on the outside...a lot thinner too. So lesson learned there. If I would have started drilling from the inside first, it probably could have worked. Who know? :noidea:

You are probably wondering why I am posted these things. Just to let others know some of the things to watch for as they make their live well.

SOOOoooo I made a decision to built the live well from scratch being how the cooler was now useless. Yes I did try different glues and such, but it wasn't working to that idea and cooler was trashed...literally!

Now we can work on the real live well. :peace:

First thing to do is figure out what size you need, not want. I say that because your wants are always larger then your needs. And remember one gallon of water weighs 8.34 pounds or 3.76 kgs. And those gallons add up real quick. So if you don't want to be carrying a lot of extra useless weight, size your live well design with some reasonable common sense.

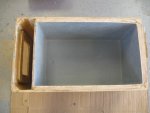
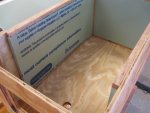
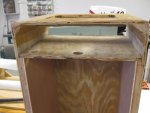
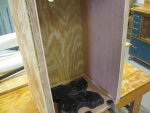
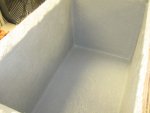
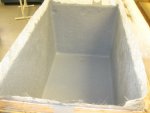
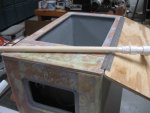
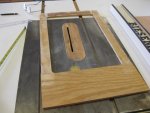
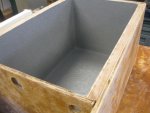
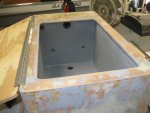
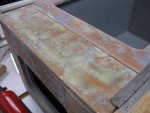
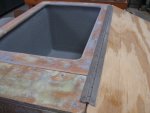
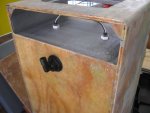
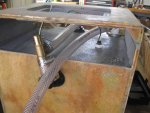
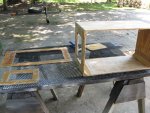
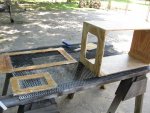
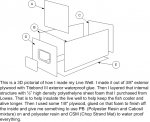
My design is 27 3/4" long by 15 3/4" wide by 12 3/4" deep. Yes I know those are unusual measurements. But I started with straight inches and when finished it was a bit larger. I used 3/8" thick "exterior" grade plywoods. But in all honesty, you could built it from 1/4" depending on what you finish it with. Ill explain as I go along.

So you can built your size to your needs. Mine is going into a stick steering boat similar to a Bass Pro pan-fish special setup. And I am going to use it as a seat as well for a third person or kid to sit on.

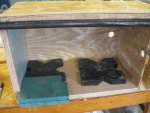
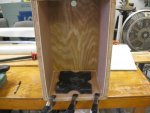
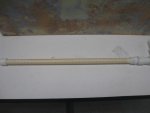
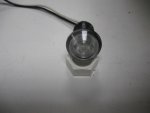
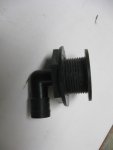
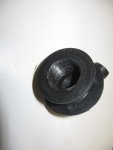
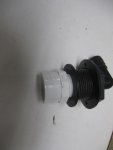
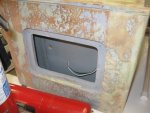
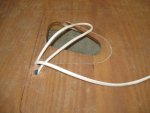
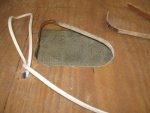
Here are a few pictures of my design and pictures thus far. More to come very soon.
 

Attachments

  • photo304388.jpg
    photo304388.jpg
    1.1 MB · Views: 0
  • photo304389.jpg
    photo304389.jpg
    1 MB · Views: 0
  • photo304390.jpg
    photo304390.jpg
    139 KB · Views: 0
Last edited:

Mad Props

Lieutenant Commander
Joined
Jul 8, 2016
Messages
1,766
Tagging along... Dont need a live well, but looks interesting!
 

gm280

Supreme Mariner
Joined
Jun 26, 2011
Messages
14,590
Tagging along... Dont need a live well, but looks interesting!

Ha great to have you along. If you see anything I did wrong, chime in.

Okay we got the preliminaries out of the way. And by now you have your design, even if it is in you head, at this time. You could draw a little scratch drawing to follow by if you like. I have to do that myself, keeps me on track. I wanted a live well to keep the fish, if I ever catch any, alive. And one way to do that is to insulate the live well and/or make sure you aerate the water. I did both.

I used standard wood glue and glued up the boxy frame. However, I used water proof wood glue like Titebond III. Is it water proof and is perfect for the initial glue up. In the basic assembly drawing there isn't any corner supports shown. If you want you can add triangle shaped gussets in the corners to make it more stout. Again I did, but looking back, they may not really been needed. This being the first live well, I went way over board in the strength department. After looking back, I easily could have eliminated some of the items and still arrived at a solid live well.

After you glue up the frame structure, you can cut some foam and glue it on the frame. I used 1/2"polyethylene foam sheet from Lowe's. The have different thicknesses so choose what you like. After gluing on the foam, I then cut and glued on 1/4" plywood. I used 1/4" Luan materiel that I got a Lowe's. So now I have a framed up basic live well that is also insulated. And you can now see how it can get heavy really quickly.

I used Luan sheet to give me a material to use with polyester resins and CSM (Chop Strand Mat) fiberglass. I covered the entire inside with CSM and colored polyester resin. That makes it extremely solid and waterproof at the same time. If you are not interested in any color, you can forego the pigment in the polyester resin. It won't change the water proofing ability or the strength either. And I got my gray pigment at US Composites where I bought most everything concerning fiberglass and polyester materials. They have different pigments, so you can choose your favorite, if you go that route.

If you look at my design. you see a frontward section where there is a end piece with a panel cut out of it. I did that to give me a place to install the supporting water and electrical parts. If you are not going to make your live well without such things, you can ignore that section.

I made it so I can access the live well plumbing parts and the lights inside the live well. It allows me some small hand room to get to those fittings if I need to. So that is your option.

Before doing all that gluing and polyestering (probably not a real word) and CSM efforts, you have to figure out where your drain will be and the inlet for the aerating system (spray bar if you want one) and if you want inside lights, where they will be placed. And then drill all those holes in the appropriate panels before hand. Can't much do some of those things after you have it all sealed up, unless you have a small capable drill. I did mine before hand and covered over the holes while sealing it up with CSM and Poly.

The front section area worked great for such things allowing the over flow, spray bar and light holes to be drilled in that plate. Planning comes in handy when constructing your live well. So think about everything you'd like before hand if you can.

From previous live wells via factory setup, lights come in really good at night when trying to see the fish and culling the ones you don't want...as it that ever happened to me. :facepalm: :cold:

More to come real soon.
 

Attachments

  • photo303623.jpg
    photo303623.jpg
    61.8 KB · Views: 0
  • photo304391.jpg
    photo304391.jpg
    74.3 KB · Views: 0
  • photo304392.jpg
    photo304392.jpg
    64.8 KB · Views: 0
  • photo304393.jpg
    photo304393.jpg
    80.1 KB · Views: 0
  • photo304394.jpg
    photo304394.jpg
    73.6 KB · Views: 0
  • photo304395.jpg
    photo304395.jpg
    67.3 KB · Views: 0
  • photo304396.jpg
    photo304396.jpg
    70.6 KB · Views: 0
  • photo304397.jpg
    photo304397.jpg
    58.3 KB · Views: 0
  • photo304398.jpg
    photo304398.jpg
    69.2 KB · Views: 0
  • photo304399.jpg
    photo304399.jpg
    64.3 KB · Views: 0

Mad Props

Lieutenant Commander
Joined
Jul 8, 2016
Messages
1,766
Man that is looking really good!
Just a dumb question cuz I don't know the first thing about livewells... Is there a reason you wouldn't want to run a pump that just constantly fills and discharges the "spent" water, rather than trying to keep the water at the right temperature and aerated? If you pump in the water you caught them from and constantly pump it through, seems they would have the ideal environment.
 

gm280

Supreme Mariner
Joined
Jun 26, 2011
Messages
14,590
Man that is looking really good!
Just a dumb question cuz I don't know the first thing about livewells... Is there a reason you wouldn't want to run a pump that just constantly fills and discharges the "spent" water, rather than trying to keep the water at the right temperature and aerated? If you pump in the water you caught them from and constantly pump it through, seems they would have the ideal environment.

Good question. I do pump water from the same place I catch the fish. I use a timer circuit to spray fresh water from the lake or river in intervals to help keep the fish cool and oxygenated. I just haven't got to that part yet. However as you pump water in, some water has to exit as well. That is why I have a stand-pipe setup and an over-flow as well. I will get to those issue shortly. Hope that help explain it some for now.

Obviously more to come..soon!
 

chevymaher

Commander
Joined
Mar 29, 2017
Messages
2,915
I like the Harbor Freight press parts. I got those. Looks good the live well.
 

sphelps

Supreme Mariner
Joined
Nov 16, 2011
Messages
11,432
:pop2: Good stuff GM ! If you fish as good as you build things your gunna need a bigger live well . :hail:
 

dezmond

Senior Chief Petty Officer
Joined
Jul 21, 2010
Messages
760
I'm tagging along :) nice work and some great ideas for when I am at that point to build one for my boat. Thanks for posting this DIY. :)
 

gm280

Supreme Mariner
Joined
Jun 26, 2011
Messages
14,590
:pop2:
wAAACH5BAEKAAAALAAAAAABAAEAAAICRAEAOw==
​ Good stuff GM ! If you fish as good as you build things your gunna need a bigger live well . :hail:
wAAACH5BAEKAAAALAAAAAABAAEAAAICRAEAOw==

Well I have heard that if you build it, they will come. That is my idea in the live well anyway. Never worked in other boats, but I can still hope. :facepalm:
wAAACH5BAEKAAAALAAAAAABAAEAAAICRAEAOw==


Thanks everyone for the feed back. But please remember this isn't the only way to build your live well, only how I built mine.

At this stage it is basically formed but not finished. On my live well I installed the lights, drain, standpipe and overflow holes before assembling anything. I covered over all those holes when I used the polyester and CSM matt fiberglass. That was easier to do then try to cut the opening out as I was laying in the waterproofing covering. Once it cures, it is way easier to recut all the hole openings.

If you are wanting to be able to see into the live well at night, install some water proof LED lights. I installed two such lights and it allows me to see easily inside when I open the lid. I used some reed magnetic switch setups so when I open the lid, the lights come on if you have power connected to them. And I installed them about mid way on the panel. They are not very expensive and even the reed magnetic switches a cheap as well, Something to think about before you get too far forward. I'l post pictures of each item so you can see what they look like.

The drain I used was a simple typical threaded in drain with a right angle turn so I can connect the drain hose to it. a lot easier then a straight out drain I made a spray bar to both fill water initially, and aerate the water after it is filled. Very easy to make.

I cut a piece of 1/2" PVC pipe to size. That size will depend on your live well length. Then I drew a straight line down the side of the pipe to help keep the holes aligned when drilling the holes. That was so I could drill some small holes about every 1/2" or so along that line using a 1/16" or there about drill bit. Those small holes will force water and air into the live well water to maintain the level and aerate the water. That helps keep the fish fresh and able to breath and stay alive.

I drilled the installation mounting hole for that PVC pipe/spray bar in the upper corner of the forward panel so the spray bar would be out of the view or in the way of accessing anything in the live well. The top plate pretty much covers over it. Make sure you point the spray pattern towards the middle of the live well water surface to get the maximum advantage of the aeration setup.

Next is the standpipe. If you are not familiar with a standpipe, it is exactly what it's labeled, a standing pipe. It is a pipe the threads into the drain that you cut to the height of the water level you want. Once the water reaches the top of the pipe, it starts emptying down the inside of the pipe and out the drain. So a threaded stand pipe is a great item to change the water level any time you want. You just cut a different size pipe to control the level. Again I used a PVC pipe and a threaded PVC fitting to be able to thread the stand pipe assembly into the drain fitting.

And that brings us the overflow drain. Yes, you do need an overflow drain as well. That is a backup drain in case your initial drain becomes slow or even stopped up totally. I installed mine higher in the live well then any standpipe height I would use. So it only would come into use if the water got well over the standpipe height. A backup if you will., but equally important if you don't want a boat full of water. Been there done that! :cold:

More to come.
 

Attachments

  • photo304438.jpg
    photo304438.jpg
    50.3 KB · Views: 0
  • photo304439.jpg
    photo304439.jpg
    39 KB · Views: 0
  • photo304440.jpg
    photo304440.jpg
    49.2 KB · Views: 0
  • photo304441.jpg
    photo304441.jpg
    62.9 KB · Views: 0
  • photo304442.jpg
    photo304442.jpg
    77.9 KB · Views: 0
  • photo304443.jpg
    photo304443.jpg
    40.7 KB · Views: 0
  • photo304444.jpg
    photo304444.jpg
    40.2 KB · Views: 0
  • photo304445.jpg
    photo304445.jpg
    36.6 KB · Views: 0
  • photo304446.jpg
    photo304446.jpg
    34.2 KB · Views: 0
  • photo304447.jpg
    photo304447.jpg
    39.7 KB · Views: 0
  • photo304448.jpg
    photo304448.jpg
    30.3 KB · Views: 0
  • photo304449.jpg
    photo304449.jpg
    35.2 KB · Views: 0
  • photo304450.jpg
    photo304450.jpg
    27.2 KB · Views: 0
Last edited:

gm280

Supreme Mariner
Joined
Jun 26, 2011
Messages
14,590
I like the Harbor Freight press parts. I got those. Looks good the live well.

Oh you have good eyes. Yes those press blocks are from Harbor Freight 20 ton press. They are very heavy and do good at weighting down the panels to dry. Clamps work good but can't get into the back of the panels like those press blocks. But bricks, cinder blocks even some scraps lengths of woo,d wedged in to hold everything 'til dry. No wrong ways.

I am sure some of you are wondering where I got my live well drain with threads on the inside of it for the standpipe to thread in? I didn't buy them that way. What I did was take a threaded black iron pipe the size I needed with threads on the end, and heated it up some with a torch and threaded into the plastic/nylon drain fitting to melt those threads into the part. It really goes a lot easier then you would think, and then your PVC fitting will thread in perfectly. Just make sure the iron pipe is the same size as the PVC part. Easy peasy!

Another thing I didn't mention but I did with my build. I use polyester resin and CSM on all wooden parts in the inside and outside of the live well. That way water shouldn't be a problem with it. You can do that after you assemble it or even before, your option. I also used a 3/4" round over router bit to round over the outside ends of the box to remove any sharp corners. I did the same to my seat bases as well and they all match now.

The next thing is the top. I cut the top out and again polyestered and CSM that top and rounded over the inside edges as well using a 1/4" round over router bit. I didn't round over the outside edges because I want them to fit flush with the box body of the live well. After that top was glued in place, I took a flush cutting router bit and flush cut the outside to the body. Now it is close to being fully assembled. And with my build, I cut the forward section out from the top plate. That way I can remove it for future access to both plumbing fittings and wiring.

When you make your top, allow some overhang so that it helps control water splash and keeps the water in the live well better. I also used some wood strips on the sides at the top to give me something to screw the lid into instead of just polypropylene foam. Those wood strips can be any size that works for your setup. And I did this before polyestering and CSM the inside as well. So when you do coat the inside, it seals the strips at the same time.

All this sounds way harder then it really is to do. What you are trying to do is build your live well and insulate it and water proofing it all at the same time. You want the water inside to stay there and no water on the outside. :D

More to come
 

Attachments

  • photo304495.jpg
    photo304495.jpg
    73.8 KB · Views: 0
  • photo304496.jpg
    photo304496.jpg
    74.5 KB · Views: 0

Scott Danforth

Grumpy Vintage Moderator still playing with boats
Staff member
Joined
Jul 23, 2011
Messages
47,491
tagging along.... looks like the coolers I built for the boat.... (I cant catch fish either)
 

gm280

Supreme Mariner
Joined
Jun 26, 2011
Messages
14,590
tagging along.... looks like the coolers I built for the boat.... (I cant catch fish either)

Maybe I should call mine a cooler instead of a live well. I mean it is so over size for my fishing abilities, it would be better utilized as a cooler... :confused:
 

Scott Danforth

Grumpy Vintage Moderator still playing with boats
Staff member
Joined
Jul 23, 2011
Messages
47,491
LOL.... with the foam you have it could double as a cooler

I used 1/4" ply for the sides, 1" ply for the top (for screws to hold under the deck) and then 1" of foam.

I did the wood on the inside and insulation on the outside so I could dump the beers in without fear of denting the fiberglass/foam

the boat now has two 55 qt coolers in the floor that will keep liquid fishing enhancer and ice for 3 days.

which is good, because it also holds the fresh fish from the fish market (near one of the on-the-water bar stops)
 

gm280

Supreme Mariner
Joined
Jun 26, 2011
Messages
14,590
LOL.... with the foam you have it could double as a cooler

I used 1/4" ply for the sides, 1" ply for the top (for screws to hold under the deck) and then 1" of foam.

I did the wood on the inside and insulation on the outside so I could dump the beers in without fear of denting the fiberglass/foam

the boat now has two 55 qt coolers in the floor that will keep liquid fishing enhancer and ice for 3 days.

which is good, because it also holds the fresh fish from the fish market (near one of the on-the-water bar stops)
---------------------------------------------------------------------------------------------

Scott lol, and that IS a good idea, and you don't need to clean them either! :thumb:

I started out with 3/8" ply, but after it is built, I could have easily gone a lot thinner and it would have been just as solid. When you stack 3/8" ply, 1/2" foam and 1/4" lauan and then polyester and CSM both inside and out, it gets extremely stout but also heavy. Who knew...not me! :crazy:

Here are a few more pictures of my live well. You can see the top plate installed and the hang over on the inside I was talking about. You can also see the top plate/cover I attached with stainless steel continuous hinge. I used stainless counter sunk screws, screwed into those wood block installed at the top of the foam around the casing. I still have to make the vinyl cushion for it and that is where I am now in this live well project.

You can also see the part I cut and screwed in at the top plate that I can remove for access to the plumbing and wiring if need be. And the casing looks like it has a serious case of leprosy. That is because I already sanded it (actually many times now) and then used polyester filler to smooth the outside to make it look nicer once it is painted. So even though it looks questionable, it is very smooth waiting paint.

The only thing I need to do now is glue it in place. And that means attach all the hoses and wires to the plumbed parts and LED lights. But not with just any glue. I will mix up some polyester resin with Cabosil and maybe even some 1/4" chopped strand fiberglass for extra strength, to make a simple PB mixture and apply that to the bottom and attach it to the boat floor. BUT, then use 1708 and poly and tab it in place. And follow that with another 1708 tabbing a little wider. Then sanding and ready to paint and it will be finished.

The opening is there for a power panel I made to allow the person sitting near it to use if they need a 12 volt outlet or even a USB charger or outlet.

I'll post the finished installed pictures as well.
 

Attachments

  • photo304514.jpg
    photo304514.jpg
    74.3 KB · Views: 0
  • photo304515.jpg
    photo304515.jpg
    77.3 KB · Views: 0
  • photo304516.jpg
    photo304516.jpg
    74.5 KB · Views: 0
  • photo304517.jpg
    photo304517.jpg
    84.8 KB · Views: 0
  • photo304518.jpg
    photo304518.jpg
    96 KB · Views: 0

gm280

Supreme Mariner
Joined
Jun 26, 2011
Messages
14,590
I haven't forgot about this thread. I actually worked on the live well some today. I removed all the fitting. The LED lights, the spray bar, the over-flow drain and the bottom standpipe drain and even the top plate/seat cover and the access plate. And then reinstalled all the fittings with 100% clear (after cured) silicone sealer as their final install. I tighten them all down pretty tight, but remember so many of these type fittings are not metal so you have to use a little finesse.

I'll post those picture soon as well. I am letting everything cure and hopefully tomorrow I can polyester the live well into the boat hull. Once I do that, the electrical and plumbing can all be attached as well. I will also post those pictures. And there is very little left to cover with this live well thread after that. I will post the live well pump setup and the drain configuration so it may make a little more sense.

And I will post the final after it is tabbed in place and painted. That way everyone can see the final results and decide if it is worth building one yourself. And remember this isn't the only way to build a live well. Any modification you would like to do will work for your setup. This is just what I built for my hull setup.

More to come.
 

gm280

Supreme Mariner
Joined
Jun 26, 2011
Messages
14,590
Okay, I seriously haven't forgotten this thread. I am at the stage to install the live well in the boat. I am presently waiting on hose clamps to come in first so I can attach all the hoses while installing the live well. They are supposed to be in next mid-week. So when I do start with attaching the hoses and PBing the live well in place, I will post pictures. So until then...
 

76Terry

Cadet
Joined
Dec 1, 2018
Messages
8
This is sweet! I may need to refer back to this in a few months to redo mine.
 

gm280

Supreme Mariner
Joined
Jun 26, 2011
Messages
14,590
This is sweet! I may need to refer back to this in a few months to redo mine.

Thanks, glad you like it. I have to wait until the weather is right to PB this in place in the boat. And when it is good temps, it is raining. And when it is nice and sun shiny, it is cold. I guess the PB mixture will cure either way, so hopefully soon.

If you see anything to improve, chime in and let us know. Or if you have any questions, post them as well. This isn't the say all of live well building by any stretch.
 

gm280

Supreme Mariner
Joined
Jun 26, 2011
Messages
14,590
A real honest update...

Today I fitted the hoses and some of the plumbing to the live well. I had all intentions of PBing the live well in place. However, the temps are cold again and therefore I had to fight the plumbing hoses to make them fit. I used a heat gun and once they got a little warm, the hoses fit. But it was still too cold for me to attempt finishing the install for final. And when you are install the different hoses to your live well, try to set the hose clamps so if you ever need to get to them, you can at least get a tool on the clamp to loosen them if need be. A little thought now could save you a lot of headaches and long tedious work later. Close but not quite there yet. I need some warmer temps to finish this project...

Anyway you can see the area I had previously cut out in the boat floor was just not quite large enough for the drain fitting to fit and line up. So even planning can still provide some changes when it is time to install, but nothing that didn't work out with a little jigsaw work.

The wires are for the LED lights and the power outlet panel I am installing on the live well compartment.

Not sure if you can see how the overflow drain plumbed with the actual drain and the "T" brass fitting. And the hose to the spray bar is installed as well. Only need to connect up the "T" brass fitting to the last drain hose to the through=the-hull drain at the transom.

More to come and soon!
 

Attachments

  • photo305247.jpg
    photo305247.jpg
    77.8 KB · Views: 0
  • photo305248.jpg
    photo305248.jpg
    76.7 KB · Views: 0
  • photo305249.jpg
    photo305249.jpg
    74.6 KB · Views: 0
  • photo305250.jpg
    photo305250.jpg
    85.6 KB · Views: 0
  • photo305251.jpg
    photo305251.jpg
    74.8 KB · Views: 0
Top