1992 Riviera Cruiser refresh

Woodonglass

Supreme Mariner
Joined
Dec 29, 2009
Messages
25,924
Alrighty then!!! Yup the plywood is your "Transom" but...Not in the truest sense of the word. On a Pontoon such as yours it's more of a motor mount. IF the plywood is solid then I'd just soak it with a good coat of sealer and move on. I like to use a mixture of Boiled Linseed Oil, Mineral spirits and Spar Varnish to seal my wood. 1-2-1 ratio.
 

Aardvarkjff

Seaman Apprentice
Joined
Oct 22, 2018
Messages
37
Thanks Woodonglass! I will try to use motor mount vs transom to be more accurate. I will look into the sealing the mount. Thanks again.
 

Aardvarkjff

Seaman Apprentice
Joined
Oct 22, 2018
Messages
37
Just wanted to wish everyone here a Merry Christmas. Hope to get back to working in her in the new year.
 

Aardvarkjff

Seaman Apprentice
Joined
Oct 22, 2018
Messages
37
And we're back. Just last weekend, I had a chance to pull the beast out from the garage. Over the winter I put on the fence and helm. I knew that the helm would be a few inches too tall to clear the garage door opening, but with a little help it should be fine. Of course, my helper had a school function that left me hanging. In order to get it out, I had to pull the wheel off and let the trailer roll along on the hub for a few feet until it cleared. Luckily with a little ingenuity, some plywood, a truckers chain, and a come-along, all went well. Here she is seeing the sun for the first time......

Front.JPGPort side.JPGStarboard side.JPG
 

Aardvarkjff

Seaman Apprentice
Joined
Oct 22, 2018
Messages
37
Convertible seating.......

OK, So we were thinking...... how can we get things set up so we can eat together and yet still have the traditional pontoon seating along the back and side? Simply have the side bench swivel. Here is the seating as a more traditional style.
Lounge 2.JPG
Then you can swivel the side seat to face the back seats.

Dinette.JPGPort Cockpit.JPG
Now before the onslaught of comments on the back not being supported on the swiveling seat, I am having a railing made that will bolt to the base and basically follow the outline of the back of the seat. That way it will be supported as if it was up against a railing and it will allow us a hand hold to move it. the "aisle" that is created is a bit small, but that should not be a high traffic area anyway as we are all adults and one teen. (yes that is a porta pottie in the port side corner per the request of my dear wife)
 

Aardvarkjff

Seaman Apprentice
Joined
Oct 22, 2018
Messages
37
Moved controls.

Originally we had the controls mounted on the left side of the helm which did not work well for me on the test drive. With a little help from a metal shop, I had them bend me a piece of aluminum that fit between the railings. On that I was able to mount the controls. In addition, I purchased a new key switch that was panel mounted and placed that on the new helm.

Starboard Cockpit.JPG

Also, in the space between the helm will be the captain's seat and behind that will be a small cabinet that will house a small sink. (That is in the shop being created now.)
 

Aardvarkjff

Seaman Apprentice
Joined
Oct 22, 2018
Messages
37
Can you hear me now??? Antenna install.....

I installed a Uniden Marine VHF radio in the helm. Luckily I was able to mount it on the port side aft platform. In order for it to clear the garage and low hanging things, I mounted the antenna on a ratchet swivel, so it can be lowered along the back of the boat and not stick out more than a few inches. This will allow me to drop the bimini for trailering without bumping the antenna. There was just enough cable to reach the inside of the helm to the back of the radio. And I will say that soldering that connector on was a bit of a pain, but youtube to the rescue.

Antenna Up.JPGAntenna Down.JPG
 

Aardvarkjff

Seaman Apprentice
Joined
Oct 22, 2018
Messages
37
Aft Decks....

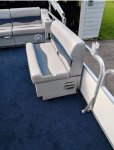
As you can see, I rearranged the things on the back decks from when I bought the boat. Originally, it had 2 tanks and 1 battery. Now I have 2 batteries (one dedicated deep cycle for the helm/electronics/etc) and one that is dedicated to starting the motor, but I have the option of tying it into the helm with a switch should the other battery die and I need to call for help. I have installed a selector that will allow me to switch between them or have them both tied in at the same time. I know this is probably overkill, but I can see my son somehow taking down the battery and we can't start it to get home. (I have that kind of luck).

Aft.JPG
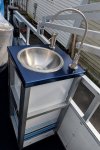
The open spot on the right side of the starboard deck will hold a 5 gallon bucket of fresh water for the small sink mentioned earlier.

As a backup plan, I can bring the batteries in the fence in one of the seat bases. There is a 3 inch hole in the fence that lines up with the base and I can vent the base out the back with no issues if needed. That would allow me to put in the second tank again if I wanted.
 

Aardvarkjff

Seaman Apprentice
Joined
Oct 22, 2018
Messages
37
Cable support.

I mounted a fish finder transducer on the back of the pontoon. However I was not certain how to get the cable to be neat against the back of the pontoon. So I went back to my metal guy and had him weld me up a quick support. I simply bolts to the top of my bracket and has a small support screwed into the top of the pontoon's lifting ear. now I can neatly zip tie this in place. Since I can't weld aluminum, I do have to outsource some things. I bought the stuff and Lowes and cut it to the size I needed, then I marked where I needed the welding done and he buzzed if off in about 3 minutes.

Cable support.JPG
 

sphelps

Supreme Mariner
Joined
Nov 16, 2011
Messages
11,435
Nice toon project you have going ! Thanks for sharing it with us !
I’ve been thinking on a pontoon boat for a while but my boating is 95% done in salt water . Just reluctant with maybe possible corrosion. I may opt for an old style Hurricane deck boat instead .. Like I need another project boat ..:facepalm:
Looking forward to seeing yours splashed !
 

Aardvarkjff

Seaman Apprentice
Joined
Oct 22, 2018
Messages
37
Thanks. We were looking at this and it seemed that the corner seat lost some leg room in the corner. The original furniture was not fastened down, so we used it to shuffle things around. For our family we found that having the layout as this was the most natural for us. Also, it allows us to have lunch as a group facing each other with a future table to be there all while being under the bimini. But that would not work well while cruising around so we can put it back against the rail while moving. This is really an experiment for us as this is our first boat, so we are taking some experiences from our RV camping to the water.
 

Aardvarkjff

Seaman Apprentice
Joined
Oct 22, 2018
Messages
37
Remounting the fire extinguisher. So I decided to replace the fire extinguisher that came with a boat. It was a decision made easier once I closed one of the seats and a loud shushing sound was heard followed by a cloud of white wafting up from around the seat cushion...... (It was stored there while the work is being done.) The one I got was a bit bigger than I planned so I decided to have a mount made by my welder guy. It will be powder coated either blue like the carpet or gray like the extinguisher is now. Wanted to share. I plan to mount it in front of the port side armrest on the back seats. That way it is easily retrieved but still out of the way.

Fire extinguisher 1.JPGFire extinguisher 2.JPG
 

Aardvarkjff

Seaman Apprentice
Joined
Oct 22, 2018
Messages
37
Sink is framed in. So I got the sink base and top back from the welder this weekend. It came out really nice. As you can see the frame is 1" aluminum I plan to powder coat gray and the sink top will be powder coated navy blue like the carpet. There is a 5 gallon blue jug which was an old pool chlorine container before converting to my waste water collection jug. The overall outside is 13" x 13". I plan to place ACP panels (aluminum composite panel) inside so the cabinet will look somewhat like the fencing of my boat with the skeleton on the outside, visible. I plan to mount this behind the captain's chair and in front of the porta pottie. There is a small pump that will pull fresh water from an aquatainer mounted on the rear deck by the battery.

Sink 1.JPGSink 2.JPG
Now here is what it looks like with the sink bowl, faucet, and soap pump placed in it.
Sink 3.JPG
My wife is very fastidious on the hand washing, so this is a win-win. I get to engineer something (welding by others) and she gets to enjoy it. :)
 

Aardvarkjff

Seaman Apprentice
Joined
Oct 22, 2018
Messages
37
We are getting near the finish line. Below you can see the pics of the finished sink base. Had a real fun time with the pin stripes! The powder coating came out great. The stripes were put on to match the stripes on the outside of the fence. If you look at the frame it was powder coated in "silversmith". This color will be used in to do the rail on the back of the swivel seat (post coming).
sink 1.JPGSink 2.JPG
 

Attachments

  • sink 1.JPG
    sink 1.JPG
    27.5 KB · Views: 0
  • Sink 2.JPG
    Sink 2.JPG
    42.8 KB · Views: 0

Aardvarkjff

Seaman Apprentice
Joined
Oct 22, 2018
Messages
37
Swivel Bench Seat - Here is the swivel bench seat with the rail mounted. Now all you have to do is grab the handle and it will swivel away from the rail and form a booth with the back benches. All hardware is stainless. I will be powder coating the rail to match the sink cabinet on the above post. I was very pleased how this came out.
bench 1.JPGBench 2.JPGBench 3.JPG
 

Attachments

  • bench 1.JPG
    bench 1.JPG
    46.4 KB · Views: 0
  • Bench 2.JPG
    Bench 2.JPG
    70.6 KB · Views: 0
Top