1994 Crownline 196br restoration

steve_h7

Chief Petty Officer
Joined
Sep 16, 2018
Messages
401
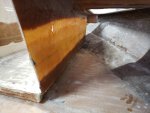
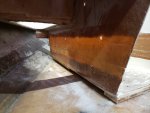
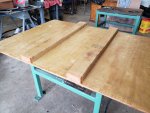
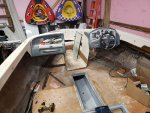
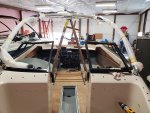
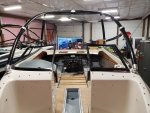
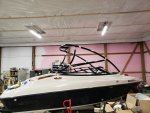
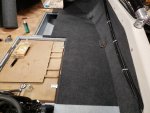
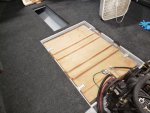
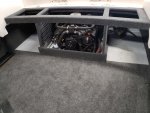
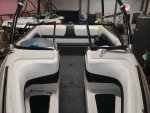
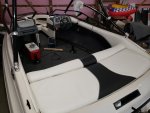
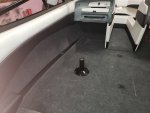
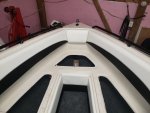
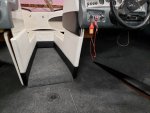
I installed the fuel tank yesterday as well as started glassing the bow section back in. I will need to do glass on the outside of the bow section this week. I also have everything hooked up in the back aside for the trim pump and trim sensors.

The glassing of your bow section resembles what I need to when I reinstall my splashwell. It looks like you just ground off the gelcoat and did you just use a layer of 1708? The same on the backside?

Great progress :thumb:
 

Superjet511

Seaman
Joined
Oct 22, 2018
Messages
65
There aren't to many places making custom fit covers stock on the shelves for these older boats. The best you will find is full over the sides cover that semi custom fit. If you want a real good fit you will have to make or have one made. I bought a semi decent one and made it fit with trimming and sewing.

Are those screw into the top of the tank for the brackets?

Looking good.

Thanks Mike! That's what I was thinking. We are putting a wakeboard tower on as well so the cover becomes more difficult. I am thinking we will buy a semi custom cover and slit it at the 4 mounting points and maybe add velcro at the slits. We will also have to cut the draw rope and add some sort of binding hooks....
Yes, they are screws in the tank. There are nut inserts molded into the tank.
 

Superjet511

Seaman
Joined
Oct 22, 2018
Messages
65
The glassing of your bow section resembles what I need to when I reinstall my splashwell. It looks like you just ground off the gelcoat and did you just use a layer of 1708? The same on the backside?

Great progress :thumb:

Yes Steve. Two layers of 1708 laminated. I did about a 2" wide strip and went over it with another layer about 6" wide. I will do the same on the backside tonight. It stayed in place pretty well with just the two c clamps but I wanted to let the inside setup prior to climbing around it to do the backside. The interior panels will cover all of it and it is pretty flat so it should work well.
 

Superjet511

Seaman
Joined
Oct 22, 2018
Messages
65
I finished up glassing the bow in and making the fuel tank hatch. I am happy how it turned out. I thonk the floor ended up slightly lower than it should be at the front. I may have to support the front section of the bow but I will wait until I screw the rear section down to the floor.
 

Attachments

  • photo314078.jpg
    photo314078.jpg
    560 KB · Views: 10
  • photo314079.jpg
    photo314079.jpg
    576.3 KB · Views: 10
  • photo314080.jpg
    photo314080.jpg
    972.7 KB · Views: 10

Superjet511

Seaman
Joined
Oct 22, 2018
Messages
65
I removed the windshield to get it ready for powder coating and tint. Since everything else in the boat is white and black we really didn't want shiny aluminum. 4 of the pieces of glass were siliconed into the frames on one side. I had a hell of a time getting 3 of them out. I soaked them with WD40 and kept working on them for at least an hour reapplying WD40. I was very nervous about breaking them and really thought I wouldn'tget them out. I finally came up with a method that worked very well. I took a piece of tig welding rod and cut off a section about 10" long. I cut one end on a sharp angle and mounted it in a drill. I slowly ran the rod into the frame near one of the corners. I worked slowing and with very little persuasion the glass came out of each frame. I thought that this would be a good place to share this to help people avoid glass breakage and a whole lot of frustration.
 

Attachments

  • photo314081.jpg
    photo314081.jpg
    743.2 KB · Views: 8
  • photo314082.jpg
    photo314082.jpg
    1.5 MB · Views: 8
  • photo314083.jpg
    photo314083.jpg
    1.2 MB · Views: 8

oldrem

Commander
Joined
Nov 7, 2013
Messages
2,002
Great idea on the glass removal. Going to look sharp with the powder coat.
 

Superjet511

Seaman
Joined
Oct 22, 2018
Messages
65
We got the windshield frame back from powder coating. That is all mocked up and the ready for the glass as soon as the tinting is done. We also installed the wakeboard tower and just need to make some plywood supports under the front legs.
 

Attachments

  • photo315108.jpg
    photo315108.jpg
    457.8 KB · Views: 8
  • photo315109.jpg
    photo315109.jpg
    232.4 KB · Views: 8
  • photo315109.jpg
    photo315109.jpg
    232.4 KB · Views: 7
  • photo315110.jpg
    photo315110.jpg
    358.4 KB · Views: 8
  • photo315112.jpg
    photo315112.jpg
    338.5 KB · Views: 7
  • photo315113.jpg
    photo315113.jpg
    433.3 KB · Views: 8
  • photo315114.jpg
    photo315114.jpg
    288.9 KB · Views: 7
  • photo315115.jpg
    photo315115.jpg
    399.7 KB · Views: 7
  • photo315116.jpg
    photo315116.jpg
    364.6 KB · Views: 8

Superjet511

Seaman
Joined
Oct 22, 2018
Messages
65
The previous owner removed the surge brakes from the trailer so we added a new electric brake kit along with all new wiring. Bought new tires and wheels as well. The trailer will need to be blasted and painted this fall/winter.
 

Attachments

  • photo315117.jpg
    photo315117.jpg
    532.2 KB · Views: 2
  • photo315118.jpg
    photo315118.jpg
    421 KB · Views: 3
  • photo315119.jpg
    photo315119.jpg
    552.2 KB · Views: 3

Superjet511

Seaman
Joined
Oct 22, 2018
Messages
65
I started putting the carpet in this weekend. It is done except for the bow section. I didn't get any photos with the ski locker in though. I am glad that I have been reading this forum. Several people have said to make sure the carpet goes down the same way it comes off the roll and man were they right. Fortunately I have it correctly installed. I took a couple photos of 2 pieces side by side from each direction with the pieces laying in opposite directions. I would never have thought it would be this different. I also starting putting the interior. Lots of miscellaneous things to do once I wrap up the interior.
 

Attachments

  • photo315929.jpg
    photo315929.jpg
    919.5 KB · Views: 10
  • photo315930.jpg
    photo315930.jpg
    1.1 MB · Views: 9
  • photo315931.jpg
    photo315931.jpg
    899.2 KB · Views: 10
  • photo315932.jpg
    photo315932.jpg
    695.5 KB · Views: 10
  • photo315933.jpg
    photo315933.jpg
    765.2 KB · Views: 9
  • photo315934.jpg
    photo315934.jpg
    934.2 KB · Views: 9
  • photo315935.jpg
    photo315935.jpg
    407.4 KB · Views: 9
  • photo315936.jpg
    photo315936.jpg
    362.8 KB · Views: 10

Superjet511

Seaman
Joined
Oct 22, 2018
Messages
65
Hi guys. Thank you for the compliments. It is really coming together now and it feels great to finally see the fruits of all of the labor. I have most of the interior in; just need to install the seat cushions. I plan to tint the winshield tonight and hopefully get it all installed tomorrow followed by a trip to the lake to test everything out. We have a trip planned to the Upper Peninsula next week on Manistique Lake so the timing couldn't be better. Keeping my fingers crossed that all goes well during our test run. I will post more photos once it is completely done and have wheeled it out for the first time. Thank you all for the advice along the way! It has been priceless!
 

Attachments

  • photo316537.jpg
    photo316537.jpg
    569.2 KB · Views: 9
  • photo316537.jpg
    photo316537.jpg
    569.2 KB · Views: 8
  • photo316538.jpg
    photo316538.jpg
    943.2 KB · Views: 11
  • photo316539.jpg
    photo316539.jpg
    758.6 KB · Views: 11
  • photo316540.jpg
    photo316540.jpg
    507.3 KB · Views: 10
  • photo316541.jpg
    photo316541.jpg
    477.7 KB · Views: 9
  • photo316543.jpg
    photo316543.jpg
    681.7 KB · Views: 11
  • photo316544.jpg
    photo316544.jpg
    450.1 KB · Views: 10
  • photo316545.jpg
    photo316545.jpg
    351.3 KB · Views: 10
  • photo316546.jpg
    photo316546.jpg
    679.5 KB · Views: 11
  • photo316547.jpg
    photo316547.jpg
    421.6 KB · Views: 10

Mechanicalmike08

Petty Officer 1st Class
Joined
Aug 29, 2018
Messages
308
That thing is looking great, I really like the theme. I cant remember are you doing the upholstery, it looks real nice.
 

Superjet511

Seaman
Joined
Oct 22, 2018
Messages
65
Thanks Mike! We really like it as well. We are glad that we went with a pretty simple design that looks sleek. We contemplated some colors but are really happy with the white, black and gray. We had a local guy do the upholstery. I would not have wanted to even attempt it!
 

sopwithcamel74

Petty Officer 1st Class
Joined
Aug 15, 2018
Messages
203
Great stuff - can't wait to see it splashed!

Can't recall if I shared this before, but I almost bought this same year/model boat about a hear and a half ago. We ended up pulling out of the deal at the last moment due to some of the concerns that were uncovered upon final inspection.

Had I seen what you've been able to accomplish with your restore before all that occurred, it's much more likely that I would have taken the chance on it... Yours is turning out that nice :)
 

Superjet511

Seaman
Joined
Oct 22, 2018
Messages
65
Great stuff - can't wait to see it splashed!

Can't recall if I shared this before, but I almost bought this same year/model boat about a hear and a half ago. We ended up pulling out of the deal at the last moment due to some of the concerns that were uncovered upon final inspection.

Had I seen what you've been able to accomplish with your restore before all that occurred, it's much more likely that I would have taken the chance on it... Yours is turning out that nice :)

Thanks! We would have pulled out had we known the extent of the repairs needed as well. At least we know we have a solid boat and I know it inside and out as well. Maybe a blessing in disguise?
 
Top