Deck and Fuel Tank Replacement Plan

porkerA10

Cadet
Joined
Jun 25, 2017
Messages
10
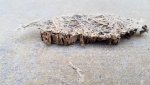
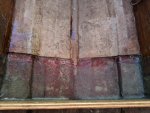
Hello, my 1997 21' Mariah had her boating season cut short this summer when it looked to have a fuel tank leak. I pulled it, and sure enough the aluminum tank was in terrible shape with numerous pits and a definite leak. Further, upon pulling the carpet back I realized it was probably a good time to make some deck repairs anyway. In several areas, the protective top layer of glass had cracked or completely broken up, exposing the deck to the elements.In one spot in particular (near my cutout in the picture), the floor staples had rusted out and one of the boards was lifting at the seam and had a little bit of delamination.

Since the original fuel tank was custom made by an out of business manufacturer, I looked a little at having a custom aluminum replacement made. Unfortunately I have yet to even hear back with any bids, and with the industry trend seeming to go towards plastic, I looked at that a bit harder. Only issue was the stock molds that would fit would require me to reduce my fuel tank size from 40 gallon down to 29 gallon. But, since I figured I needed to get a bit dirty with the deck repair, I thought I might as well reconfigure things while I was in there and pulled the trigger on a 39 gallon Moeller. The reconfiguration seems relatively limited as the replacement tank is a tad long, I just need to move the bulkhead that separates the tank area from the ski locker back about 1.5 inches.

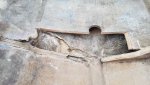
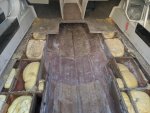
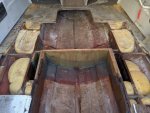
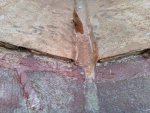
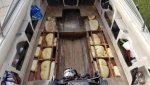
Back to the deck, my inexperience may be showing here but I think the damage done thus far is relatively limited. I cut out a small area near the delamination and the wood was very dry. From what I can see (didn't do a core sample), the "no rot" stringers also seem to be holding up well. So, that leads me to think I can get away with replacing the easily accessible portions of the deck. I linked a couple of pictures (sorry had trouble doing attachment to this post) where I drew with red lines my plan on what I would replace.

https://i.imgur.com/8t4LZlD.jpg
https://i.imgur.com/Ij1BW0K.jpg

So, my plan of attack is:
  • Demo the deck along the lines in the photos
  • Move bulkhead and install tank
  • Install deck
  • Install replacement carpet and put her back in the water
I am new to boats so would appreciate any guidance or critique that can be offered.

Also, assuming my plan is reasonable, I had just initial questions about laying the new deck. How do the new floorboards tab into the existing material that I leave behind? I'm talking specifically about where the red lines run in my pictures. It seems neither board will have its edges sitting on stringers/struts, so they won't have great support where they meet. Is that a problem, or will throwing some PB in there and re-glassing the top harden it up enough that it won't be a problem?
 

alldodge

Moderator
Staff member
Joined
Mar 8, 2009
Messages
40,746
Have you checked with Flordia Marine and tank? They are in North Carolina
http://floridamarinetanks.com/

Place rubber strips under the fuel tank, and use some 4 pound foam on bottom and sides.

Once everything is back in the hull, the deck is attached using glass tabbing around the edges. Need to cut holes, maybe 2 inch at various places and then pour foam in other areas. Take the plugs cut out for pouring foam and place back in holes. Glass over the plugs

Ij1BW0K.jpg
 

Broaters

Petty Officer 2nd Class
Joined
Jul 31, 2017
Messages
139
Hi Porker

we also have to join old and new deck pieces.
our idea was to put an extra piece of wood just under the joint probably 2" wide with 1" under each parts. we will use PB or polyester based glue paste ans SS screws. we also plan to pour foam under the entire deck to add support.
It will be glassed over the top afterwards.

By the way do you guys reccomend using expansive foam aroud or under the tank?
I believe that ventilation is the key to keep an aluminium tank safe, wouldn't it?
 

alldodge

Moderator
Staff member
Joined
Mar 8, 2009
Messages
40,746
If the boat was designed with a foamed in tank, then it needs to go back that way. The foam bonds to the tank and structure to make the hull more rigid and gives it strength
 

JASinIL2006

Vice Admiral
Joined
Feb 10, 2012
Messages
5,545
I had a couple of seams where new decking joined old decking on my boat. I also used cleats like Broaters suggests. I used wanted considerable more overlap than one inch, though. I used plywood cleats and they extended several inches on either side of the seam, then filled the gap with thickened resin. Then the whole deck was glassed over. I didn't want any movement along the seam. Mine are really stable; if you didn't know what was underneath, you'd never know there was a seam there.
 

porkerA10

Cadet
Joined
Jun 25, 2017
Messages
10
Have you checked with Flordia Marine and tank? They are in North Carolina
http://floridamarinetanks.com/
I did not, and honestly I didn't look into the aluminum replacement too terribly hard. RDS never got back to me with a quote. I also contacted some local shops and they couldn't recommend any local builders and instead steered me towards plastic provided I could find a cast that fit. Further, I feel like that fuel leak could have brought about a terrible outcome and going plastic feels a little safer. Also, I know the price with shipping of a custom aluminum belly tank could also get pretty high, so when I had an opportunity to pick up the Moeller for $400 delivered I went ahead and took it. Shipping company is scheduled to deliver it to me tomorrow.


then pour foam in other areas
Are you recommending I replace all the foam? Or at least add more foam in general? Thus far I really don't know what kind of shape it is in. What I have seen so far actually looks pretty dry, but I didn't do a core sample yet. I figure I'll know more after demo, but at least initially I hadn't thought of it as necessary if it is dry.


put an extra piece of wood just under the joint
I like that idea, thanks. Also the JASinIL2006 restoration thread looks like it contains lots of good info for me.
 

alldodge

Moderator
Staff member
Joined
Mar 8, 2009
Messages
40,746
Just saying, if the tank was foamed in, then the new one should also be done. Need to have the deck installed when doing foam, so it fills all the voids, otherwise the deck might get springy.
 

Broaters

Petty Officer 2nd Class
Joined
Jul 31, 2017
Messages
139
agreed if it was built with foam around the tank, it should be foamed again.
on our searay the tank was not foamed in.
 

Woodonglass

Supreme Mariner
Joined
Dec 29, 2009
Messages
25,924
I'm gunna disagree just a bit. Depending on the hull structure and Stringer/Bulkhead detail it may not be necessary to encompass your tank in foam. IMHO this should NOT be done because it IS one of the main reasons for aluminum tank failure. You cannot get a perfect foam encapsulation and the inevitable voids WILL allow condensation and thus the pitting and eventual failure of the tank. In most boats, you can install the tank in such a way to allow it to BREATHE and Not compromise any structural integrity. I'm curious about your NO ROT stringers. Is that what the MFG claims? Most boats prior to 2001 had wood core stringers. There were SOME that did have composite systems but few. I'm not an expert on Mariah boats but do know they are considered a High End boat soooo you may indeed have ROT PROOF stringers and bulkheads.
 

porkerA10

Cadet
Joined
Jun 25, 2017
Messages
10
I'm curious about your NO ROT stringers. Is that what the MFG claims?
My understanding is that Mariah boats from that era rarely have rot issues, but its not unheard of either. I also see claims that the stringers were all fiberglass, and other claims that stringers/bulkhead/transom simply utilized specially treated wood that was all encapsulated in glass. I am too new and inexperienced to know anything beyond that. Heck, I have my deck partially open and I don't even know what is in my boat :). If you are curious there are some more intelligent discussions on the subject at the Mariah forums http://www.mariahownersclub.com/forum/original-mariah-talk/312-mariah-stringer-construction.html

Regarding the tank, the previous tank wasn't foamed so I don't plan on foaming the replacement. From my research foam is discouraged even more strongly on plastic tanks, in fact the Moeller installation procedure specifically forbids it.
 

porkerA10

Cadet
Joined
Jun 25, 2017
Messages
10
Resurrecting my old thread since the calendar says boating season has started but I still have a project sitting in my driveway :)

To summarize my plan above, I decided to move a bulkhead a few inches in order to fit a molded fuel tank replacement. Moving forward with that plan, I started cutting out the original bulkhead and noticed something unexpected that I was hoping to get some help with. I'm sure this speaks mostly to my inexperience, but I thought I would be able to grind the bulkhead down onto a clean hull. But, in actuality the bottom of the bulkhead goes down through an inner hull (that I didn't realize existed) and is tabbed onto the outer hull.

The inner hull layer is structurally thin and fairly brittle once punctured. There is a sacrificial 3/8" plywood layer separating the two hulls, which at this point is mostly mush in the lower sections. There is a picture showing a chunk of plywood with the thin glass layer still attached.

My question relates with how to go about repairing the inner hull. I assume I need to go ahead and peel it back quite a ways in order to properly tab the new bulkhead onto the outer hull. Should I follow the original design and lay down another sacrificial 3/8" plywood separator? When I glass over it, what kind of fiberglass layers does it look like I will need in order to blend and patch it to the existing layer?

The picture also shows a partially cut out ski locker floor board. It seems I'll need to completely cut it out in order to do the repair. I haven't decided if I should replace it and the old carpet, or alternatively just leave it out and instead lay down a gel coat.
 

Attachments

  • PlywoodSeparatorAndThinGlass.jpg
    PlywoodSeparatorAndThinGlass.jpg
    620 KB · Views: 2
  • PartialBulkheadDemo.jpg
    PartialBulkheadDemo.jpg
    1.9 MB · Views: 2

porkerA10

Cadet
Joined
Jun 25, 2017
Messages
10
Finally got around to making a little bit of restoration progress (missed this boating season :grumpy:), but have a question I was hoping to get some input on...

My first image shows what things looked like after demo was complete by cutting out the bulkhead that needed to move and trimming away some small portions of the stringers that were in poor shape. The second image shows where I am at today after installing the new wood and tabbing to the hull. I put in a little bit of extra wood by way of a half-sister to support the stringer extensions.The final photo shows a zoom of the inner/outer hull transition issue I am trying to solve.

I don't know if my inner/outer hull terminology I use here and my previous post is even correct. It just seems to be an additional bedding layer in the middle of the boat, perhaps it has a proper name, although as I don't understand its purpose I am having trouble being confident in a fix for it. Further, it is a very lightweight layer, perhaps just a lightweight layer of CSM. Not sure if the photos show it well, but from me walking and sitting on it during the restoration I have damaged it a bit, particularly in the ski locker area.

My inclination is to lay some 3/8" plywood wrapped in glass to raise the exposed areas and fill the gaps with peanut butter. This would give me a surface that I can lay some new mat down and float it into to the existing material. Additionally, to re-enforce and repair the whole bedding area, I would put down a larger piece of CSM over the whole area.
 

Attachments

  • photo322058.jpg
    photo322058.jpg
    227.7 KB · Views: 3
  • photo322060.jpg
    photo322060.jpg
    245.6 KB · Views: 3
  • photo322061.jpg
    photo322061.jpg
    325.9 KB · Views: 3

alldodge

Moderator
Staff member
Joined
Mar 8, 2009
Messages
40,746
Not understanding what your asking but will offer this. The stringers should not come in contact with the hull, if they do this will be a hard spot. A hard spot can cause cracks

I would have removed the entire strake and replaced as one piece. The one cross frame has been moved forward instead of removing and is spliced together.

Is glass mat and resin the only thing that holds the stringers together?

hull.jpg
 

emoney

Commander
Joined
Jul 19, 2010
Messages
2,551
I see what you're asking, and that's a good question. It looks as if both the front and back area of that section was built up with an additional layer of CSM(?) but only in the front and back, not in the center. Out of curiosity, would that happen to be directly under where the old fuel tank sat, or did it come out like halfway under it? I'm afraid I can't answer your question, but hopefully someone will come along who knows why this would've been done. I could almost see a manufacturer doing that to strengthen up the keel, but then that would've been along the entire length of the hull, which this isn't. Nobody worked on the boat before you, did they?
 

porkerA10

Cadet
Joined
Jun 25, 2017
Messages
10
Not understanding what your asking but will offer this. The stringers should not come in contact with the hull, if they do this will be a hard spot. A hard spot can cause cracks

Is glass mat and resin the only thing that holds the stringers together?
The original stringers were not in contact with the main hull, and seemed to be properly tabbed to the main hull. The weak mat layer that I referred to was an additional layer built on top of the hull up the center of the boat. I cut some of that layer away for the retrofit and my question relates to how it should be repaired. This image shows a closeup taken from the new bulkhead back to the engine bay of what it looks like now, showing the 3/8" transition that I need to build up to or otherwise solve.


I would have removed the entire strake and replaced as one piece. The one cross frame has been moved forward instead of removing and is spliced together.
Totally reasonable. Overall the wood below deck was very hard and dry so I just decided to splice instead.Not as strong, but at least in my mind it meant less work and money.
 

Attachments

  • Transition.jpg
    Transition.jpg
    78.7 KB · Views: 2
Last edited:

porkerA10

Cadet
Joined
Jun 25, 2017
Messages
10
It looks as if both the front and back area of that section was built up with an additional layer of CSM(?) but only in the front and back, not in the center.
The reason the additional layer is not in the center, is because I removed it in order to relocate the bulkhead and attach it to the inner hull. Sorry for not originally providing more context on my original post. Hopefully this photo showing what things looked like before I began demoing below the deck will clarify what it looked like before and what I have done since. After this picture I proceeded to remove the bulkhead, the ski locker bottom, and that "center" layer of mat.
​​​​​
Out of curiosity, would that happen to be directly under where the old fuel tank sat, or did it come out like halfway under it?
Hopefully this is clarified by the photo, but that additional layer originally extended from the front of the engine bay all the way to the front of the boat (essentially under the fuel tank and ski locker).
I could almost see a manufacturer doing that to strengthen up the keel
That was my original guess, but at the same time figured if that was the case they would have used something stronger than mat. I also thought it might be to keep the fuel tank off the main hull, if that mattered. Or perhaps it was some sort of waterproofing layer, but again I don't see why and further it was bound to break down over time. When I removed the small middle section, the thin separator ply material had turned to mush in the lower sections due to moisture.
 

Attachments

  • photo322082.jpg
    photo322082.jpg
    161.5 KB · Views: 2

alldodge

Moderator
Staff member
Joined
Mar 8, 2009
Messages
40,746
Think I understand, its about the thin layer in the bottom, and if something needs to be added to make it all flat.

Need to get WOG's take on it, but if your foaming back in the tank, I wouldn't worry about it. Do get some good measurements of tank and space to see what issues there might come about. The tank was originally foamed in and the piece was there, correct?
 

porkerA10

Cadet
Joined
Jun 25, 2017
Messages
10
Think I understand, its about the thin layer in the bottom, and if something needs to be added to make it all flat
Right. So if I go that route and add something, should I use wrapped ply for the base?

Only alternative I could think of is completely removing the additional layer, but that seems like additional effort.

if your foaming back in the tank
Not foaming the tank. The original aluminum tank was not foamed, and the Moeller replacement specifically forbids it.
 
Top