1995 Larson 174 SEI Complete Rebuild

kcassells

Fleet Admiral
Joined
Oct 16, 2012
Messages
8,600
Well I might have let my nerves get the best of me with that last post. I think I did mix it to light but it finally got pretty tacky. So I tipped it up and put down some more resin, then laid down the CSM. Went pretty well I think, seem to get a bunch of small bubbles between the CSM and resin but the bubble buster did its job. I can see how hard it would be to wrap around edge once I got to the edges.


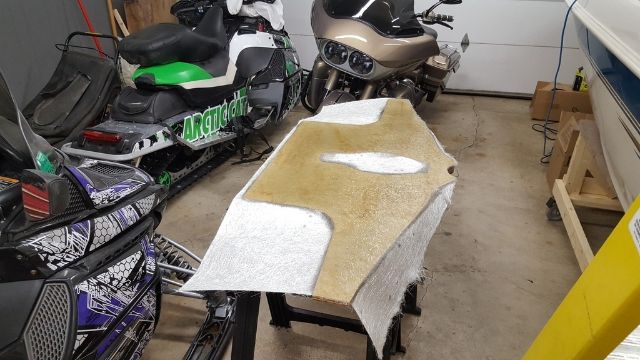
I also tried my hand at some PB, went well I think. I'm glad I got the big bucket of Cabosil. I was smart about it and after I was done with the resin on the CSM I quick mixed in some cabosil and chopped strand so I didn't waist any resin. I then spread more on the areas I need to blend in on the side walls. So far I only waisted about 8oz from the first batch before I thought about using it on the side walls.


One final question for the night on the PB, is the cabosil just to thicken it enough so it stays where you want? Or does it serve any strength purpose? I only ask because the first batch I used not as much cabosil and still was able to shape it nicely and have it stay in place.

The cabosil is your waterproof thickner. No strength.
http://fx.wikia.com/wiki/Cabosil
 

Mechanicalmike08

Petty Officer 1st Class
Joined
Aug 29, 2018
Messages
308
Thanks everybody, I was just over thinking it. It's nice and hard this morning and ready for instal. It makes me a little happier that I know I can have a little longer working time. Thanks for the cabosil info anything I can stretch and keep the budget under control is best.

Today it will be getting installed and filleted. So far looking like my plan is coming together.
 

Mechanicalmike08

Petty Officer 1st Class
Joined
Aug 29, 2018
Messages
308
Got it all clamped in and filleted. Messier than I thought, oh well. Fillets are nice a smooth, I really recommend a bondo spreader. But I also have some background in bodywork which helps. I will need to touch up some spots and fill in a few areas tomorrow before I start tabbing. Going to let it sit for 24h. I know some might say not enough clamps but I didn't want to distort the hull as it was square and flat and the center area had a gap between it and the plywood that I wanted to fill with PB. Checked with my caliper and still looks pretty good, sitting around 1.92"
 

Mad Props

Lieutenant Commander
Joined
Jul 8, 2016
Messages
1,766
Looks good! Once you get more familiar with glassing, if you plan everything out well, doing tabbing and the rest of your glass all in one shot makes it easier to avoid bubbles cuz the PB still has some softness to it...
I learned that fillets can be tough to sand a nice radius into which can cause bubbles on subsequent layups...
as with all things, you'll learn what works for you as you go
:mad-new:
 

Mechanicalmike08

Petty Officer 1st Class
Joined
Aug 29, 2018
Messages
308
Got two layers of tabbing done...almost. I started out knocking down some rough spots. Cut all my pieces so they were ready to go for both layers. Made up some PB and filled any areas and smoothed out some details. Then it was on to my first layer of 1708. Was going pretty good, the bubble buster and chip brush really work great. Had to be a little carful with the soft PB to not squeeze it out. Then onto the second layer, this one took a lot longer than I thought, I fought some bubbles in some spots for too long and by the time I got to the end my resin started to gel a little in the roller pan. So I decided to just stop and not try and push my luck, So I still have the very top and the small radius on the left side to finish the second layer.

Going to give me knees and back and rest while this kicks before putting the skins on tonight yet.

Very happy with how it turned out, my PB work looks great. Really nice blend outs. Id say 99% bubble free. Got some small ones and not to sure about the very top, I only have about 2" to work in there and cant see much.
 

Mechanicalmike08

Petty Officer 1st Class
Joined
Aug 29, 2018
Messages
308
Alright got the skins on now. I should have just kept going before, there were a couple nubs here and there that contributed to some air bubbled that really needed some work to get out. Also all the already hardened edges created some air traps that also required some work. But there on and pretty darn good. There's a couple small bubbles on the wings but I'm not worried because in those spots there's like 4-5 layers now. Ill go out when its semi hard and trim the keyhole. I'm pretty happy for my first time doing multiple layers.

The garage and boat need a good cleaning tomorrow, its a mess out there. Then going to start on the bulkheads. I think I'm going to bed the bulkheads in PB and hold them straight with some rigging, that way I can bed the stringers to them and use the bulk heads as the supports.


Mechanicalmike08

Petty Officer 1st Class
Joined
Aug 29, 2018
Messages
308
are you doing 2 layers of 1708 on the transom?

Yep there's 2 layers on everything, tabbing and skins all 1708. The wings are so small that the overlaps make it about 4-5 layers in areas.

I just went and cut the keyhole and looked at my handy work, there's no large bubble but a few small bubbles. Nothing bigger than a 1/16" to a 1/8". Can I just die grind the bubble out and coat with resin and maybe a small amount of csm?
 

Mechanicalmike08

Petty Officer 1st Class
Joined
Aug 29, 2018
Messages
308
Make sure it is a little big. I CSM'ed mine and had to do a bunch of filing to get the gimble to fit.

The bubbles aren't in the keyhole, I just cut the excess not wet out glass covering the hole. The bubbles are on the flat surface of the transom. I haven't sealed the hole yet as I left it small so I could router it to size once fully installed. Im gona test fit the housing before i seal the inside of the hole.
 

Mad Props

Lieutenant Commander
Joined
Jul 8, 2016
Messages
1,766
Looking awesome! You'll be boating next week! lol
If I can make one suggestion it would be to put a layer of CSM on the transom, at least around the keyhole because when you drill your holes for the transom plate and gimbal housing, the 1708 tends to "tear out" like wood. Having the CSM there can help prevent it.
:mad-new:
 

Mad Props

Lieutenant Commander
Joined
Jul 8, 2016
Messages
1,766
or drill it from both sides like friscoboater did

That works as long as you plan for it and drill the holes in the transom prior to glassing the inside, but he didn't do that so how would you know where to drill the holes from the inside? I guess you could stop just before poking thru, but that only really works if you use a spade bit or auger bit with a long point, but they don't leave a very clean hole...

Proof again there are a lot of ways to skin the cat.. just figured if your already glassing anyways, probably just as easy to throw a quick layer of CSM on and call it a day.
 

Mechanicalmike08

Petty Officer 1st Class
Joined
Aug 29, 2018
Messages
308
I am going to have to do another layer or something to even it out, the bottom has a few overlaps so its thicker down there. I also need to address the bubbles in the skin layers. All the tabbing is perfect, if theirs a small pin bubble here and there i would be surprised. The skin layers on the very tips of the wings and at the transition from the double layer have some smaller bubbles I don't really like.

I think the plan unless someone tells me otherwise is to dremel out the bubbles, patch with a little PB and them one final layer of either CSM or 1708 while the PB is still soft. Not sure if the CSM will get me to the correct thickness where i need it as the rest if 1708.
 
Top