Woodonglass
Supreme Mariner
- Joined
- Dec 29, 2009
- Messages
- 25,924
I'd put some fabric on too! CSM offer very little strength to the laminate.


Wow, you are setting a land speed record with this restoration. To add to WoG's comment, CSM is not very strong, whereas cloth will be much stronger. Also, keep in mind that if you do a lot of grinding, you will want to add back that material and cloth would be the way to go.
You could use resin/CSM on the transom between the fiberglass and the new wood core, as it will tend to take up any unevenness in the mating surfaces.
On tabbing the new structural members (stringers bulkheads, etc.) 1708 biaxial cloth is a good choice and the portion that mates to the hull will add back thickness that may have been depleted from grinding. You may want to add more thickness to the hull in other areas, depending on how much grinding you did.
Your experience in feeling how 'wobbly' the hull was once the structure was removed is very telling in that boat hulls are not very strong by the fiberglass alone. It is the structure that really makes it into something seaworthy.


Shop vac with a brush end. Then hit them with a air chuck and compressed air.


Wow... you have done a lot of work in only a week! Looking good!


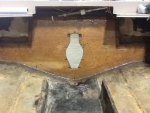
Not much progress the last 2 days, waiting on supplies. I need some comments. Made the template for the transom and am planning on this shape instead of the wings that floated I space like the old one. This way I can tab it all the way around. My only thought is the wings gave a little more torsional strength but im thinking I will gain that back by tabbing all the way around. Any comments?
Do you have Tow Eyes or access ladders needing mounted to the transom?