First rebuild - '89 Campion Allante 185 - Stringers, Deck, Transom

ACon977

Senior Chief Petty Officer
Joined
Nov 21, 2017
Messages
759
I spent most of the day just looking at pics taken during the demolition and wishing I had taken more. :joyous:
Questions are piling up but one at a time...

And PREACH about wishing you had taken more pictures. This is the most frustrating part of these rebuilds haha, no picture is a bad one to take. Especially in this digital era where everything can be deleted with no harm, no foul.
 

steve_h7

Chief Petty Officer
Joined
Sep 16, 2018
Messages
401
The cap of the boat is just sitting on the hull. Typically they are screwed together and then the rub rail goes overtop for aesthetics, as well as to protect the boat. I would assume this trim was also an aesthetic, there to cover up the gap. Are there any screws or attachments in this area?

Thanks Austin!
And yes, the pieces were just cosmetic and the rub rail was riveted on both sides of the splash well running forward towards the hull, so it seems like it was all normal. I was just expecting to have to cut the two pieces apart and thought that you would have to do the same around the entire boat if you were removing the cap... so I learned something new today! :)
Thanks again!
Steve
 

steve_h7

Chief Petty Officer
Joined
Sep 16, 2018
Messages
401
I've got to be missing something;
I have the splash well cut down to the where the cap and hull split but I can't for the life of me get it to come out! No matter how much I pry I can't seem to break it loose. It's seems to be glued or somehow attached to the transom but I can't see anything other than this stuff between it and the transom. I can break small pieces of it out but it's not enough to make a difference... anybody know what this stuff is?

spash well debris.jpg

Here's where I made the cut:


splash well cut.jpg

And shots showing the transom and splash well from the underneath on the port side and from up above.

splash well port.jpg
splash well.jpg

Any tips on how to break the splash well loose? I'm afraid I'm going to break something if I pry any harder between it and the transom!
.
 

ACon977

Senior Chief Petty Officer
Joined
Nov 21, 2017
Messages
759
if its glued then you need to get a wedge between the two layers, maybe get a thin prybar and tap it between, this will hopefully break the adhesion. but you're right, dont keep prying, youll end up breaking something for sure.

820909628989.jpg

Although Im not entirely sure how to help you since I dont know your boat model at all, thats probably the direction I would go.
 

steve_h7

Chief Petty Officer
Joined
Sep 16, 2018
Messages
401
Another thank you Austin!
Believe me, I've got several pry bars and all of them have been beaten between the splash well and transom. A long cold chisel is what I was able to chip part of that glue out; but the wedges seemed like a great idea and sure enough, we started making progress after several were pounded in! :thumb:

splash well progress.jpg

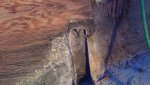
But I could see before long that the center portion of the splash well was holding firm while the outer portion was releasing, so it was damaging the back edge as it bent out:

splash well removal damage.jpg

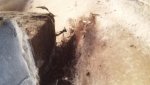
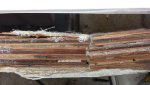
But it at least allowed me to see what portion was stuck, and it was right along the very top edge between the well and the transom. So I took one of the pry bars and pounded it between very top edge between the top of the transom and the well. It still caused some damage but I'm hoping most can be repaired. Here's a terrible picture but shows how it tore the CSM glassed to the splash well off of the transom wood.

splash well fiberglass torn.jpg

I'm still trying to think of why in the world it was done but maybe there's a good reason... but doubt I'll be putting it back in like that. :)

Thanks again Austin!
 

steve_h7

Chief Petty Officer
Joined
Sep 16, 2018
Messages
401
Looking at the transom as a whole now it seems it's made up of several small pieces. I'm wondering if I should just trace the entire thing and make it one large one or what. It extends almost the whole width of the stern, be that good or bad.

transom without splash well.jpg
 

Woodonglass

Supreme Mariner
Joined
Dec 29, 2009
Messages
25,924
I'd recommend cutting the stringers out so you can get to the entire transom and then make it solid piece spanning the entire width of the stern. How big of Outboard will she have?
 

steve_h7

Chief Petty Officer
Joined
Sep 16, 2018
Messages
401
I also got the other stringer removed (there was only two) and it looks like they had a unique way of holding them in place while tabbing them in :eek:; both stringers had these or I would have thought maybe a previous owner had added them for some reason:
 

Attachments

  • photo303336.jpg
    photo303336.jpg
    150.8 KB · Views: 3
  • photo303337.jpg
    photo303337.jpg
    310.6 KB · Views: 3

steve_h7

Chief Petty Officer
Joined
Sep 16, 2018
Messages
401
I'd recommend cutting the stringers out so you can get to the entire transom and then make it solid piece spanning the entire width of the stern. How big of Outboard will she have?

Sorry, I took that picture before removing the second stringer... they're both out now. The outboard is 150 hp Merc.
 

Woodonglass

Supreme Mariner
Joined
Dec 29, 2009
Messages
25,924
OK with that big of Motor, I'd for SURE make it a solid full width transom. You need all the strength you can get with a big motor like that.
 

Woodonglass

Supreme Mariner
Joined
Dec 29, 2009
Messages
25,924
Since you've left the top cap on...What's the plan for clamping the transom to the outer skin?? OOPS for got you cut the splashwell. Did you get it off?? If not, use a sawzall with a long flexible blade and cut it. It's Fiberglass and ANYTHING can be repaired.
 

steve_h7

Chief Petty Officer
Joined
Sep 16, 2018
Messages
401
Since you've left the top cap on...What's the plan for clamping the transom to the outer skin?? OOPS for got you cut the splashwell. Did you get it off?? If not, use a sawzall with a long flexible blade and cut it. It's Fiberglass and ANYTHING can be repaired.

Yes, I got it off after much trauma! See post #65.
And the whole time as I saw the cracks appearing and cringing at each one I kept remembering those words you've spoken before, "It's fiberglass and ANYTHING can be repaired!" and I was counting on you being right. :D
 

Woodonglass

Supreme Mariner
Joined
Dec 29, 2009
Messages
25,924
Ahhh Ok I see and trust me, THAT is NOT damage!!! Once you do some grinding and glassing on the "Go Back" you'll never know it was damaged.
 

Woodonglass

Supreme Mariner
Joined
Dec 29, 2009
Messages
25,924
By the way. This....Is damage and it WAS repaired successfully.

bad-hullhole-pic.jpg
 

ACon977

Senior Chief Petty Officer
Joined
Nov 21, 2017
Messages
759
Yes, I got it off after much trauma! See post #65.
And the whole time as I saw the cracks appearing and cringing at each one I kept remembering those words you've spoken before, "It's fiberglass and ANYTHING can be repaired!" and I was counting on you being right. :D

Ha sorry for the struggles you had, but glad that you did end up getting it apart. Most people will use something to adhere the cap down, whether that is PB or 5200 or whatever, no doubt the PO decided that it made more sense to get it as solid as possible.

And WOG has it right, you can cut a hole in your hull and still be able to patch it. Just be sure to follow the cracks in each direction to ensure that there arent any weak points you dont reinforce. From your images, nothing to worry about, grind it down, glass it up, and paint over top. :thumb:
 

steve_h7

Chief Petty Officer
Joined
Sep 16, 2018
Messages
401
Ha sorry for the struggles you had, but glad that you did end up getting it apart. Most people will use something to adhere the cap down, whether that is PB or 5200 or whatever, no doubt the PO decided that it made more sense to get it as solid as possible.

And WOG has it right, you can cut a hole in your hull and still be able to patch it. Just be sure to follow the cracks in each direction to ensure that there arent any weak points you dont reinforce. From your images, nothing to worry about, grind it down, glass it up, and paint over top. :thumb:

I'm not sure it didn't just come that way from the factory that way, or at least I've not seen any signs of the cap or splash well ever being removed before. But I curse whoever it was. :lol:

And the thinking I had caused a major problem just shows you that I don't even know what I don't know!
But I'll try not to test how big of a giant hole in the hull I can fix. :)
 

steve_h7

Chief Petty Officer
Joined
Sep 16, 2018
Messages
401
Question:
I was creating a template of the transom before trying to chip the existing one out. If I make it one piece it'll be 79" across at the top. The outboard is a big 150hp Merc. The existing transom looks like it's layered in pieces? I don't know for sure but there's quite a curve to the back. Am I going to be able to bend the new one to fit if it's all one piece? Should I do it in layers like I've read some doing for curved transoms? Some pictures of the original; the picture with the straight edge shows the gap that I'd need to bend the transom to glue it... it's about a 2" gap. I'm not sure what path to take at this point or whether it's a non issue and it'll clamp fine as one piece.
Thanks for any help!
 

Attachments

  • photo303335.jpg
    photo303335.jpg
    194.9 KB · Views: 3
  • photo303467.jpg
    photo303467.jpg
    257.4 KB · Views: 4
  • photo303468.jpg
    photo303468.jpg
    232.7 KB · Views: 4
  • photo303469.jpg
    photo303469.jpg
    189.9 KB · Views: 4

ACon977

Senior Chief Petty Officer
Joined
Nov 21, 2017
Messages
759
Its amazing what standard practice looks like, and still has worked for years.

Although this is pretty common to do piece together transom's in order to counteract the curved hull. Others should chime in, Im not a transom expert (nor a transom rookie lol), but I know that its been done before. My personal opinion is that they should be feathered together, rather than having all the layers with the same flex point.

kcassells ; Woodonglass
 
Top