1990 4.3 Century 2000 - Floor,Transom,Stringer,Upholstery Project

Mechanicalmike08

Petty Officer 1st Class
Joined
Aug 29, 2018
Messages
308
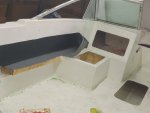
Coming along nicely, you can try a hair dryer on the front cushions to tighten up the fabric a bit just don't sit in one spot to long. A day in the hot sun will help too.
 

Mad Props

Lieutenant Commander
Joined
Jul 8, 2016
Messages
1,766
The rear engine mount has a fiber washer, a spring, a sleeve and a metal washer. I forgot where what goes. I know the fiber washer goes ontop of the transom assembly mount, then I think the spring goes inside the hole of the transom assembly. then the engine mount with the sleeve and the washer on top

Sounds like you got it... spring washer goes inside the fiber washer, then the long bolts go thru mounts with large washer on top of the spacer... make sure your threads are clean and start the bolts by hand... you don't wanna cross thread them.
 

Chris51280

Ensign
Joined
Jan 24, 2018
Messages
907
Sounds like you got it... spring washer goes inside the fiber washer, then the long bolts go thru mounts with large washer on top of the spacer... make sure your threads are clean and start the bolts by hand... you don't wanna cross thread them.

Thanks.
 

Chris51280

Ensign
Joined
Jan 24, 2018
Messages
907
Installed new trim sensors and bellows. I forgot ho much of a pain they are. My fingers hurt. I wonder who the poor guy at the factory must have felt doing this every day
 

Chris51280

Ensign
Joined
Jan 24, 2018
Messages
907
It seems like I have the same problem as mike did with his boat. the gelcoat with wax did not cure fully and is still tacky. Do I need to add another coat or can I spray some PVA over it or is it too late for that now. I had about 1.5% wax added and shook the bottle too. the temp was well in the 70s.
 

Woodonglass

Supreme Mariner
Joined
Dec 29, 2009
Messages
25,924
Did you put wax only in the last coat of gelcoat?
PVA must be applied within 30 minutes of the last coat. After that it's not gunna do much good. Get it in the sun and or get some heat lamps on it but i'm skeptical it will harden. You'll probably need to remove and start over.
 

Chris51280

Ensign
Joined
Jan 24, 2018
Messages
907
I did mix 2% MEKP and 1.5%Wax. The Wax I mixed in the can. I added the MEKP last in the mix. I can get it in the sun. I currently is in a barn and needs to come out anyways for engine install. It is slightly tacky not like it is when you would apply it without wax. It may still cure? Can I paint another layer over it with PVA on top then as last resort?
 

Mad Props

Lieutenant Commander
Joined
Jul 8, 2016
Messages
1,766
was the wax seperated? The surfacing wax is dissolved in styrene but if its now warm <75° or 80° it tends to separate out of the styrene.. You need to slightly heat it before shaking and adding to the gelcoat. You might have been okay with your temps, but just a thought on what the issue could be.

Just an FYI, ive found the best way to heat the wax is to put the bottle in a cup of hot faucet water for 10 or 15 minutes. When you can't see any cloudy/white solids in the bottle, you know its dissolved in the styrene.
 

Chris51280

Ensign
Joined
Jan 24, 2018
Messages
907
I will try to get it out in the open and if that doesn't help, then I will paint it again with a bit more wax and shaken up. And add PVA. That should then do the trick
 

Chris51280

Ensign
Joined
Jan 24, 2018
Messages
907
So i applied another layer. I'm out of pigments now too. I sprayed pva on within 10-20min. Is it normal that it takes awhile to dry with the pva? I did a good 2% of wax on it and 2% mekp. Today was 75F. Hope it works now
 

Woodonglass

Supreme Mariner
Joined
Dec 29, 2009
Messages
25,924
After the PVA is applied you should be able to wash it off in a few hours. You'll need to wait a few days before doing and wet sanding.

You either use surfacing wax or PVA NOT both.
 
Last edited:

Chris51280

Ensign
Joined
Jan 24, 2018
Messages
907
When I installed the bellows, why are the metal clips on there? Wouldn't that give a chance for not completely seal and water getting inside the drive bellow?
There is no current flowing through the rubber bellow to be of any purpose. Is is to grab onto the ring? It seems to be more of a pain to get them oriented right along with the whole installation process. Need like 3 hands.
 

Mechanicalmike08

Petty Officer 1st Class
Joined
Aug 29, 2018
Messages
308
To ground the clamps, they are a pain.

Mine was fine after a day in the sun, But I know I had a problem with separated wax. Mine still felt soft for the first day or so but once i got it out in the sun everything hardened up real nice.
 

Chris51280

Ensign
Joined
Jan 24, 2018
Messages
907
Outdrive is ready to accept the engine. Test fitted the cluster and coutout the old dash.
the gelcoat cured in a couple of spots but appears still soft in others. I will likely e with it for now. Maybe it will still cure enough
 

Attachments

  • photo315173.jpg
    photo315173.jpg
    181.3 KB · Views: 2
  • photo315174.jpg
    photo315174.jpg
    164.5 KB · Views: 2
  • photo315175.jpg
    photo315175.jpg
    173.8 KB · Views: 2

Chris51280

Ensign
Joined
Jan 24, 2018
Messages
907
Pulled the boat out onto rhe trailer. Ready for some horses.
the trailer got a new roller and new bunks.
the rear bunks were moved 12 inches forward. They are now perfectly even with the transom
 

Attachments

  • photo315242.jpg
    photo315242.jpg
    389.9 KB · Views: 3
  • photo315243.jpg
    photo315243.jpg
    328.2 KB · Views: 3

Chris51280

Ensign
Joined
Jan 24, 2018
Messages
907
Continued with the install. Steering ram attached. Speed sensor installed, chair mounted. Ski locker hatch installed. Measurement of the side panels.
 

Attachments

  • photo315290.jpg
    photo315290.jpg
    275.2 KB · Views: 6
Top