Cobalt 19BR motor mounts

Joined
Sep 7, 2018
Messages
12
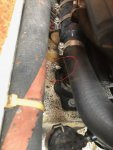
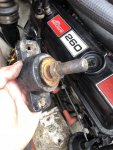
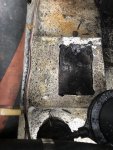
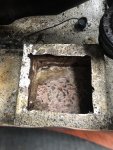
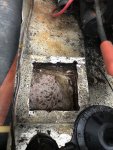
Just purchased a 1982 Cobalt 19BR from the original owner, 569 hours, all original. Discovered a crack on the starboard side, fiberglass motor mount (on top of the mount). The crack is about 1" long and the actual mount has sunk into the fiberglass about 1/8". Does anyone know how these mounts were constructed? Are they hollow on the inside? Was it just a plywood box that was glassed over?

The plan was to pull the motor, cut out both mounts, and glass in new ones. Lately, I've considered saving the time and $$ and just pulling one mount at a time, and filling the fiberglass mount with an epoxy slurry (if they are hollow).

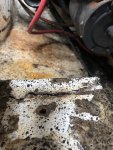
I have no concern that this crack is due to rot. Both motor mount bolts (large ones) were finger tight and I think the movement and vibration is what cracked the fiberglass. The port side looks perfect and both mounts do not appear to sit on a stringer. Everything else is super dry. This boat has been stored in a garage since new and continues to sit under a cover at my house. If I can get by with the simpler repair for a few years, I'll be happy. But I'm also not opposed to pulling the motor if that's what I have to do. It'll give me a chance to clean everything and paint the bilge. Anything else maintenance wise I should do if I do pull the motor?

Sorry for the long post but only 2 questions: How are these mounts constructed? Things to do when a motor is pulled.

Thanks for any input!
 

Woodonglass

Supreme Mariner
Joined
Dec 29, 2009
Messages
25,924
More than likely they're NOT hollow. Some sort of Wood core. Every MFG did it differently.
I'd drill down low on both MM's and check the shavings. IF in fact they are not dark wet shavings then I'd dirll the holes oversized and insert a dowel soaked in epoxy. Next day predrill the holes and then coat the holes and Bolts with 3M 4200 sealant and install.
 
Joined
Sep 7, 2018
Messages
12
Do you have a specific size dowel you’d recommend using? Which epoxy would you recommend? Thanks for the reply!
 

Woodonglass

Supreme Mariner
Joined
Dec 29, 2009
Messages
25,924
wood dowel should be at least double the size of the bolts diameter. I'm guessing at least 1".
I'd just use the 5-10 minute epoxy you buy at Lowe's It won't take all that much.
 
Last edited:
Joined
Sep 7, 2018
Messages
12
I’ll keep your method in mind. I think for my situation though, filling the mount with epoxy would work better. I took both lag screws out today and the first one had the obvious “crunching” noise as it was being backed out. The bolt was covered in rust and brown wood. I think the water hose located right above it had been leaking at some point and dripped onto the mount, soaking the wood in the process.

This combined with the loose motor mount nut most likely contributed to the crack......just an educated guess though.

My local shop had West Systems epoxy so I picked up some resin, hardener, and some 404 to mix in for strength.

Currently trying to to get the mount off which is a huge pain. I’ll post an update soon!
 

Woodonglass

Supreme Mariner
Joined
Dec 29, 2009
Messages
25,924
Have you core sampled the MM ? That rusty bolt is NOT a good sign. Epoxy will not keep the wood from continued rot. Just a temporary fix
 
Joined
Sep 7, 2018
Messages
12
I have not cored sampled the mount. Will do tomorrow.

I was was kind of hoping someone would know how these boats were constructed specifically the motor mounts. If the mounts sit separately from the stringers and are just glassed to the sides of the hull, which it looks like it does, then I’m not worried.
 
Joined
Sep 7, 2018
Messages
12
I saw his thread. You’re right.....MM’s are just 3/4” ply laminated.

The plan is to remove the mount, drill the holes a little larger, scrape the inside as best as I can, vacuum out the debris, mix a slurry with resin, hardener, 404, and chopped strand, pour in, insert 2 3/4” square dowels that extend to the bottom of the mount, wait to cure, and then drill new holes into the dowels and re-install the mount with new SS 3/8X4” lag bolts coated in PL. Just waiting for the rain to let up and I’ll get started.

Thanks for the replies woodonglass!
 
Joined
Sep 7, 2018
Messages
12
The rain let up just enough for me to do some more prep work. Got the motor mount off.

Plenty of room to work now.
 

Attachments

  • photo300664.jpg
    photo300664.jpg
    749.6 KB · Views: 0
  • photo300665.jpg
    photo300665.jpg
    747.2 KB · Views: 0
  • photo300666.jpg
    photo300666.jpg
    1,004.2 KB · Views: 0
Joined
Sep 7, 2018
Messages
12
Cut an “access hole” to start digging out rot. Got to the bottom and hit glass! Thank you Cobalt for glassing your mounts separately and not directly on stringers.

Almost ready for the slurry pour.
 

Attachments

  • photo300702.jpg
    photo300702.jpg
    1.1 MB · Views: 0
  • photo300703.jpg
    photo300703.jpg
    1,011.1 KB · Views: 0
  • photo300704.jpg
    photo300704.jpg
    1 MB · Views: 0

Woodonglass

Supreme Mariner
Joined
Dec 29, 2009
Messages
25,924
Make sure to add slurry to the bottom as well and let it squish all round the sides. Don't press to hard so you leave 1/2" or so of resin on the bottom. I'd use Resin, 1/4" and 1" CSM fibers and cabosil and mix it like catsup or mayonnaise
 
Top