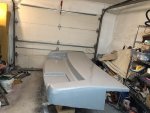
Custom Fiberglass Extended Swim Platform

tpenfield

Moderator
Staff member
Joined
Jul 18, 2011
Messages
17,692
Sunday Update (11/18/2018) . . .

I got the fiberglass on the swim platform plug today. It took a while to glass all the corners and angles, but it is done.

Here are a few pics of the glassed plug . . . I colored the epoxy gray and added a filler to the epoxy to give it some body.
.
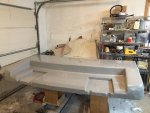
IMG_1769.jpg .
.

IMG_1770.jpg .
I'll need to do some fairing compound and sanding to get it smoothed out.
.
Here is a time lapse video of the glassing . . . 10 minutes of video covers about 1 hour. In total, it took about 3 hours to glass the plug.


kcassells

Fleet Admiral
Joined
Oct 16, 2012
Messages
8,596
Nice work Ted. How many coats of glass did you end up putting on the plug?
 

sphelps

Supreme Mariner
Joined
Nov 16, 2011
Messages
11,432
You sure work fast ! :lol:
Maybe I missed it but why did you tint the epoxy ?
 

Scott Danforth

Grumpy Vintage Moderator still playing with boats
Staff member
Joined
Jul 23, 2011
Messages
47,490
Looking good.....need flight od the bumblebee playing in the background
 

tpenfield

Moderator
Staff member
Joined
Jul 18, 2011
Messages
17,692
You sure work fast ! :lol:
Maybe I missed it but why did you tint the epoxy ?

Because. . . :D

I wanted it to be a solid color rather than white, which the glass filler would make it look.
 

Mad Props

Lieutenant Commander
Joined
Jul 8, 2016
Messages
1,766
Looking awesome! Lotta work in that layup but turned out great.
 

tpenfield

Moderator
Staff member
Joined
Jul 18, 2011
Messages
17,692
Thanks everyone for your kind words. I am thinking that this part is only 1/3 of the project, which I started towards the end of summer. Once the 'plug' is done, then I got to make the actual mold, and from that make the swim platform. :rolleyes:

I'm just trying to gauge my timing on work over the winter to make sure I can get the platform done by April/May (2019). Fortunately, the garage where I am working has the oil burner/heater for the house in an adjacent room. It throws off a fair amount of heat, which keeps the garage at working temperature for glassing. Should be good for working over the winter.
 

tpenfield

Moderator
Staff member
Joined
Jul 18, 2011
Messages
17,692
Update:

Since I have been changing the design of the swim platform 'on-the-fly', I went back to 'the drawing board' (in a virtual sense) and updated my design drawing. One concern I have is the number and positioning of grab rails associated with the ladders. Obviously, there is the one grab rail that would be mounted on the ladder hatch, but I was concerned about having a second rail somewhere in a leveraged position to allow a person to pull themselves up as they climb the ladder.

Here is what I figure on doing, different than the original design . . .
.
Click image for larger version  Name:	SP4AR.png Views:	1 Size:	112.4 KB ID:	10681239 .
Each ladder will have a second grab rail along the side as shown. In order to accommodate the grab rail, I plan on having only 1 cup holder per side. I was trying not to make the side 'pylons' too cluttered with hardware and such. Hopefully, this layout will work out.

I do need to spend some time on the structural design underneath the platform. My main objectives are . . .

1) Wicked strong
2) Light as possible

I think the shape of the platform will provide some strength, but I want to make sure it is not prone to flexing as people board, stand, sit on the platform. . . just thinking 'out loud' a bit :)
 

Grub54891

Vice Admiral
Joined
Jun 17, 2012
Messages
5,911
Looks good, if the handles are to far away, they may be hard to grab. Could you put recessed pockets close to the ladder? not to big but enough to get the hand in.
Wait, I see you can access the cover rail with it closed. Perhaps a handhold instead of the cover rail?
 

tpenfield

Moderator
Staff member
Joined
Jul 18, 2011
Messages
17,692
Looks good, if the handles are to far away, they may be hard to grab. Could you put recessed pockets close to the ladder? not to big but enough to get the hand in.
Wait, I see you can access the cover rail with it closed. Perhaps a handhold instead of the cover rail?

Good point . . . I did check on the design software that I'm using . . . The mid-point of the 2 grab rails associated with each ladder are 24" apart, so it should be a fairly easy reach for the second grab rail. If need be, I could shorted that distance down to about 21".
 

JASinIL2006

Vice Admiral
Joined
Feb 10, 2012
Messages
5,539
The placement of my ladder relative to the grab rail is really similar to what you show in your drawing, and it works out quite well. Having the grab rail mounted a bit forward of the ladder really helps a person pull themselves out of the water and off the ladder.
 

tpenfield

Moderator
Staff member
Joined
Jul 18, 2011
Messages
17,692
More design work and images . . .

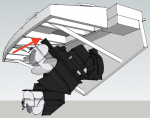
I took a stab at the underneath structure and the strut supports, using my 3D software. Here are a few pictures. I was able to download a CAD file of the Bravo III outdrives for reference. It gives me a pretty good visual on how this thing is going to look.
.
SP4-2.png .
.

SP4-1.png .
My plan is to make the structural ribs out of rigid foam-core & fiberglass. I think it will be relatively light, yet strong.
.
The 3 struts will be 1-1/2" 316 stainless tubing. I'd like to be able to vacuum bag the resin & glass so I can get as high a glass/resin ratio as possible . . . still thinking about how to approach that. :noidea:
 

Attachments

  • SP4-3.png
    SP4-3.png
    171.9 KB · Views: 1

Scott Danforth

Grumpy Vintage Moderator still playing with boats
Staff member
Joined
Jul 23, 2011
Messages
47,490
If you raise the drives and turn them, they will hit your center strut
 

tpenfield

Moderator
Staff member
Joined
Jul 18, 2011
Messages
17,692
If you raise the drives and turn them, they will hit your center strut

Voice of experience? I was thinking I should check the clearance. What would you advise? Maybe raise the attachment point to make it similar to the outer struts?
 

Scott Danforth

Grumpy Vintage Moderator still playing with boats
Staff member
Joined
Jul 23, 2011
Messages
47,490
Working on a movable swim platform for work. Trying to miss the drives is a biotch
 

tpenfield

Moderator
Staff member
Joined
Jul 18, 2011
Messages
17,692
Got it, and thank you for the heads up on that. :thumb: I’ll see what I can do to remedy any possible interference.

I’ll have to see if I can find some dimensional drawings of the tilt and pivot for the Bravo drive. Then I can use the 3D software to simulate tilt and turn.
 

tpenfield

Moderator
Staff member
Joined
Jul 18, 2011
Messages
17,692
Back to the drawing board . . .

Based on Scott Danforth 's comments about the outdrive/strut interference, I did some checking on the Bravo drive spec's and applied them to the 3D model. The Bravo's can tilt up to a maximum of 51 degrees with no spacers, and about 40-45 degrees with spacers

It looks likes, based on my current model, the outdrive will interfere on a tilt up at about 45 degrees.
.
BravoTilt-4.png
.
So, it is back to the drawing board (so to speak) on the underside of the swim platform. I'll be able to take some more precise measurements with my boat this weekend, but the model is fairly accurate. It is good that I checked it at this point, based on Scott's comments and experience.
 

Attachments

  • BravoTilt-1.png
    BravoTilt-1.png
    148.6 KB · Views: 2
  • BravoTilt-3.png
    BravoTilt-3.png
    162.7 KB · Views: 2
  • BravoTilt-2.png
    BravoTilt-2.png
    248.5 KB · Views: 2

Scott Danforth

Grumpy Vintage Moderator still playing with boats
Staff member
Joined
Jul 23, 2011
Messages
47,490
thought it was worth mentioning.

your two outer kick braces can go outboard and may need to be a bit higher. the one in the center needs to be shorter and raise up.
 
Top