Custom Fiberglass Extended Swim Platform

tpenfield

Moderator
Staff member
Joined
Jul 18, 2011
Messages
17,705
Quick update . . .

The stretcy bagging material did not work out so well. I think I may have been stretching it too much in some areas and not enough in others :rolleyes: It ended up puncturing. So . . .

It's standard bagging material with pleats.

I'll probably infuse later this evening. The Admiral fell & hurt her arm, so got to have the urgent care place take a look. :(

Probably fractured . . . hurts wicked bad to twist her arm.

Meanwhile . . . here is a picture of where I am at . . .
IMG_2428.JPG
 

tpenfield

Moderator
Staff member
Joined
Jul 18, 2011
Messages
17,705
Evening update. . .

The Admiral's arm is not broken :) She'll be wearing a sling for a week or so, but at least no cast.

I did the infusion . . .

I had trouble getting a good vacuum, but managed to get it done

Here are the first few moments . . .
Click image for larger version  Name:	IMG_2430.JPG Views:	1 Size:	184.5 KB ID:	10730955
.
Click image for larger version  Name:	IMG_2432.JPG Views:	1 Size:	200.2 KB ID:	10730953
.
I had to coax the resin a bit with the roller.
Click image for larger version  Name:	IMG_2440.JPG Views:	1 Size:	162.7 KB ID:	10730957
.
Click image for larger version  Name:	IMG_2436.JPG Views:	1 Size:	188.9 KB ID:	10730956
.

The bag sprung a leak at the resin fittings, so I had to do a little bit of patchwork on the fly. I probably needed another set of feed lines in those 2 areas. I'll see how things look in the AM.
 

Attachments

  • IMG_2430.JPG
    IMG_2430.JPG
    184.5 KB · Views: 1
  • IMG_2440.JPG
    IMG_2440.JPG
    162.7 KB · Views: 1
Last edited:

tpenfield

Moderator
Staff member
Joined
Jul 18, 2011
Messages
17,705
I did a 'secondary infusion on the 'wings' this morning by adding resin under vacuum. Hopefully, they wetted out OK. :noidea:

IMG_2441.JPG

.

It seems that I am short 1 gallon of resin . . . I thought that I bought 7 gallons, but maybe it was 6 :noidea: Anyway, I have a little under 2 gallons left, so I will probably order 2 more gallons. I used an extra gallon on the main infusion, because within the first 10 minutes or so, it did not look like enough.

Next steps will be to de-bag the mold and get ready to lay in the core pieces.
 

sphelps

Supreme Mariner
Joined
Nov 16, 2011
Messages
11,435
Glad the admirals arm is ok !
This infusion thing is really cool ! Thanks for. Pics ! Time lapse video would be awesome!
 

tpenfield

Moderator
Staff member
Joined
Jul 18, 2011
Messages
17,705
Thanks guys for the well wishes. The Admiral is learning to do things with one arm while the other heels.

I got the platform de-bagged and did some grinding to clean things up. Here are a few pictures.
.
Click image for larger version  Name:	IMG_2446.JPG Views:	1 Size:	212.7 KB ID:	10731447
.
Tomorrow, I plan on adding a layer of glass to the flat areas and laying-up the core pieces.
 

Attachments

  • IMG_2449.JPG
    IMG_2449.JPG
    232.5 KB · Views: 2
  • IMG_2451.JPG
    IMG_2451.JPG
    236.5 KB · Views: 2
  • IMG_2450.JPG
    IMG_2450.JPG
    213.2 KB · Views: 2
  • IMG_2446.JPG
    IMG_2446.JPG
    212.7 KB · Views: 2

tpenfield

Moderator
Staff member
Joined
Jul 18, 2011
Messages
17,705
Lamination Update . . .

I had Friday off and also took a vacation day today (Monday) to make for a 4-day weekend :)

An early start today, working on the lamination of the glass layers and core material. I figured if I could get the large flat area done up to enclosing the core, that would be a decent amount of work.

The flat area that goes over the existing platform is going to have 2 bolts going through the existing platform (along with lots of 4200 adhesive). The Tech Assistance group at Formula shared their method of fastening the extended platforms, so I'm using a similar method. My plan is to embed the bolts into the underside of the platform, so I got some squared SS U-Bolts and cut them in half.

Click image for larger version  Name:	IMG_2452.JPG Views:	1 Size:	227.9 KB ID:	10731815
.
Here is the 1708 all laid out and rolled.
.
Click image for larger version  Name:	IMG_2463.JPG Views:	1 Size:	290.5 KB ID:	10731814
.
Next will be the core material (foam strips that can be seen stacked on the rear of the platform). The core is a bit tricky, as it is strips with 8 oz cloth woven in between to make a corrugated core (aka 'navtruss') rather than a solid core.

It looks like I will be a bit short on materials (glass & resin), so I'll see about getting some more before next weekend.
 

Attachments

  • IMG_2453.JPG
    IMG_2453.JPG
    211.1 KB · Views: 2
  • IMG_2452.JPG
    IMG_2452.JPG
    227.9 KB · Views: 2
  • IMG_2458.JPG
    IMG_2458.JPG
    289 KB · Views: 2
  • IMG_2455.JPG
    IMG_2455.JPG
    282.7 KB · Views: 2
  • IMG_2457.JPG
    IMG_2457.JPG
    197.1 KB · Views: 2

tpenfield

Moderator
Staff member
Joined
Jul 18, 2011
Messages
17,705
I just ordered some more resin & glass, along with a little bit of pour-in foam. I'll pick it all up on Friday AM. VE resin prices have gone up quite a bit in the past year . . . now more than 2X the price of poly, it seems. :eek: :faint2:
 

tpenfield

Moderator
Staff member
Joined
Jul 18, 2011
Messages
17,705
Update . . .

I laid out the core material and secured it (with resin) to the platform. Next step was to embed the 'J' Bolts in the platform.

Here are a few pictures . . .

Core material laid out.
.
Click image for larger version  Name:	IMG_2465.JPG Views:	1 Size:	187.4 KB ID:	10732065
.
I have about 1/2 gallon of resin left, so not really enough to do anything meaningful. So, that's about it until next weekend. :)
 

Attachments

  • IMG_2468.JPG
    IMG_2468.JPG
    166.6 KB · Views: 3
  • IMG_2468.JPG
    IMG_2468.JPG
    166.6 KB · Views: 3
  • image_311606.jpg
    image_311606.jpg
    194.2 KB · Views: 3
  • IMG_2466.JPG
    IMG_2466.JPG
    189.2 KB · Views: 3
  • IMG_2465.JPG
    IMG_2465.JPG
    187.4 KB · Views: 3

Scott Danforth

Grumpy Vintage Moderator still playing with boats
Staff member
Joined
Jul 23, 2011
Messages
47,528
Looking good Ted....i feel lucky that I have a 'glass supply house near by
 

tpenfield

Moderator
Staff member
Joined
Jul 18, 2011
Messages
17,705
Looking good Ted....i feel lucky that I have a 'glass supply house near by

The nearest glass guy to me is about 90 minutes away. He is a bit expensive, but to order elsewhere the shipping costs eat up the difference real fast. I don't mind driving the 90 minutes once in a while to pick up stuff.
 

tpenfield

Moderator
Staff member
Joined
Jul 18, 2011
Messages
17,705
Quick update . . .

I will be picking up the additional resin, some more DBM1708 and a small pour-in foam kit today.

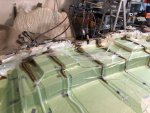
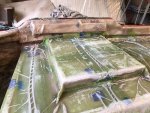
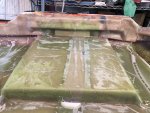
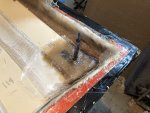
I have been searching for a few better methods on wetting out large sheets (2' x 8' ) of the 1708 biaxial. In my past boat restoration work, I have used a large shallow pan for the resin and laid smaller pieces in the pan to soak. Working with larger pieces on this project has been more tricky to get the resin spread out evenly and soaking in on large (2' x 8') pieces.

A couple of methods that I have come across so far are to . . .

1) Lay the cloth out on the substrate, then fold half of it back on itself . . . wet out the half of the substrate and the half of the underside of the cloth that are exposed. Then fold the cloth back onto the substrate. Repeat for the other half.

2) Use polyethylene sheeting on a table . . . put the cloth face side down on the sheeting, pour the resin on the backside of half of the cloth. Fold the other half onto itself (sort of like booking wallpaper). Then put another polyethylene sheet over the cloth and use a rolling pin (or squeegee) to move the resin around.

I am wondering if there are some other 'tricks' that folks have used to wet out large pieces of biaxial :noidea:

Feel free to chime in. :thumb:


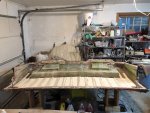
For this weekend, the plan is to . . .

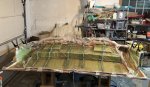
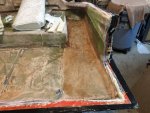
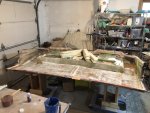
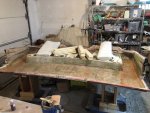
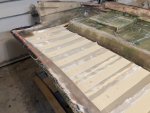
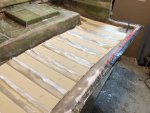
Put layer #2 of 1708 on the 'upper' deck, then secure the remaining foam core strips.

Use a bit of the pour-in foam around the perimeter of the foam strips to fill in gaps. I am getting 2 lb foam, and for the perimeter, I plan on pre-cooling the foam liquid parts so the I get less expansion and a higher density. We shall see how that goes.

Then I will trim up the cured foam and start on the outer layers of glass

Time permitting, I will work on some structural support in the 'pylon' areas and rear edge areas. I plan on boxing in some beveled areas on the underside that will be near the waterline. I'll use more of the pour-in foam to fill those structures.
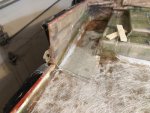
 
Top