1965 26' Owens Flagship restoration underway.

Sea18Horse

Chief Petty Officer
Joined
Jun 1, 2008
Messages
626
this is the company we use at work for custom worm gears and custom spur gears

https://www.rushgears.com/gear-types/spur

Thanks Scott,
My friend Dave had been doing a bit of research about the gear issue a week or two ago and said RushGears looked promising.. I did a little research on them at the time and found some reviews that were basically good but also a lot of folks said the quotes they got for gears a lot like what I need ran about $900.00 for a one-off. So I didn't pursue it. So today I went ahead and requested a quote. But I made the mistake of mentioning what it was for. And I got this in return;


"Thank you for your interest in Rush Gears, Inc.!
Rush Gears products are intended for commercial, industrial uses, they
are not designed for use in automotive, motorcycle, recreational , marine or aircraft drive train units.


Best Regards, Blah Blah Blah"


So important safety tip for anyone thinking of having a custom gear manufacturer make a gear for them. Don't mention it's for anything fun :) ! I checked with other gear makers they all want a company name. So I can't use my PDX Automotive -where I work- email. It's a dead give-away. I Could say the company name is Vandelay Industries. Think they'd buy it? :) I'm still working on that option. If someone really can do it for $150 it'd be worth it.

Cheers......................Todd
 

Sea18Horse

Chief Petty Officer
Joined
Jun 1, 2008
Messages
626
Thanks Scott, emoney, Micky for the suggestion of 3D printing. We thought of that too. A buddy of Daves' has a 3D printer but not a scanner. He could print it but would need a cad file or a scan file. He could print it from any number of materials. But which one? What would be suitable for the harsh environment of the inside of an engine? Just the thought of researching this one facet makes my head hurt! The reality is I have a hard time believing that I could have any more confidence in a 3D printed part than I do in my existing part.

I'm thinking about using my existing part with a washer with three holes drilled in it to spread out the load and a sleeve pressed onto the hub portion to keep it from spreading. I found a Redi-Sleeve shaft repair sleeve from Timken bearings part # JV1157. It's the exact right size to lightly press on the hub but of course it's unobtainium. Still working on it. Thanks guys!

Cheers......................Todd
 

Scott Danforth

Grumpy Vintage Moderator still playing with boats
Staff member
Joined
Jul 23, 2011
Messages
47,499
you need an aluminum gear or a bronze gear

not for power train

match up the pitch and diameter, buy a standard gear with an appropriate hub for about $50 and then machine the pilot and bolt pattern to match the cam.

you can also buy from Berg

https://www.wmberg.com/products/gears
 

emoney

Commander
Joined
Jul 19, 2010
Messages
2,551
Anytime there's a requirement of "company name", I just use my Initials & Last Name and add "..& Associates", lol.
 

Ned L

Commander
Joined
Sep 17, 2008
Messages
2,266
For the caulking question I would go with the Sikaflex as you thought, or BoatLife Like caulk. I would stay away from 5200 or anything with silicone in it.
Great progress on your engine! I like your fender washer idea for the Nylon gear. That whole gear thing would give me reason to pause and think too.

(Sorry for not seeing this sooner. Life has gotten pretty busy and complicated for me the last couple of months.)
 

kcassells

Fleet Admiral
Joined
Oct 16, 2012
Messages
8,598
For the caulking question I would go with the Sikaflex as you thought, or BoatLife Like caulk. I would stay away from 5200 or anything with silicone in it.
Great progress on your engine! I like your fender washer idea for the Nylon gear. That whole gear thing would give me reason to pause and think too.

(Sorry for not seeing this sooner. Life has gotten pretty busy and complicated for me the last couple of months.)

Good to hear from you Ned. I hope all works out for you!
 

Sea18Horse

Chief Petty Officer
Joined
Jun 1, 2008
Messages
626
Thanks Ned!
And I'm with Kevin on this, I hope the life complications aren't too serious. I often complain about life's complexities. Isn't life supposed to be getting simpler? WTH?!

Still waiting for authorization from the "chief financial officer" to buy the drive gear. Home improvement projects seem to have taken precedents over boat projects.....again! Haven't had a chance to look for a washer yet. I did get one of the heads painted today.

Cheers........................Todd
 

mickyryan

Rear Admiral
Joined
Apr 18, 2016
Messages
4,210
i know how that is about house projects , lol i almost went and got a jet boat for new project but was quickly reeled in and steered to a home improvement project to disorient me from my mission , lol
 

Sea18Horse

Chief Petty Officer
Joined
Jun 1, 2008
Messages
626
Ok, I got the gear ordered last week. Hopefully it will arrive next week sometime. I found a washer that will work. It's too big around but I should be able to grind it down to size. And then I can drill the holes in it.

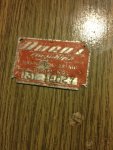
On an unrelated note, early on I found the serial number plate on a shelf in the galley.
IMG_0318_s.jpg
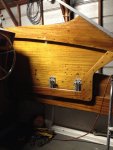
I'd always wondered where it was originally mounted. Well the other day I happened to be sitting in the boat contemplating the 27 orphaned holes left in the starboard cockpit wall and having a smoke, I happened to notice a set of four holes that still had the screw or nail? shanks in them where none of the other ones did. Lower edge of the upper board about 2/3rds of the way back.
IMG_0588_s.jpg
So I went and got the serial number tag and it was a perfect match. So that's where it was mounted. No wonder it's in such poor shape. I wonder if there is any way or anyone to reproduce such a thing?

Cheers..........................Todd
 

archbuilder

Vice Admiral
Joined
Sep 12, 2009
Messages
5,697
There are a few companies out there that do that kind of work. I would search under aluminum machine tag reproductions. I can't tell is that is stamped and etched or just etched. I bet you can find someone who can get it pretty close.
 

Sea18Horse

Chief Petty Officer
Joined
Jun 1, 2008
Messages
626
Thanks Arch! Yeah a couple of the outfits that pop up for that search look promising. I went down to the the boat the other night and took a couple photos of the tag to send in to get a quote but forgot to get a ruler in the picture for scale :facepalm: .

I got the gear delivered this week. It looks good. Clearly has way fewer hours on it than mine because it is way paler in color and no wear visible on the thrust button. Also clearly not the one in the picture. But it did come with the original bolts so there's that. I found a washer and ground it down to fit but have not drilled the holes yet. I think I'm going to give it a shot without the washer first and see what it feels like. The holes in the gear look pristine so here's hoping!

Cheers............................Todd
 

Sea18Horse

Chief Petty Officer
Joined
Jun 1, 2008
Messages
626
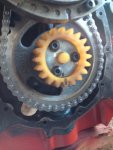
Long overdue update time. Sorry. Ok so I got the new gear and it came with Allen head bolts, whose heads were actually slightly larger than the original ones I had. 1/4" Allen vs. 7/32" and slightly larger diameter so I had high hopes. But no dice. It felt exactly as before. With the bolt heads sinking into the plastic. &^*$#%! So Dave found a 1/2" fender washer that was much thinner than the SAE and USS washers I'd found at my local hardware store and some small copper washers to fit into the indentations made by the original bolt heads and then I found some pan head Allen bolts at the hardware store that I thought could spread the load a bit more. So after much F***ing around we're finally over that stupid little hurdle and off and running again. 035_s.jpg
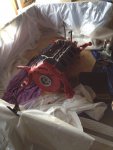
So now the engine is ready to go back in. 036_s.jpg
And then we can begin the fiddly and time consuming task of getting the shaft lined up. We'll get the engine in there and close to where it needs to be and then set the heads on it and let it sit and settle for a couple weeks. Then with the gantry set up to take some of the weight off the wedges hopefully we can get it aligned.

Cheers..............................Todd
 

mickyryan

Rear Admiral
Joined
Apr 18, 2016
Messages
4,210
lookin good man glad ya got that thing sorted out! cant wait to see it back in the boat!
 

Scott Danforth

Grumpy Vintage Moderator still playing with boats
Staff member
Joined
Jul 23, 2011
Messages
47,499
make sure to run a pressure gauge to the helm. I dont trust 55 year old plastic parts.
 

Sea18Horse

Chief Petty Officer
Joined
Jun 1, 2008
Messages
626
Thanks guys! Yeah Scott I know what you mean. I wish I could come up with a solid alternative. But my re-engineering skills only go so far. :)

Oh, also I forgot to update on the serial # tag situation. I sent in the photos of the tag to a couple outfits. They said that they could do it but had like a 200 tag minimum or something like that. So the cost would be too much for this project. Oh well.

Cheers......................Todd
 

mickyryan

Rear Admiral
Joined
Apr 18, 2016
Messages
4,210
you know , i heard, not sure how true it is but that they switched to nylon gears early on because it was a way to beat warranty claims for locked up engines that had been run without oil , other was fact they were quieter, i do know i had a engine blow once and they told me it wasn't oil related cause gear was not black so they covered it (i asked how they knew if id ran it with low oil he showed me nylon gear and said they turn black when ran without oil) .
 
Top