1987 Ski Centurion Tru Trac II - First Time Rebuild - Floor, Engine, Dash, etc.

Status
Not open for further replies.

Ned L

Commander
Joined
Sep 17, 2008
Messages
2,266
AC,.... no problem, it’s all good. (It took me a couple of years to catch onto the ‘splashed’ thing.
 

ACon977

Senior Chief Petty Officer
Joined
Nov 21, 2017
Messages
759
AC,.... no problem, it’s all good. (It took me a couple of years to catch onto the ‘splashed’ thing.

I definitely thought it was a filter keyword that they were using to qualify people for the competition. But it makes more sense that its your project "splashed" into a lake for the first time.

Thanks GA_Boater ! hope to be splashed within 2018!
 
Last edited:

GA_Boater

Honorary Moderator Emeritus
Joined
May 24, 2011
Messages
49,038
"Splashed" as we define it, is the project is finished, back on the water getting wet and putting :D's on your face.

So git 'er splashed this year, AC. :)
 

ACon977

Senior Chief Petty Officer
Joined
Nov 21, 2017
Messages
759
Ned L Glad you got splashed but hoping that I dont take 3 years... but who knows, stuff comes up out of nowhere to slow ya down sometimes.

No work done since my last post, but planning on getting back on it this week and weekend!
 

ACon977

Senior Chief Petty Officer
Joined
Nov 21, 2017
Messages
759
A little pre planning as I start thinking about rebuilding the stringers, does anyone have experience with the inboard motor mounts? The stringers are made from 2x6 material and the motor mount looks like its a 3' section on the outside for additional structural support.

I was thinking of Liquid Nails or PB to hold them together, let it cure, then seal and put them in. Wondering on people's thoughts.
 

Ned L

Commander
Joined
Sep 17, 2008
Messages
2,266
I will just point out some things for you to think about regarding what engine stringers on an inboard have to be up to (very different than an outboard).
Keep in mind that every bit of force required to move the boat, pull skiers, tubes, etc is thansferred through the prop, through the prop shaft, through the thrust bearing in the reverse gear to the engine, and to the motor mounts. So the motor mounts have to be up to the job of “pulling” the boat through the water. They need to be pretty robust.
 

89 resorter

Petty Officer 1st Class
Joined
Oct 3, 2013
Messages
287
Acon, the motor mounts in my Coronado were similar to yours. I built mine by laminating 3/4" marine ply using Tight bond III water proof glue. This is a picture of the starboard motor mount stringer being test fitted. I also had a couple inch wide bump out that was glued to this after this picture was taken that started right behind the jig and ran about 3' toward the transom.
 

Attachments

  • photo289487.jpg
    photo289487.jpg
    201 KB · Views: 1

ACon977

Senior Chief Petty Officer
Joined
Nov 21, 2017
Messages
759
I will just point out some things for you to think about regarding what engine stringers on an inboard have to be up to (very different than an outboard).
Keep in mind that every bit of force required to move the boat, pull skiers, tubes, etc is thansferred through the prop, through the prop shaft, through the thrust bearing in the reverse gear to the engine, and to the motor mounts. So the motor mounts have to be up to the job of “pulling” the boat through the water. They need to be pretty robust.

I certainly understand the transfer of forces through the boat, thankfully my ME mind helps with that. Which is what makes me wanting to reach out to see what people have done in their projects. Most of what I see is plywood, but thats with the motor mounted and pushing on the transom (I/O or Outboard), which mine wouldn't.

Since it was built with what appears to be pine stringers, thats what I plan on doing. And I wanted to use bolts to hold the motor mounts to the stringers, rather than Lag Screws, since I feel I can get those holes sealed better than I could with the screws.

But again, I have no experience with this, just conceptual knowledge.
 

ACon977

Senior Chief Petty Officer
Joined
Nov 21, 2017
Messages
759
Acon, the motor mounts in my Coronado were similar to yours. I built mine by laminating 3/4" marine ply using Tight bond III water proof glue. This is a picture of the starboard motor mount stringer being test fitted. I also had a couple inch wide bump out that was glued to this after this picture was taken that started right behind the jig and ran about 3' toward the transom.

Now was yours an Inboard? or I/O? I am REALLY hesitant on using plywood. 1st of all because it wouldnt come in 16' lengths, 2ndly because it wasnt what was originally in the boat.
 

ACon977

Senior Chief Petty Officer
Joined
Nov 21, 2017
Messages
759
You could feather the plywood together since it isnt a continual piece of wood anyways. But I just feel like I can see that splitting and shearing if its trying to take the load of the engine. Most sub floor made of plywood is only doing hull rigidity (with the help of the foam) and supporting the floor that you are walking on. Not the case for my boat.

Again, this is just my thoughts, always looking for input and am thankful to have people chiming in! I just like to challenge back to make sure I understand the best way to move forward.
 

89 resorter

Petty Officer 1st Class
Joined
Oct 3, 2013
Messages
287
My Coronado is an inboard (454 chevy motor) and the original construction of the stringers that the motor mounts to were plywood. The engine stringers on mine ran from the transom up to the bulkhead closest to the bow. The only thing that I changed was the widened area where the motor actually mounted to. This area had what looked to be a 2x4 laminated to the plywood and it was that 2x4 section that was the most rotted....I laminated marine ply in this area too. I staggered the ply's to get the length that I needed. The only dimensional lumber that I found was the short part of the stringers that start at the front bulkhead and run towards the bow. That's just how I tackled it but I don't see any problem using dimensional lumber.
 

Woodonglass

Supreme Mariner
Joined
Dec 29, 2009
Messages
25,924
Using plywood is fine and quite easy. Use 1/2" ply and overlap the joints. Glue and screw the two pieces together and it will be twice as strong as regular wood. Make sure to soak the edges with lots of resin. Motor mounts can be made the same way using 3/4" laminated together Lag screws will be fine to use just ensure to predrill the holes and coat them and the bolts with 3M 4200 sealant. If you do it this way you WON'T ever have to do it again.:joyous:
 

ACon977

Senior Chief Petty Officer
Joined
Nov 21, 2017
Messages
759
Thanks 89 and WOG. I think i am going to make them with dimensional lumber, It is what is std factory, and I have more experience with it.

I will have to look into getting some 3M 4200 sealant for those holes, I want this fix to be as permanent as it can be!
 

Baylinerchuck

Commander
Joined
Jul 29, 2016
Messages
2,726
Just found your thread and started following. Looks like the heavy hitters in boat restoration are all following you which is great. These guys helped me a lot in my rebuild......and if Ned L wouldn’t have splashed this year I might have had a chance at the SOTY Award!!! :D

Anyway, looking great there this far, you’ve gotten a lot done in a short amount of time. You may already know this, I don’t see it mentioned, don’t use treated dimensional lumber. Lots of reasons I won’t mention. Plywood is much stronger than dimensional lumber and easier to work with.

Nice looking boat!!!
 

ACon977

Senior Chief Petty Officer
Joined
Nov 21, 2017
Messages
759
Thanks Baylinerchuck I'm very happy with the following I have had so far! Glad to have you here as well. I've seen your comments on other forums I follow on here and you really know your stuff as well. Although the progress seems quick, I have been idle for a week due to the job getting busy and I'm anxious to get back on it. But now I need to figure out which way I want to move forward, ply or dimensional.

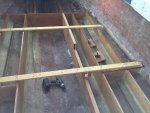
Hoping to finish grinding and clean the garage tonight to get ready for the cutting the stringers and starting glass work. The debate in my head keeps going back and forth now that I have 100% of the pros on here recommending plywood rather than dimensional. Especially 89 resorter, who has an inboard, and used all ply. BAH

I did read that treated dimensional lumber is a bad idea for boat work. Once you glass it in there is no way for the gas/chemicals to escape; or something like that. If I was to do dimensional I would probably cut it, pre seal it with resin and put an initial layer of CSM on it for strength while the "seal" layer is still tacky. Kind of like how people have prepared their transoms before install.

A lot of my concern with the plywood is the fact that my bolts would be going into the end of the plywood. I know you can cap it with another piece and WOG makes it seem like if you soak the ends you'll end up with a strong board. But it concerns me.
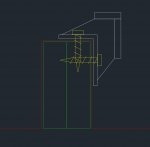
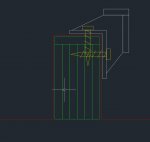
I definitely want to have the full 1 1/2" so that would end up being 3 layers of 1/2" so that I could sandwich one in the middle without creating a stress riser. Then in the motor areas I would have to do 6 layers to get to the full 3" (to replace the 2x). But with that I would be putting my lag bolt into the end of one or between 2 sheets. Below are rough sketches I made to illustrate my concerns, not perfect, but good for discussion.

looking at this gives me a bad feeling, I just don't feel like there is much strength in the side ends of plywood. I really want to take your guys' advice, since you are much more versed than I am, but it gives me an uneasy feeling.

Engine mount (2).JPG

Engine mount.JPG

In addition to all this, I also need to dig into the engine and get it running, but with the power out of the garage at the moment I am a little stuck. Was supposed to have an electrician over this week but that didn't work out.

and so off to looking for your guys' advice yet again. Sorry for the long response, I just want to try and spell out my thinking so that I can see if my thinking is in the right direction, or if I'm misinterpreting. so Please challenge my thinking or understanding, I have read a lot, and have an engineering mind for this stuff. but my experience in these departments is lacking.
 

Attachments

  • Motor Mount DWG.JPG
    Motor Mount DWG.JPG
    23.9 KB · Views: 0
  • Motor Mount DWG.JPG
    Motor Mount DWG.JPG
    23.9 KB · Views: 0
  • Motor Mount DWG2.JPG
    Motor Mount DWG2.JPG
    30.9 KB · Views: 1

TRH299

Petty Officer 2nd Class
Joined
Aug 4, 2017
Messages
123
"In my opinion", either way shown in your sketch will work fine assuming you do a good job of bonding all pieces together and encase the whole thing in glass prior to drilling the pilot holes. "If it were me doing it".... I would probably pilot drill full length for screw, then go back in about half way with maybe a 5/8" bit then thread in bolts once to cut threads then remove bolts and pour holes full of epoxy then reinstall waxed bolts just snug. This would guarantee never having water getting to your wood and it also is a much stronger connection as there would be more surface area with the larger hole If one ever had to remove the bolts.

"In my opinion", the only thing that makes ply better than solid wood in your situation is that the ply by nature is pretty uniform in strength/quality vs trying to select proper grain/moisture level solid "decent" wood at Home Depot. I have built aircraft out of wood and have used both straight grain quarter sawed sitka spruce and douglas fir, but it was very difficult to obtain blemish free.

No matter what you use, it will likely work fine and as a bonus, your mounts have 4 bolts each vs most boats that only have two bolts from the top.
 

ACon977

Senior Chief Petty Officer
Joined
Nov 21, 2017
Messages
759
"In my opinion", either way shown in your sketch will work fine assuming you do a good job of bonding all pieces together and encase the whole thing in glass prior to drilling the pilot holes. "If it were me doing it".... I would probably pilot drill full length for screw, then go back in about half way with maybe a 5/8" bit then thread in bolts once to cut threads then remove bolts and pour holes full of epoxy then reinstall waxed bolts just snug. This would guarantee never having water getting to your wood and it also is a much stronger connection as there would be more surface area with the larger hole If one ever had to remove the bolts.

TRH299 This is perfect. I was thinking of pre drilling and filling with a silicone or something that could seal it, then run the bolts in. But I like having resin already in a hole with the threads pre-cut. and the wax would give a layer between the bolt and resin. If anyone wanted to take it out (aka me if I ever rebuild the engine) I wont be tearing the whole stringer core apart.

"In my opinion", the only thing that makes ply better than solid wood in your situation is that the ply by nature is pretty uniform in strength/quality vs trying to select proper grain/moisture level solid "decent" wood at Home Depot. I have built aircraft out of wood and have used both straight grain quarter sawed sitka spruce and douglas fir, but it was very difficult to obtain blemish free.

No matter what you use, it will likely work fine and as a bonus, your mounts have 4 bolts each vs most boats that only have two bolts from the top.

hmm I see the reasoning there. and yea, HD lumber is not typically perfect :laugh: that's certainly a factor.

and the motor mounts are a bit more than the normal boat due to this being a competition ski boat, so I will have load on the pylon which is mounted to the stringers, in turn getting torqued from the prop and drive shaft. Thats the reason for my hesitation before moving forward, These stringers need to be rock solid.
 

TRH299

Petty Officer 2nd Class
Joined
Aug 4, 2017
Messages
123
For what it is worth, I know partially potting fasteners with epoxy works well.... Not so sure about polyester "resin". Even if you are using poly resin for the majority of the restoration, I only can recommend the EPOXY for potting screws.
 
Status
Not open for further replies.
Top