1987 Ski Centurion Tru Trac II - First Time Rebuild - Floor, Engine, Dash, etc.

Status
Not open for further replies.

Scott Danforth

Grumpy Vintage Moderator still playing with boats
Staff member
Joined
Jul 23, 2011
Messages
47,543
I think a compression test would be more thorough, but I always like the "gut checks" to ensure that it makes sense to keep working.

And I also agree about the hull first, it is in pretty decent shape thankfully. Some scuffs, but no dings or spiders. My goal was to start on the engine to see if I want to pull it out and rebuild, or clean it up, test it, and drop it back in. Then I get to do the fun work of floor (hopefully not stringers, tbd), seats, and wiring.

if the floor is soft, stringers and bulkheads are long long long long long gone. motor needs to come out anyway.
 

ACon977

Senior Chief Petty Officer
Joined
Nov 21, 2017
Messages
759
the fact that the core plugs are out would scream improper winterization. assume your going to be looking for a block, heads and exhaust. I would look for a 351 out of a low mileage truck and plan on swapping your marine accessories, rotating electrics and tin over if you want to stay within your really low budget.

Thanks for the response. A poorly winterized boat is exactly what I bought, no doubt about it. probably left uncovered as well based on the floor and seats, but the freeze plugs (hopefully) did what they are supposed to, pop out and drain the block before the ice is able to expand. This is my reasoning for doing the leak and compression test.

Again, this is optimistic thinking, but I am trying to stay upbeat with this project and roll with the punches that are guaranteed to pop up.

Another interesting thing, when I was turning the motor over by hand I noticed that some of they cylinders were pushing the marvel oil that I had put into the spark plug holes, back out, that gives me hope that the rings are in decent shape and still creating a seal. Not a guarantee, but could be another good sign.


Thanks to everyone for the responses, I appreciate being challenged and 100 minds are certainly better than mine alone.
 

ACon977

Senior Chief Petty Officer
Joined
Nov 21, 2017
Messages
759
Not a pro here, but I can tell you that a battery at 7-8 Volts is a dead battery and won't do a thing...
I'd get a new battery first, or at least test with a different battery.. Borrow from car if you have to..
Might be able to fully charge existing one then have it load tested at local parts store, but I wouldn't count on it being that low..

In any event, don't go buying a solenoid or starter until you can test with a known good battery..

My $0.02

Thanks for the change! I 100% agree that the battery is shot and will certainly buy a new one before a solenoid and starter. I was just surprised that the solenoid and starter did nothing. no click, no hum, just a little sparking from the connection. Do you have any idea if there is a voltage requirement for the solenoid to activate?
 

jbuote

Lieutenant Junior Grade
Joined
Aug 17, 2016
Messages
1,001
I think I think I've read that anything less than 10-11v won't do anything really..
Not sure of the facts on that though..

You got a little sparking from the connection..
Sounds like all the wiring connections need to be cleaned up as you may have dirty/corroded connections which add resistance anyway.. It's the current draw that drops a battery voltage when in use.. If connections aren't clean (as in shiny clean) then you get more resistance, and more voltage drop.

I put a brand new battery in my new to me boat in 2016. It didn't work.. No clicking, no starter engaging, nothing.
Had new battery load tested and it was fine. Turned out I had a corroded ground on the engine that was so bad even a new battery wouldn't work. Cleaned it up and all was well..

In any event, sounds like there are bigger things to look at before seeing if the starter and solenoid work..
New battery, starter and solenoid (as needed) will probably end up being the cheapest things you'll need..

Again, not a pro here so I defer to others,

Hope it helps! :D
 
Last edited:

Scott Danforth

Grumpy Vintage Moderator still playing with boats
Staff member
Joined
Jul 23, 2011
Messages
47,543
Thanks for the response. A poorly winterized boat is exactly what I bought, no doubt about it. probably left uncovered as well based on the floor and seats, but the freeze plugs (hopefully) did what they are supposed to, pop out and drain the block before the ice is able to expand. This is my reasoning for doing the leak and compression test.

.

They are NOT freeze plugs. they are core plugs (actually called welsh plugs), used to get the sand out during the casting process. they were never intended to save the block from freezing. they were intended to get foundry sand out of the core of the motor.

the fact that someone years ago mistakenly called them freeze plugs is a joke.

as for electrical systems, a good battery is starting out closer to 13.2 volts and is considered dead at 12-volts. below 12 volts is severely discharged to the point of damaging the plates.

the starter bendix wont pull in at 7-8 volts and the starter wouldnt even think of turning below 12 volts, much less turning an engine.

pull the battery out of your truck and hook it up.
 

ACon977

Senior Chief Petty Officer
Joined
Nov 21, 2017
Messages
759
I think I think I've read that anything less than 10-11v won't do anything really..
Not sure of the facts on that though..

You got a little sparking from the connection..
Sounds like all the wiring connections need to be cleaned up as you may have dirty/corroded connections which add resistance anyway.. It's the current draw that drops a battery voltage when in use.. If connections aren't clean (as in shiny clean) then you get more resistance, and more voltage drop.


For clarification, the "sparking" was my jumper wire, not the connections. But yea definitely a good start would be to clean the connections. Thanks for the response, I know that the standard voltage drop is approximately 1.5-2 when activating the starter. So if I wasn't getting enough to begin with then maybe it wasn't going to do anything to begin with. I'll pull the battery from my car and give that a quick try.


In any event, sounds like there are bigger things to look at before seeing if the starter and solenoid work..
New battery, starter and solenoid (as needed) will probably end up being the cheapest things you'll need..

Again, not a pro here so I defer to others,

Hope it helps! :D

This is the truest statement, it's been rattling around in my head as I get thinking about the project as a whole. The goal is to take it one step at a time and do it right, which means figuring out what is good/bad/passable, and understand each component of the boat. I should probably just pull the engine out since I want to do the floor anyways and can mess with it on the side.


Scott Danforth Please correct me if I'm wrong, but if the stringers were properly glassed, the floor could have rotted on top of it and not penetrated. As I stated before, this is a first project and I am trying to balance being realistic with being optimistic. The ultimate test would be to just get the floor up and physically look at it. But the engine was my first thought, right, wrong, or otherwise.
 
Last edited:

ACon977

Senior Chief Petty Officer
Joined
Nov 21, 2017
Messages
759
They are NOT freeze plugs. they are core plugs (actually called welsh plugs), used to get the sand out during the casting process. they were never intended to save the block from freezing. they were intended to get foundry sand out of the core of the motor.

the fact that someone years ago mistakenly called them freeze plugs is a joke.

Very interesting history, I used to work in a foundry so the casting process is familiar, interesting that it's been mislabeled for so long. Thanks for the information.
 

Scott Danforth

Grumpy Vintage Moderator still playing with boats
Staff member
Joined
Jul 23, 2011
Messages
47,543
Scott Danforth Please correct me if I'm wrong, but if the stringers were properly glassed, the floor could have rotted on top of it and not penetrated. As I stated before, this is a first project and I am trying to balance being realistic with being optimistic. The ultimate test would be to just get the floor up and physically look at it. But the engine was my first thought, right, wrong, or otherwise.

In theory, maybe. in reality. if the floor is gone, the stringers left a while ago. plan/budget/estimate for the worst, hope for the best. celebrate if it comes out better than you planed for.

I think there was only one restoration thread on iBoats out of tens of thousands that only had a patch needed on the deck due to improper screw penetration. all others that started with its just the floor ended up to be full gut-jobs
 

Ned L

Commander
Joined
Sep 17, 2008
Messages
2,266
They are NOT freeze plugs. they are core plugs (actually called welsh plugs), used to get the sand out during the casting process. they were never intended to save the block from freezing. they were intended to get foundry sand out of the core of the motor.

the fact that someone years ago mistakenly called them freeze plugs is a joke.

as for electrical systems, a good battery is starting out closer to 13.2 volts and is considered dead at 12-volts. below 12 volts is severely discharged to the point of damaging the plates.

the starter bendix wont pull in at 7-8 volts and the starter wouldnt even think of turning below 12 volts, much less turning an engine.

pull the battery out of your truck and hook it up.


Scott, Thank you. You saved me from having to type that out,... on all points.
 

ACon977

Senior Chief Petty Officer
Joined
Nov 21, 2017
Messages
759
Hey All!

Sorry for not updating at all last week, work got a bit crazy for me but I was able to put in a few hours in the afternoons and got some small progress done on the boat. So here we go!

I followed 
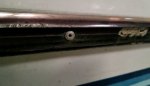
boedekerj's advice and got a scope, pretty nifty little camera that was cheap and showed me exactly what I needed, I only looked in cylinders 2,3,4 out of curiosity, I still need to do my due diligence and do them all, but the image below shows pretty decent cross hatching (from my unprofessional optionion)
Cylinder Wall 3.JPG
IMO; I would scope it to look for scoring in the cylinders before you put too much into it that block, man. Google search "borescope camera for android". they're cheap. If you take a peak in each of your cylinders (at bottom) make sure that you still see good and distinct cross-hatching and no hazing or vertical scoring. This happens sometimes if debris/corrosion get's into the cylinders and you rotate it. If the cross-hatching is gone or its scored or hazed, you're going to have a smoky-blue haze that never goes away.

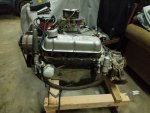
next, I also got the engine out of the boat, I have more images on my camera but these are what I can pull from my phone. I built a basic engine "stand", although I am afraid to call it that since it doesn't do much more than keep it off the concrete and be on casters so I can move it around the garage. I had spaced the top 4x4 so that I could use the engine mounts to be more sturdy, but the oil pan is too low for that to actually work, whoops. But, it is serving its purpose until I can do my compression and leak test to see if a rebuild is necessary, in that case I will get an actual stand.

engine on stand 2.jpg

I used a small rotary wire brush and cleaned out the core (welsh) plug holes to be ready for the new plugs. I realize that this may be premature if I end up doing a rebuild on the engine, but I got excited to start putting something together rather than keep tearing things apart. So I got 3 of them in and then bashed my hand with the mini sledge I was using. Does anyone have a better way of getting new plugs in without being able to rotate the engine? I was using my axle socket and an extension in it reversed. It worked pretty well until I missed the extension, just an awkward angle and its tough to keep them all in line with each other.

Seats and Engine out.jpg
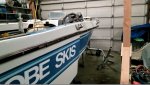
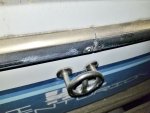
Next we went back into deconstruction/destruction mode on the floor. Starboard was VERY soft and came up in fist sized pieces. Port was a bit better and I actually had to cut the glass off the wall and transom and got it all out in 1ish piece. Looks like the port was the original (or at least correctly rebuilt), and the starboard was a chop job with small pieces of plywood slopped together with CFM and TONS of screws. As Scott Danforth pointed out, my optimism for the stringers did not pay off and most of the screws I was able to pull out of the stringers by hand. Dont think thats how they are supposed to work haha. So, ouch.

I have images on my camera that I will try to get up in the next couple days of the stringers and deconstructed floor.

We got the foam out from under and cleaned up the boat a bit, but we are looking at having to take the cap off to get to the front portion of the hull. Any advice on getting the hull off of an inboard? I would guess that it is similar to an outboard, but my only reference is a Glastron project that JMink did. Huge fan of his videos, informational, and he has an awesome dry sense of humor that I appreciate.
https://www.youtube.com/playlist?list=PL3VcOAbbi5n1gEzUaZF3CiTJs4-21ol2d

My thought was to build a support for the hull so it doesn't sag out of shape, and then take off the rub rail and gently motivate the separation of the two. then build a frame to hold it up and pull the hull out from under it? This is my basic thoughts but I'm sure someone on here will have a better idea or reference I can look at.


Lots of words but hopefully it gives a good scope of where we are now and I can get some feedback on how to proceed which makes sense. I don't run a machine shop or rebuild for a living, so I understand not everything I do is perfect, but just trying to have some fun, learn a lot, and come out with a better boat than when I started. Cheers!
 

Attachments

  • Engine on stand.jpg
    Engine on stand.jpg
    1.2 MB · Views: 4

ACon977

Senior Chief Petty Officer
Joined
Nov 21, 2017
Messages
759
Also, forgot to mention that the starter and solenoid are both toast. I used a battery at 15V and still nothing. took it off the engine to bench test it and clean the connections better, still nothing on either the solenoid or starter.

So I put in an order for a new starter last week, found one on ebay for $35, pretty pumped about that find. And it should be here in a week or so. Then we can get working on the compression testing of the engine.

I fabbed up a leak test system from my compression tester, I have a picture on my camera of it I will hopefully get up tomorrow. But plan to do the leak test sometime this week, I will post what results I get from that.
 

ACon977

Senior Chief Petty Officer
Joined
Nov 21, 2017
Messages
759
Hey All,

I got some of the pictures off my camera but realized I didn't take any final deconstruction pictures. BUT I did do a leak down test on the engine and got some interesting results.

So since I dont have a starter or anything, I did the test cold, Does anyone know what the numbers should be for a cold test? i have read that 15% is ok, obviously less is better.

here is an image of my setup, I realized that the compression tester had fittings that did not match Automotive or Industrial standard so I cut the tube and put fittings into the tube in order to be able to hook it up to the tester. Probably not the "right" way to do it, but I tested all the connections and they weren't bubbling with soap and water, so I called it good enough for wat I was looking for. I filed the connection tube with epoxy and drilled a .04' (1mm) hole.

20180402_180159.jpg20180402_182453.jpg20180402_182445.jpg

Unfortunately, results of the leak test were not good. I tested 20-25% on cylinders 1,3,4, and then 35-50% on 2, not sure why it was fluctuating so badly, but this cylinder was significantly worse. Now, I havent run this on a "good" engine, so I have no idea if the rig I built is actually testing accurately, but I would guess it's close, or at the very least tells me that cylinder 2 is not consistent with the others.

So i started looking at why it could be testing differently, and broke out the boreoscope, this thing is pretty dang cool, pretty pumped that I bought it. I looked into the cylinders and did notice some vertical scoring, so then I checked the other 3 and they all looked about the same. any thoughts if this is enough to significantly impact the performance? I understand that its not a good sign, but is it a deal breaker on the engine? That is my question.
20180402_190323.jpg20180402_190335.jpg20180402_190346.jpg20180402_190455.jpg


Alright, and I noticed some air coming from the exhaust port on cylinder 2, the one that tested low. And so I took the boreoscope and took a look at the valves when they were open, These things look terrible to me. #2 is definitely the worst, and it is no wonder I was getting a much lower reading,

#1 cylinder 1.jpg

#2 cylinder 3.jpg

#4 cylinder 4.jpg


So to wrap up, I'm now sure I need to take the heads off and clean the valves and valve seats. But regarding the tests, is 20-25% acceptable for a cold engine? or is that a red flag right off the bat.

As always looking for advice and guidance. I am still excited for the project, even though it is getting messier and messier every step I take haha
 

Attachments

  • Cylinder 2 (2).jpg
    Cylinder 2 (2).jpg
    130.2 KB · Views: 1

ACon977

Senior Chief Petty Officer
Joined
Nov 21, 2017
Messages
759

boedekerj

Seaman
Joined
Jul 24, 2017
Messages
71
Are you injecting air into the cylinder to do your test, or rotating the crank to allow the cylinder to generate it's own compression?
 

ACon977

Senior Chief Petty Officer
Joined
Nov 21, 2017
Messages
759
Are you injecting air into the cylinder to do your test, or rotating the crank to allow the cylinder to generate it's own compression?

I had an air supply that was regulated down to 100psi, I injected this into the cylinder at TDC and measured the decrease in pressure. That decrease was my leak percentage. That was what I had seen other people do when they tested older engines.
 
Last edited:

boedekerj

Seaman
Joined
Jul 24, 2017
Messages
71
Ah. Gotcha. So, are you adjusting the crank position prior to testing each cylinder to make sure that the Intake and Exhaust valves are closed? If so, perhaps somethings sitting in the valve seat. Who knows what's climbed down your intake manifold, if it's been a while since it's been started. Could be anything preventing it from seating. You could try pulling the plugs from each of the bores except the one you're testing, then put a drill on the nose of the crank and see if you can get the crank turning fast enough to get a good pressure test on a "per cylinder" basis?

Looking at the pics, I'm not completely sure on some of them where "parallel to bore" is, so I can't tell if there's vertical scoring, or not.
 

ACon977

Senior Chief Petty Officer
Joined
Nov 21, 2017
Messages
759
boedekerj Thats exactly right, bringing each cylinder as close to TDC as I can and making sure that the valves are closed. My thought is that the valves are not seating in addition to some wear on the rings etc, that are both adding up to a poor test. I just don't know how much of the leak is from the valves, versus the piston.

I tried to put a drill on the crank but it didn't have enough torque to rotate the engine and I didnt want to keep trying and end up burning up my good Ryobi drill.

In the cylinder pictures I tried to have the piston or top of the cylinder on one side to show which way the cylinder is oriented. But each one of the pictures the score lines are vertical.
 

ACon977

Senior Chief Petty Officer
Joined
Nov 21, 2017
Messages
759
Alright, another day, a little progress. The beginning of this feels like the proverbial frog climbing out of the well, 2 steps forward, slide 1 step back. But its a labor of love, and I'm becoming overly attached to this boat, even in its stripped down form.

So to the updates.

I did my leak down tests on cylinders 5-8 and ended up getting downright rotten results (60-70% leak) on 6 and 8. So yea, I think this engine rebuild just got a lot more exciting as well.

I then felt the need to get some progress done on the boat and started the process of removing the cap. So first step is get all the heavy stuff off. So we unbolted the tower and windshield. Got that pulled off and then pulled the rub rail. Started in the back of the boat with the 2 screws holding the rail down and simply pulling it all the way around the boat. It came off pretty easily, but the rubber ripped in half for most of the way around and we will definitely have to get a new one.
Click image for larger version  Name:	20180403_184458_1.jpg Views:	1 Size:	664.1 KB ID:	10554236Click image for larger version  Name:	Rivet Popped out.JPG Views:	1 Size:	25.9 KB ID:	10554232Click image for larger version  Name:	Drill Through Hole.JPG Views:	1 Size:	23.0 KB ID:	10554235


So with all of those done, the next step is to build a cradle for the Hull and then pull the rail off. Its been pretty fun so far still, hoping to keep the motivation going so that this project can move along swiftly, can't wait to hear back from people for advice or comments.
 

Attachments

  • Rivets.JPG
    Rivets.JPG
    28.1 KB · Views: 1
  • Boat without Rub Rail.JPG
    Boat without Rub Rail.JPG
    65.6 KB · Views: 1
  • 20180403_184458_1.jpg
    20180403_184458_1.jpg
    664.1 KB · Views: 1
Last edited:

Ned L

Commander
Joined
Sep 17, 2008
Messages
2,266
As I said earlier I wouldn’t even bother with a compression (and even more so a leak Dow test) until after I get the engine running and warmed up well.
The engines in my boat sat untouched for 14 years. After I got them up and running the compression was all over the place. After using the boat for three months (end of last season) a compression test showed all cylinders within 10%. I’m happy.
 
Status
Not open for further replies.
Top