1972 Cathedral Trihull

Trihulled

Seaman Apprentice
Joined
Jun 15, 2015
Messages
49
Alright, I gave this a shot about a year ago and totally dropped the ball. I am going to take another crack a recording this project and hopefully make it all the way thru as it nears completion.

Backstory:

My Uncle used to live in Kiln, Mississippi and had a house right on the Bayou. During that time he purchased a 1972 Cathedral Trihull and regularly took the boat out. Unfortunately in 2005 their house was directly in the path of Hurricane Katrina. Their house took significant damage and the boat at the time, trailered off to the side was left out in the open. Shortly after that time he offered me the boat if I would take it off his property. As a Floridian I said no. I knew the old saying that it's better to know someone with a boat then to own one yourself.

So the boat was left to sit outside for the next 5-6 years.

This all changed in 2012, when I accidentally mentioned the existence of this boat to my two roommates at the time. They thought it would be a great idea to go get this boat and getting it working again. I'm sure they had dreams of catching giant fish and being surrounded by beautiful women.

After hours of persuasion, I eventually called my Uncle and asked if we could come grab the boat. He said the offer still stood and a FREE boat was on the table. We arranged the truck that could tow it back and headed out. Before heading out the last thing that my Father told me was.... "I will never see this boat come up my driveway." He like me, knew this was a bad idea.

I agreed and off we went. On the way their my two roommates thought we were going to simply show up, hitch this baby up in 30min and head out. Party in NOLA!!

Man were they disappointed.

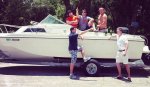
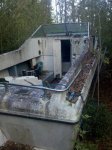
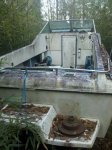
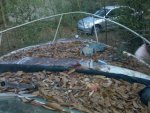
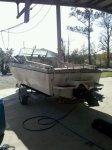
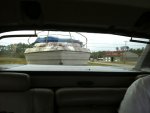
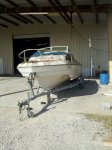
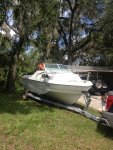
Below are some pictures of the first sight.
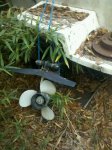
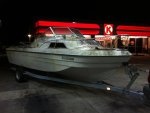
 

Attachments

  • photo224609.jpg
    photo224609.jpg
    82.7 KB · Views: 11
  • photo224610.jpg
    photo224610.jpg
    85.7 KB · Views: 10
  • photo285683.jpg
    photo285683.jpg
    81.5 KB · Views: 10
  • photo285684.jpg
    photo285684.jpg
    79.9 KB · Views: 10

Trihulled

Seaman Apprentice
Joined
Jun 15, 2015
Messages
49
Once we arrived and got to work my roommates original 30min estimate was looking promising. To my surprise the tires head air and the trailer wasn't buried. We hitched it up and began to pull it out. After moving it about 6in, the axle ripped off where it attaches to the leaf spring......

We then spent the next 6 hours jacking and strapping the axle back on in place. We made several trips to a trailer shop in Gulfport, who were kind enough to sell us trailer parts. Essentially, we were able to use ubolts to reattach on side, but had to stick with ratchet straps on the other side. The owner of the trailer shop said that if we could get the trailer down to him before sunset his guys could get it fixed up for our trip back home.

Little did he know. We finally get this thing out of the jungle and drive it down to Gulfport. Upon arrival the owner runs out and tells us, "If I'd known this was what you guys were doing I would of told you to ditch it." We had already come this far and the owner said he should be able to fix the trailer.

We head out and go to NOLA for the evening. The next morning, upon further inspection and finding out 50% of the axle is rusted thru the owner tell me that there is no way we are taking this thing 500 miles back to Florida and we need to find a new trailer.

I end up finding one at a local dealer in Slidell and I empty my entire savings account at the time to purchase a $1600 trailer. My roommates didn't offer up any doe and to this day I have no idea why I did that.

Below are pictures of the trip home and after she got a good cleaning.
 

Attachments

  • photo285685.jpg
    photo285685.jpg
    23.3 KB · Views: 11
  • photo285686.jpg
    photo285686.jpg
    62.1 KB · Views: 10
  • photo285687.jpg
    photo285687.jpg
    51.1 KB · Views: 10
  • photo285688.jpg
    photo285688.jpg
    54.8 KB · Views: 11
  • photo285689.jpg
    photo285689.jpg
    65.4 KB · Views: 11
  • photo285690.jpg
    photo285690.jpg
    80.3 KB · Views: 12
  • photo285691.jpg
    photo285691.jpg
    1,019.9 KB · Views: 11

Trihulled

Seaman Apprentice
Joined
Jun 15, 2015
Messages
49
It is important to note that I knew absolutely nothing about boats at the time, but knew a lot about cars. I didn't know anything about I/O's other than it had a car engine in it and I was very confident I could get a GM L6 to fire up.

First, I replaced all of the spark plugs and distributor wires. The 5/8'' nut on the spark plug actually stripped and I hammered a torx bit into the ID of the plug and that got it right out! Next, I ran a piece of sand paper between the contact point inside the distributor. Something I still have to do to this day to remove corrosion if I don't run it every 2 months or so.

The wiring was so confusing to me, so I essentially just just it all out and ran the +&- to the starter from the battery. And a + directly to the coil pack as my ignition. To start I was simply going to cross the terminal on the starter to get it to turn over and pop the vise grips off the + terminal to turn it off.

The last thing was the carb. I had broken it down and was soaking it, but was waiting on a gasket kit. Who needs a carb? So we went ahead without it.

My roommate goes to turn it over and.... nothing. Starter was dead. We run down to Pepboys and buy a new one. Now, swapping this starter was my first realization that boats can be a huge pain in the ass to work on. Vertical mount starter bolts with a floor underneath and no way to see the nut head made this job difficult.

After a little cursing and some lactic acid build up we had the new start on and was ready to fire.

We poured in a little gas, turned her over and she began to pop. We then decided to see if we could get it to run.... without a carb.

What a bunch of idiots. See video below:

https://www.youtube.com/watch?v=WiSDUcDat1I
 

mickyryan

Rear Admiral
Joined
Apr 18, 2016
Messages
4,210
you guys are crazy...:) that said i would never run outdrive in gear at high rpm and with it in up position, hard on u joints cool looking boat looks like it rode nice
 

Bayou Dave

Lieutenant Commander
Joined
Dec 13, 2012
Messages
1,780
At this point your FREE boat has only cost you $1600. I can only imagine how many more thousands you will end up spending. I agree with Mickey.... you guys are crazy!! :eek:
But, this should be a very interesting project and I will be hanging around to see how it goes. Good luck!
 

oldrem

Commander
Joined
Nov 7, 2013
Messages
2,002
Looks like an entertaining project for sure. Definitely need to tag along on this one. At least looks like it cleaned up ok.
 

Trihulled

Seaman Apprentice
Joined
Jun 15, 2015
Messages
49
If I knew what I know now about boats I definitely would have taken a different approach. At the time I knew very little; outdrives, reverse interlock switches, hydraulics, etc. were all a foreign concept and I was just trying to get this thing working in hopes one of my roommates who was really into USING boats would take it over. This was a project I didn't want.

Okay... to continue. After our near death experience at firing it up we decided to wait for the carb rebuild kit. Got that installed and decided to take her out on the water for a test run. The current configuration the pilot could control forward and reverse but had no throttle control. In my rag tag wiring setup I cut out the reverse interlock switch because I had no idea what it was, so we later learned that to change gears we has to turn the motor of.... change gears and fire it back up.

The throttle control would be handled by someone sitting next to the carb and actuating the butterfly. The starting and cutting of ignition would be handled by a third person who would use a screwdriver to cross the starter and discount the ignition line running to the battery when the time was right.

We bought some champagne and headed out to a local lake for the first run. A bunch of our friends came along that thought we were crazy for getting this thing in the first place. I would be the carb guy, with one of my roommates handling the starting/ignition and the other roommate would be the captain. Everyone else was along for 1st class ride.

Attached is the only picture of that day, but essentially we got her running, out on the water and took her for a couple small circles around the lake. The engine cut out a few times and I could never get it on a plane(had no idea what speed was acceptable for this boat or any for that matter at the time) All in all it was about 30 min total on the water. Most importantly there were no leaks in the hull!!

After that... nothing happened for almost 2 years. I got really busy with school and work and didn't want to spend my free time on this project. My roommates also lost interest and so it sat in our front yard for about 2 years. It had a tarp on it that would occasionally blow off and I'd get around to putting it back on a few days later.

During that time I had nicked name the boat BOHICA and there had been multiple garage conversations about just backing the boat up over our fire pit during the next bon fire.
 

Attachments

  • photo285702.jpg
    photo285702.jpg
    70.5 KB · Views: 5

Trihulled

Seaman Apprentice
Joined
Jun 15, 2015
Messages
49
After it sat in my front year for about two years, a friend of mine from college that now worked in S.FL was up visiting and became interested in the boat. I attempted to demonstrate it was in running condition, to no avail(flooded the carb that day), in hopes of quickly getting rid of it. After about 15min of looking at the boat he had lost interest. Later that afternoon the engine fired right up and it motivated me to take it out again, maybe tune the carb and see were we stand on this thing. I spent a couple days cleaning it up, tuning the carb, and changed the oil.

The next weekend me and my roommate took it out for the second test run and about 15 min into the trip we had water up to the base of the floor in the front and more was coming in. We quickly headed back to the dock and got the boat back on the trailer.

After we pulled the boat out, I saw water pouring to the right of the out drive... there was about a 6in long crack in the transom, where the outdrive mates with the hull. I knew this was bad and decided to take the boat out to fathers shop to see what he thought.

After some discussion I to cut the fiberglass on the inside of the transom to see what the condition was. To my surprise there wasn't much there other than a giant nest of carpenter ants and much. In addition I found that the stringers were rotted out were the mate to the transom. After this point I was pretty frustrated and was now looking on how to dispose of a 23ft boat.

I headed home and left the boat at my Dad's shop in defeat and ready to toss in the towel.

Little did I know.... about 4 hours later I got a call from the shop and my father started telling me, "Guys do this! This thing can be saved! The stringers are only rotten about 7ft up!" In the four hours I hand been gone he had been researching others guys boat projects on Youtube and found out that this is actually possible. He then went back and started cutting out the floor to see how far up the stringers were damaged.

Encouraged and completely reversing the course of this entire boat fiasco I decided to head out the next day, remove the outdrive, motor, and the rest of the transoms and stringers.

I wish I had more pictures of how bad of a condition it was, but attached are the few pictures I have. The night before I was researching on how to remove the transom, and all I read was that it is brutal. Fortunately, the transom was so rotted out it was the easiest part of the job and was pretty much just picking up scoops of rotted wood.

Knowing what I know now, it was clear as day that the transom was shot based on the amount of flex the outdrive put on the hull.
 

Attachments

  • photo285782.jpg
    photo285782.jpg
    1.7 MB · Views: 5
  • photo285784.jpg
    photo285784.jpg
    1.5 MB · Views: 5
Last edited:

Trihulled

Seaman Apprentice
Joined
Jun 15, 2015
Messages
49
More pictures... there is a pile of transom that fell thru the I/O hole during removal.
image_285786.jpg
Click image for larger version  Name:	2014-08-02%2016.44.28.jpg?itok=MTS7bg8y.jpg Views:	1 Size:	527.9 KB ID:	10542069Click image for larger version  Name:	2014-08-02%2016.44.16.jpg?itok=9SXO9byt.jpg Views:	1 Size:	515.4 KB ID:	10542070Click image for larger version  Name:	2014-08-02%2016.43.44.jpg?itok=bZB15k7x.jpg Views:	1 Size:	552.2 KB ID:	10542071
 

sphelps

Supreme Mariner
Joined
Nov 16, 2011
Messages
11,435
You have your work cut out for you on this one ... If decide to keep going on the project do it right . There are ways to keep some cost down but don't cut any corners on the structure of the boat .. That's what keeps you and who ever else is on board safe ... If your not sure what or how to do something just ask .. There are no stupid questions here ..
Good luck and have fun !!
 

Trihulled

Seaman Apprentice
Joined
Jun 15, 2015
Messages
49
Alright… I am picking this back up after a long hiatus and posting the remaining content in hopes that someone else out there finds it useful and knows that it is possible to save a boat that is in complete disrepair.

Once the floor was removed up to where the rotten stingers ended the stringers needed to be removed. This was primarily done with a reciprocating-saw to trim it as close to the hull as possible and then sanded flush to the fiberglass hull with an angle grinder and a flap disc. Highly recommend using a flap disc. This became one of my favorite tools when working on large areas of fiberglass. It made quick work of a really tough job.

Fortunately for the transom it was so rotted out that the major chunks of remaining wood could be pulled out by hand with the carpenter ants. The overlapping fiberglass in the corners was trimmed with the angle grinder/flap disc.

Transom all cleaned out and prepped. My buddy in the picture thought I was insane for taking on this project, but did want to be there for the first improvement:
2014-08-25 20.11.40.jpg

Transom Install:
Now that the area was cleared out, I need to make a template to use to trace and cut the transom pieces. I did this with a couple of pieces of cheap ¼’’ thick plywood. I started in one corner and then marked and added additional pieces of thin ply would until it formed a complete layout of the transom back. Finally, and what would be very important later, I traced the previous outdrive hole in the transom onto the transom template. Unfortunately, I don’t have a picture of the template, but it was kind of like a overlapping jigsaw puzzle. It took a decent amount of time to get the pieces right but was really the only way to get an accurate trace of the existing structure.

Once I had the template, I could cut the transom pieces. The previous transom was roughly 2’’ thick. I decided to go with 3 sheets total(¾’’, ½’’, ¾’’) of marine grade plywood from 1984 lumber. It was pricey stuff, but it was important for the backbone of the boat.
2014-08-25 20.28.05.jpg

For the fiber glass portion and after watching a decent amount of YouTube I decided to go with a layer of 1oz mesh fiberglass between the hull and the first ¾’’ sheet of plywood, another 1oz mesh sheet between the ¾’’ sheet and the ½’’sheet, another 1oz sheet between the ½’’ and internal ¾’’ sheet and that capped it in with a 1oz sheet of mesh and a then a final sheet of 0, -45, 90, +45 fiber glass cloth (I forget what the weight was). This final sheet was impressive stuff and absorbed a lot of resin.

Prior to putting the first sheet in I prepped the surface with Acetone. When it came to the resin, I was planning on using a 2-part epoxy since that was what I was accustomed to using with the carbon fiber work I did. I calculated how much I was going to need for this layup and realized I was going to go broke if I went that route. This was when I learned about Polyester Resin. Way cheaper! And much more in line for this kind of large-scale work. It has a quicker working time and it’s not good for you skin or lungs… but way cheaper. Little did I know that this was the start of a long friendship with gallons and gallons of polyester resin.

2014-08-25 21.01.04.jpg

During the layup, I would coat the two mating sides with resin and then would lay the cloth out on the transom piece and thoroughly wet it out with resin. Then slide the board in and put it into place. Prior to moving onto the next board, I would mix a batch of resin and then mix is with Cabosil to a mayonnaise consistency. I used this to fill in the corner gaps left between the edge of the transom and side of the hull. Finally, I added 4’’ strips on top of the perimeter edge to overlap the transom corner with the side of the hull. Hindsight, I should have just made the transom cloth oversized and used the overhang for the same purpose once it was installed.

2014-09-04 17.53.10.jpg

I repeated this process for all 3 panels (¾’’, ½’’, ¾’’). I had previously drilled a few holes thru the midplane that I was going to use to pull the boards home. I started with the two that aligned with the outdrive exit hole and mounted a couple of 2x8’s to the back side of the transom and pulled them home. I felt that this did a pretty good job pulling the transom panels home and did feel the need to drill additional holes in the back side of the hull.

2014-08-25 21.20.39.jpg

After the glue cured I pulled the brace boards off and she was solid as a rock. Huge improvement already!
 

Trihulled

Seaman Apprentice
Joined
Jun 15, 2015
Messages
49
Stringers:

Next up was replacing the stringers. The rotted portions were already pulled out and sanded flush to the hull. I decided to use regular pine boards from Lowes for the stringers. I bought some 1x8’s for the inner stringers and 1x6’s for the outer stringers. Next, I cut the angle on a table saw so the board would sit close to flush with the bottom of the hull. This wasn’t perfectly accurate but got me in the ballpark.

Next, I made a template to get the angle between the bottom of the hull and the face of the transom so this out be traced on the backside of the new stringer boards. This was done with ¼’’ scrap ply, held in place and glued together to get the angle. Once cured the line was traced and the stringers were cut on the back side. Finally, the overall length had to be cut. This was done by putting each stinger in place and transferring the line from where it would butt up to the old stringer. This was cut and the stringers were ready to go in.

I didn’t worry about trimming the height of the board at this point in time. I had the previous floor mate still existing on the inner hull and decided to leave this problem for a later time.

Prior to installing I prepped the surface with acetone. Then I put down a HEAVY bead of Loctite PL Construction glue where the edge of the board was going to rest on the hull and mating surfaces. Recommend getting the 28oz tube of PL glue for this step. Once the glue was down, I installed the boards, provided light pressure to seat them, but I did NOT want to push the board flush the hull and squeeze out all the PL glue. There was probably about a ¼’’ of PL glue between the hull and the stringer. I ended by using my hand and some paper towels to filter the glue seam to make a clean-ish transfer between the stringer and the hull and then let the PL glue cure overnight.
2014-09-18 18.21.49.jpg

2014-09-18 18.21.58.jpg

Once the PL glue was cured, I cut some lap-joints to overlap the butt joint between the new and old stringer. I put PL glue on the mating surface and used wood screws to pull them home. I know using screws wasn’t recommended but wasn’t concerned considering the stringer would eventually be entombed into fiberglass and polyester resin.

2014-09-29 19.11.44.jpg

Next was to glass in the stringers. I decided to go with a layer of 1oz mesh fiber glass and then a layer of 0/90 fiberglass (I forget the weight, but the cross pattern was about 3/16’’ thick). This job took three people and was a mess. Fortunately, my Dad and a friend were willing to help out. One guy was constantly mixing polyester resin, while the other two coated the stringers first with resin and then started laying cloth down and soaking in. The cloth was laid down along the top edge of the stringer, run down both sides and left about a 3’’ overhang on either side to the hull. A brush (highly recommend getting a block of Harbor Freight paint brushes) was sometimes used in tight areas, but mostly the resin was poured on and spread around by hand (gloves of course!). We definitely went heavy on the resin here, because we wanted to be sure the cloth stayed down.

2014-10-26 12.19.15.jpg

2014-10-29 20.00.33.jpg

Around this same time, I decided to repair the front engine mount. The fiberglass was still good, but the inside was all rotted out. I cut off the back side of the fiberglass and removed all the junk until it was pretty much hollow. At the time I didn’t want to completely remove the engine mount based and rebuild it, because I had read about engine-to-outdrive alignment and was concerned about starting from scratch. I stubbed across some stuff called SeaCast(http://www.transomrepair.net/index.php?cPath=1) that is normally used for transom repairs without having to go the wood route.

I glassed the back side of the motor mount back in and bought a 1-gallon batch of SeaCast. I drilled a 1.5’’ hole in the top of the mount, mixed up the SeaCast and poured it into hole filling the space underneath the fiberglass. Once it was cured it was rock solid, I redrilled the motor mount holes in the SeaCast and installed threaded inserts that I could use later to bolt down the motor. This worked out really well and saved me a lot of time.

One regret I had was not putting a drain tube between the front of the engine mount base to the bilge area! Not sure why I didn’t do this and decided to just plug it up.

2014-12-21 13.38.47.jpg
 

Trihulled

Seaman Apprentice
Joined
Jun 15, 2015
Messages
49
Gimbal Housing Repair:

One small but critical step that had to be taken pertained to the Outdrive Transom Assembly. From the saltwater and sitting out in the rain the gimbal bearing sleeve had weathered away on the bottom third of the sleeve and came off when we pulled the original bearing out. This was a cast piece of aluminum, and we were not too confident in welding a chuck back on or how we would get the smooth surface back.

We decided to go the JB-Weld route… not kidding. We machined an outer ring so that the ID of the ring matched the OD of the bearing plate. We then installed a new gimbal bearing into the existing/remaining inner bearing plate and filled the gap with 15-minute JB-Weld (the good stuff). At the time I wasn’t concerned about replacing the gimbal bearing and decided to press ahead. But since that time there has been no issue with this fix and have done at least five gimbal bearing changes with the puller. The surface has maintained a solid structure and mating surface for the bearing.

2014-09-18 18.15.48.jpg
 

Trihulled

Seaman Apprentice
Joined
Jun 15, 2015
Messages
49
Metal Plate:

After the new transom was in and the stringers installed it was time to cut the outdrive opening in the transom. Before doing this, we decided to reinforce the external portion of the hull in that area. This was mainly because there was a deep crack in the fiberglass hull in this area about 3’’ long that I didn’t feel confident with just patch with glue. Also, there were some previous chucks of resin chop that fell out on the inside of the hull hole, and it no longer matched the outdrive shape. My assumption is that there was a previous motor in this boat when it was first made (before the MR Alpha Drive) and when it was updated in the late 70’s they just patch in the hole with chop.

My solution was a metal plate on the exterior to reinforce the hull. To do this I made another template that reflected the inner shape of the outdrive hole and an ideal outer edge.

2014-10-25 13.22.53.jpg

Using the image of the template I was able to sketch the shape in CAD and create a 3D model. Next it was machined out into 1/8’’ thick 316 stainless steel plate.

Using the outdrive mount holes that were traced over and drilled from the original transom template we were able to glue and then bolt down the plate to the hull. The adhesive that I used was 3M 5200 which is some of the best marine grade adhesive I have ever used and has all sorts of applications if you never want to take something off again.

2014-12-21 13.38.36.jpg

Once the plate was on, we started to open up the outdrive hole thru the transom. We started by drilling a couple of holes and rough cutting with a jig saw. Once we got as close as we felt comfortable, we sanded the rest of the way. Mainly by mounting a round sanding bit in the drill and working it out till we started making contact with the stainless-steel plate. Once the hole was flush with the plate and we test fit the outdrive assemble we coated the inner wall of the transom with epoxy to seal up the wood.

2014-12-21 13.38.43.jpg

2014-12-24 19.46.42.jpg
 

Scott Danforth

Grumpy Vintage Moderator still playing with boats
Staff member
Joined
Jul 23, 2011
Messages
47,528
5200 isn't UV stable.

Not sure I would have done that
 

Trihulled

Seaman Apprentice
Joined
Jun 15, 2015
Messages
49
Attempt at Painting Gelcoat:

We moved on to painting the hull next. In the past I had painted multiple vehicles but had no experience with gelcoat and didn’t really know what we were getting into. We prepped the surface by sanding the exterior and patching the cracks with Bondo.

2014-12-24 18.13.59.jpg

2014-12-24 20.04.31.jpg

2015-01-21 19.42.46.jpg

2015-01-21 20.09.48.jpg

2015-01-21 20.10.26.jpg

When it came to the painting it was a brutal process trying to spray it. We used a 2mm gun based on the research that we did, but the working time of the gelcoat was short and had multiple instances of the gun locking up and breaking it down after each shot to clean it out.

In total we did 4 coats with a final coat being gelcoat with wax. It came out okay, but at the time we weren’t too thrilled, and we didn’t spend any time polishing the surface after the fact.

Looking back on this, this effort was a time waste, and we should have done a lot more research on how to prep gel coat surfaces, spray gelcoat on existing gelcoat and spray gelcoat in general. Considering we store our boats undercover I don’t think I’ll ever have to spray a gelcoat again but recommend to anyone going this route to do a lot better research, get the right equipment and do a few test pieces before taking on the final surface.

2015-02-16 21.55.22.jpg

2014-12-24 20.26.57.jpg

2014-12-26 14.34.43.jpg
 

Trihulled

Seaman Apprentice
Joined
Jun 15, 2015
Messages
49
Floor:

Next, we moved onto finishing the flooring. My friend who had started this journey with me was really the one the led this effort. First, the stringers had to be trimmed to height. We did this by using a level and transferring the bottom inner hull contact point that were left and then using the straight edge to connect the lines. We took into account the plywood thickness (3/4’’) and offset the line. Then simply crawling on all fours and using a circular saw trimmed the stringers down to the appropriate height.

He then moved onto cutting and laying out the plywood panels. These were cut and fitted into place. Originally we were planning on putting the gas tank below the floor and left the center panel exposed. Ultimately, we couldn’t find a tank that would fit for the volume we wanted (roughly 30-40 gallons) nor anything that made sense from a cost point of view. We ended up making another panel to cover this space. Looking back we could have done this with a few less cuts, but it worked out well either way.

Once all of the panels were good to go we used PL construction glue on all the contact points and slid the panels into place. We then filled and filleted any excess gaps with PL glue.

2015-06-20 18.53.05.jpg

At some point my friend got the itch to paint the bilge. He prepped the area and painted it with specific bilge paint. This was the last time this area was this clean.

2015-06-30 17.42.26.jpg

Next, he tabbed the floor to the hull. We bought a couple rolls of 8’’ wide 1oz mesh fiber glass cloth and put them in place all along where the floor contacted the hull. Mixed up some batches of polyester resin and wetted down the fiberglass.

2015-07-03 17.08.07.jpg

2015-07-03 21.20.35.jpg

2015-07-03 21.20.24.jpg

Next, we need to glass in the floor. This was again done with a single layer of 1oz mesh fiber glass. We laid out the sheet and started coating them with polyester resin.

2015-07-06 14.13.52.jpg

2015-07-09 17.37.07.jpg

Before painting the floor, we knew that we wanted to do something different with the engine cover. The original cover was a simple fiberglass bucket that just covered the motor. This was tossed day one and we wanted to make something that made the space more usable.

We settled on the idea of putting a bulkhead that spanned the width in-front of the motor and a removable deck that would rest on top.

We started out cutting out the top cap and sand the edges flush.

2017-03-11 10.04.31.jpg

2017-03-11 10.40.04.jpg

Once that was done, we started with making another template out of ¼’’ ply for the front paneling size and placement. This took time and had a lot of back and forth but ended up with a good template to use to cut the ¾’’ piece. We cut the bulkhead and PL glued it in place. We decided to not glass this piece in since it wasn’t structural.

2017-03-02 07.48.52.jpg

2017-03-11 11.07.15.jpg

Next, we had to make two smaller side panels to cover some of the cutouts from the old fiberglass piece that was removed and create a resting surface on the side edges for the final deck. This was done again using some ¾’’ plywood sheets and cut and trimmed to fit. We decided to glue and bolt these pieces to the top cap to pull them home securely.

After all this and prior to doing any more painting we decided to take it out and see how she ran on the water.

2017-12-17 14.23.56.jpg

2017-04-22 13.52.58.jpg

Picture of the finish top deck after we had painted the floor and engine bulk head.

2018-02-16 17.04.39.jpg

After this and a few more trips out on the water we came back around to finishing the floor. We started by sanding the fiber glass surface to remove the high spots. Once done we moved onto gelcoat-ing. Knowing that we didn’t want to relive our spraying experience we decided to apply the gelcoat with paint rollers. This worked incredibly well and came out great.

2017-09-02 13.54.27.jpg

After this we started taking the boat to all kinds of places and doing day and multi-day trips on the gulf. All this time making upgrades to the motor, wiring, etc. She wasn’t a pretty boat on the outside, but we were getting great use out of her.
 

Trihulled

Seaman Apprentice
Joined
Jun 15, 2015
Messages
49
New Paint Job:

Over maybe two years we came around to the idea of painting the top cap and hull to where the boat would look the part and forget her Mississippi bayou past. We settled early on not wanting to make another attempt ourselves.

Thru a friend I met a guy that worked at a company that painted boats professionally. I brought it down to them for them to have a look and gave me a fair quote. I had about a month until dropping it off to them and decided to strip everything off the exterior to make the painting easier and more finished. Glass, gauges, cleats, fuel port, etc., everything came off.

Once it was dropped off, they had it about two weeks before finishing the job. They stripped off a lot of old gelcoat and ended up not running into any issues. They called me and I came down to pick it up and the final product came out great.

Picture the morning it was picked up:
IMG_3828.JPEG

Once I had it back, I started re-installing the hardware and electronics. A couple of decisions I made was to replace the glass with new glass. I took the old pieces to a local glass shop, and they cut new pieces. The trim that originally held the glass into the frame couldn’t be sourced so I ultimately used white silicon to seal them in place.

Also, for the chrome pieces (all of which were weathered) I was planning on having them re-chromed and got a few quotes, but all of them were way too high. I settled on sand blasting the pieces and spray painting them. This ended up coming out well.

IMG_5806.JPEG

From here we continued to take it out on the water regularly all around the state.
 
Top