Lowe 16.5 Sea Nymph Fm restoration

Sagerider

Seaman Apprentice
Joined
Jul 2, 2017
Messages
37
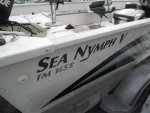
I have been deep into restoring my new to me 2004 Lowe Sea Nymph 165 FM since I bought it in July of 2017 I got at what I thought was a reasonable price, I still think I did ok not great but ok. The boat came with a 2005 Evinrude 75 Etec and a Honda 8 hp as a kicker. Turns out the transom weight and hp rating of 75 hp was also exceeded due to the addition of the 8 hp Honda. All of that is covered pretty well in a different post in Boat Questions and Topics under Another Kicker Question so we won’t have to go through all of that here.

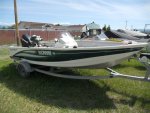
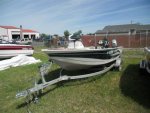
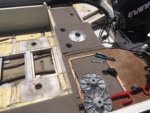
So I found a boat for sale at a dealer that had taken it in on a trade for a new boat. Turns out it was exactly the type and sized boat I wanted. 16.5 feet long 7 foot beam and decent freeboard. I bought it and had everything motor wise sorted and checked out at an Evinrude dealership. I took it out one time, caught a small walleye, took it home and tore it apart. Why would I do a thing like that? Because it was getting old and showing it’s age sort of like me. I like nice things and my new boat was just not nice enough. We can fix that! Now began the adventure and documented in drawings and photographs.

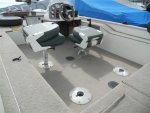
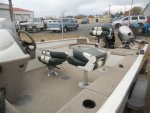
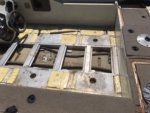
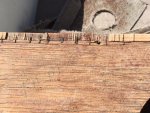
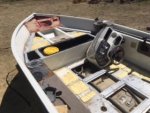
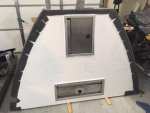
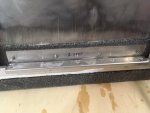
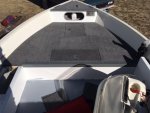
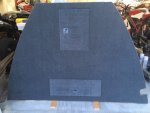
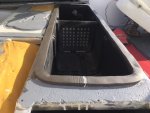
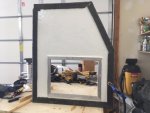
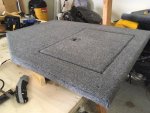
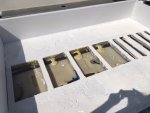
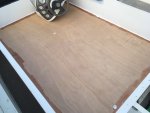
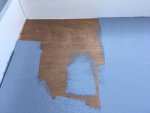
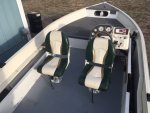
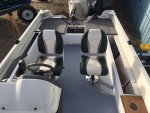
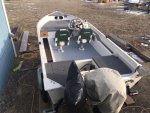
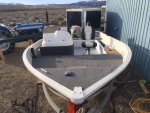
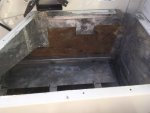
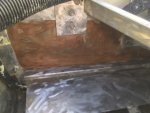
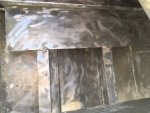
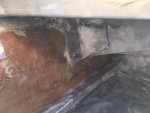
As I found it at the dealer lot. The live well leaked badly due to a poorly installed seal at the top flange. Carpet was past it’s prime and the wooden decks were delaminating so a good time to fix repair and replace all of this stuff. Not as easy as I First though however.
To be continued.
​​​​​
 

Attachments

  • photo283731.jpg
    photo283731.jpg
    58.9 KB · Views: 2
  • photo283734.jpg
    photo283734.jpg
    43.2 KB · Views: 2
  • photo283735.jpg
    photo283735.jpg
    50.9 KB · Views: 2
  • photo283956.jpg
    photo283956.jpg
    60.2 KB · Views: 2
  • photo283957.jpg
    photo283957.jpg
    54.9 KB · Views: 2
Last edited:

Sagerider

Seaman Apprentice
Joined
Jul 2, 2017
Messages
37
This is the boat in process of disassembly. Original lack of quality becomes apparent where deck ply was stapled together to make parts fit. But over all the hull was put together pretty well with some excellent looking welds. The aluminum transom construction I like very much, beefy with good support structure and design. In my before before life I was a welder and then eventually became an NDE, non destructive examination, Level III working in the commercial nuclear power industry retired now and loving it.
 

Attachments

  • photo283994.jpg
    photo283994.jpg
    35.1 KB · Views: 2
  • photo283995.jpg
    photo283995.jpg
    31.8 KB · Views: 2
  • photo283996.jpg
    photo283996.jpg
    166.9 KB · Views: 2
  • photo283997.jpg
    photo283997.jpg
    36.7 KB · Views: 2
Last edited:

Sagerider

Seaman Apprentice
Joined
Jul 2, 2017
Messages
37
After I got all the old wood out I started at the bow and moved toward the stern. I flattened out the support structure under the fore deck using 8 pound expanding foam. I used 1/8th inch aluminum welding rod held in place with resin to contain the foam while liquid to keep it in place. I sanded the surfaces and flattened it to within 1/16 of an inch using a straight edge across the entire area. I did the same thing in the main deck area after replacing the 1/16th inch thick “top hat” aluminum supports down the center line over the fuel tank with 2x2x1/8th inch aluminum angle for better support. After all the foam was poured and surfaces flattened I painted them with white Interlux Bilgekote with several coats to seal the sanded surface.
The new marine plywood was primed with two coats of polyester resin and then 2oz. chopped strand glass mat laid down on top of that. All edges were also carefully sealed with 2 coats of resin. After glassing I painted the bottom surfaces and edges with two coats of Interlux Bilgekote. The area around the live well I used three coats under the fore deck. The Interlux Bilgekote makes for a very nice smooth hard surface, good stuff.
 

Attachments

  • photo284001.jpg
    photo284001.jpg
    124.6 KB · Views: 2
  • photo284002.jpg
    photo284002.jpg
    141.3 KB · Views: 2
  • photo284003.jpg
    photo284003.jpg
    87.7 KB · Views: 2
  • photo284004.jpg
    photo284004.jpg
    107.1 KB · Views: 2
Last edited:

Sagerider

Seaman Apprentice
Joined
Jul 2, 2017
Messages
37
There were some issues with the hatch covers that needed to be mitigated which was done after I started carpeting the fore deck. One of the issues that needed to be fixed was the carpet to hatch underside where the hinge was fitted. 6mm stainless screws with nylock nuts were used instead of pop rivets where ever possible to secure the hinges in place. The hinges were placed on the bottom side over the carpet that was folded under. This eliminated the issue with the carpet peeling off from friction during use. This area of carpet is bolted securely in place now.
The live well top flange got a new seal installed before the fore deck was screwed down. The seal surface of the live well was too close to the edge to fold the carpet under the plywood so I used a length of 2x2x1/8th aluminum angle across the entire rear edge to hide this area, looks good too. Hatch handles and aluminum trim were all painted grey to some what match the carpet color. Before the hatch handles were black, you ever kneel or step on a black surface after it has been in direct sun at 98 degrees, yeah that’s why.
 

Attachments

  • photo284005.jpg
    photo284005.jpg
    88.9 KB · Views: 1
  • photo284006.jpg
    photo284006.jpg
    112.1 KB · Views: 2
  • photo284007.jpg
    photo284007.jpg
    95.1 KB · Views: 1
  • photo284008.jpg
    photo284008.jpg
    115.6 KB · Views: 1
  • photo284009.jpg
    photo284009.jpg
    114.2 KB · Views: 1
Last edited:

Sagerider

Seaman Apprentice
Joined
Jul 2, 2017
Messages
37
The main deck was going to be different than the fore or rear decks due to it would be the area subject to the most wear, fish goo and blood. The main deck got the same fiberglass treatment top and bottom but on the top surface I put two coats of non slip gelcoat over the fiberglass.
A special note on securing all deck wood with stainless screws was to make detailed drawings with measurements as to where the supports were located and areas where you do not want to place screws like into fuel tank, fuel lines or live well hoses. All countersunk screw holes were made in the deck plywood before the surfaces were carpeted. The reason this was done was to be able to resin the inside of the holes after they were drilled which left bare wood exposed inside the holes. The point was to minimize or eliminate any water intrusion into the wood from the screw holes. The carpet glue under the screw heads also serves as a seal to keep out water.
When carpeting using marine carpet glue care must be taken that you do not clamp or secure the carpet in place too heavily because the glue will be forced through the carpet backing and ruin your work. Gently secure the carpet and edges is what you want to do so they stay in place while the glue sets.
All aluminum hatch flanges were set and sealed to the deck plywood using 3m 4200 caulking before the carpet was put down.
 

Attachments

  • photo284006.jpg
    photo284006.jpg
    112.1 KB · Views: 0
  • photo284008.jpg
    photo284008.jpg
    115.6 KB · Views: 1
  • photo284010.jpg
    photo284010.jpg
    122.2 KB · Views: 1
  • photo284011.jpg
    photo284011.jpg
    97.9 KB · Views: 1
  • photo284012.jpg
    photo284012.jpg
    140.8 KB · Views: 1
Last edited:

Sagerider

Seaman Apprentice
Joined
Jul 2, 2017
Messages
37
After I had flattened the main deck area using the same 8lb pour in foam I painted the surface with three coats of Interlux Bilgekote to seal the sanded foam surface. Flattening the underdeck surface was a huge pain and to get it flat I used a piece of 4 inch wide 1/4 inch aluminum channel that spanned across from port to starboard. By sliding the channel as I went I could mark where to sand the foam down to. The 8lb foam is for support of the floor and decks not for floatation, too heavy. I flattened out everything to a pretty tight standard until I felt I had enough support under the main deck to call it good. Like I said this was the least enjoyable aspect of the whole operation. Fine foam dust was everywhere and static made it double miserable. All done while wearing a respirator, no one needs their lungs full of foam dust.
Useing a fitted template of cardboard I cut the main deck plywood to fit with 3/32nds of an inch clearance on the outside edges. The bottom surface was glassed and two coats of Interlux Bilgekote applied. Before the main deck was laid in I placed a thick continuous bead of 3m 4200 on the outside edges on the floor support surface as well as down the two stringers that ran bow to stern flanking the fuel tank. A gap of 1/4 inch x 18 inches was made when placing the 2x2x1/8th inch aluminum angle at the stern bulkhead to act as a scupper to drain the main deck down into the bilge and was reflected into the main deck plywood. This area was also carefully glassed to eliminate water intrusion into the deck plywood. At this time the main deck was laid in with no fiberglass or resin on the top surface except for around the edges. The reason for this was to keep from contaminating a primed surface with dirt tracked in from my feet. None of the decking fiberglass was waxed, wax additive for curing the fiberglass. Wax being used to starve the raw fiberglass of oxygen in order for it to cure to a hard surface but of course you already knew that. The paint on the undersides and carpet glue took care of curing the fiberglass in those areas.
Now with the thick unbroken bead of 3m 4200 placed the main deck was laid in and screwed down using 3/16th inch dia. stainless steel screws according to my previously made detailed floor map. Needless to say I was sweating bullets with this one. All went according to plan and the one piece main deck floor went in fitting like a kid glove, perfect. Of course there were multiple fitting checks prior to final fitment. After all was firmly screwed down I placed another bead of 3m 4200 caulking around 360 degrees of the edge to vertical surface walls and down into the 3/32 inch gap.
I allowed the 4200 to set up and then I put two coats of resin down then a layer of mat overlapping about three inches toward the stern across the beam. This turned out very nice with no issues, another scary part complete. To complete the main deck I rolled on the first layer of non slip gelcoat using crushed walnut shells then a second and final coat, no walnut shells, with the wax additive to cure the gelcoat surface. Note, a word to the wise. Don’t mix more than a quart of resin at a time unless you can get it spred out quickly or it will flash over in less than half the time of just one quart. The increased volume creates more heat so it flashes over super fast.
 
Last edited:

Sagerider

Seaman Apprentice
Joined
Jul 2, 2017
Messages
37
Here are some pictures of the main deck installation process. I really lucked out reguarding the main deck fiberglass phase.
The weather here in Montana where I live can turn on a dime from sunny and warm to snow like someone flipped a switch. The main deck fiberglassing and gelcoat was completed on the 13th of September the very day before winter showed up. The weather had been wonderful and warm up in the 80s up until the 14th when the temperature dropped and it started to rain, it has been winter ever since. All activities outside came to a screeching halt and any further work was done in the heated side of the shop. There were a few good days that I could work on the inside of the boat but those were few. The fiberglass work on the rear deck panels was done in the heated shop.
 

Attachments

  • photo284003.jpg
    photo284003.jpg
    87.7 KB · Views: 0
  • photo284013.jpg
    photo284013.jpg
    82.6 KB · Views: 0
  • photo284014.jpg
    photo284014.jpg
    88.7 KB · Views: 0
  • photo284015.jpg
    photo284015.jpg
    86.5 KB · Views: 0
Last edited:

Sagerider

Seaman Apprentice
Joined
Jul 2, 2017
Messages
37
So now with the main deck completed I could install the seats and steering console. With the weather now turned I had to take advantage of any breaks as they came allowing me to get this far.
 

Attachments

  • photo283737.jpg
    photo283737.jpg
    104.3 KB · Views: 0
  • photo284016.jpg
    photo284016.jpg
    112.4 KB · Views: 0
  • photo284017.jpg
    photo284017.jpg
    147.1 KB · Views: 0
  • photo284018.jpg
    photo284018.jpg
    151.5 KB · Views: 0
  • photo284019.jpg
    photo284019.jpg
    140.4 KB · Views: 0
Last edited:

Sagerider

Seaman Apprentice
Joined
Jul 2, 2017
Messages
37
While I was flattening the main deck getting it ready I got curious and decided to do some investigation of the stern floatation foam compartments. What I found was that there was moisture in the floatation foam which made direct contact with the wooden transom. Using a die grinder with a wire brush I proceeded to mine out the foam completely from both stern compartments. What I found is that the transom was slimy, not good but not the end of the world. I cleaned all of the surface on the transom and removed all of the old floatation foam. I placed a small ceramic space heater in the compartments altering from one to another over the following next two months. I left the heater running 24/7 during this time and the transom is looking pretty good, solid and dry. I can’t say anything about the back side of course but two months of open exposure on the front side with heat could do nothing but help there as well. There maybe a time for replacing the transom in the future but for now I will go with what I’ve got. There is no weakness detected and it sounds good and solid when impacted with a hammer.
i do have two areas where I will need to do some repair with “GetRot” at the two transom U bolts used for the rear hold downs. Fortunately this rot is not wide spread but confined and should recover nicely with the GetRot resin compound. The reason this occurred was because the folks at Lowe did not put any sealant what so ever under or around these two fittings.
That was a serious mistake that should never have happened.
As for the bolting that secures the transom to the stern there are several thru wall bolts with rubber washers that are showing signs of aging. I will remove them all and treat the transom wood in these areas with resin to ensure the area is sealed then reinstall them with 3m 4200 and new silicone washers which will last longer than I will.
While doing all that I will paint the inside transom surface with the Interlux Bilgekote to protect it from any further degradation.
As for installing new floatation foam I will insure that there will be no direct contact and an adequate air gap is present across the entire inside transom surface.
 

Attachments

  • photo284020.jpg
    photo284020.jpg
    81.4 KB · Views: 0
  • photo284021.jpg
    photo284021.jpg
    99.9 KB · Views: 0
  • photo284022.jpg
    photo284022.jpg
    108.8 KB · Views: 0
  • photo284023.jpg
    photo284023.jpg
    93.1 KB · Views: 0

Sagerider

Seaman Apprentice
Joined
Jul 2, 2017
Messages
37
So up to now this is where it sits waiting for the spring and warmer weather. With highs in the low 20s and dipping to single digits at night I am stuck where I am for now. There are still some things I can do like finish carpeting the rod storage locker cover, cutting, glassing and carpeting the remainder of the cover on the port side. I also need to do the cover on the starboard side over the control and cable area. While doing that I will install my Canon down rigger on that same side toward the stern. I can’t make the center stern cover panel for the battery and bilge area until I secure the two rear deck panels in place. That won’t happen until all the transom work and reinstalling the floatation foam is completed.
So there is still a lot of work to be done yet but with a bit of luck weather wise I will be out fishing in the April May time frame.

What did I do wrong or right that I know of? I did not remove and replace all of the original floatation foam from bow to stern. 20/20 hind sight and all that. Where I did mine down in the foam adjacent to the fuel tank I detected no moisture. If I had removed all of that though I would not have made the progress I have thus far. I would not have my main deck in for sure and I would not be fishing until fall. Laying fiberglass and gelcoat in the rain and cold just ain’t gonna work real well. Some things like replacing broken pop rivets along the way and reenforcing weak areas was the normal procedure as I progressed so I am all good there. I also wish I had taken the time to insulate the live well under the fore deck but I didn’t, dang. I did install a 130 cubic foot per minute bilge fan in the bow under the bow peak so air is forced down under the fore deck and into the bilge under the fuel tank all the way to the transom drain. I also secured the fuel tank with new silicon foam rubber which was a good idea. I also drained the fuel tank completely and installed a new 1.5 diameter 90 degree fuel inlet elbow at the tank fitting.

So there you have it, the good the bad and the ugly. I know this post will show up if anyone does a search on refurbishing a Lowe Sea Nymph and I do so very much hope this information is helpful. How much money did I save by doing all of this? I saved a bunch! A new boat for me was just out of the picture. Being retired there is no way I would ever strap myself with a $30,000,00 + something boat payment. I paid $7,500.00 for the boat as it sat and about another $5,000.00 + for materials and tools. Speaking of tools a good oscillating hand sander is a must have item. A good collection of various hand tools is also required.
For me and I am sure for many others that enjoy working with their hands, the joy is in the work we do. Keep in mind the devil is in the details and details eat time by the bucket load. I would say details took as much time as the bigger items to get completed. In my world details really matter a great deal. In the end I will have a very sea worthy boat that I know every little screw, rivet or fitting. I will have a boat I will be proud of and satisfied in that I did my best with it.
Any questions on this or your own project please feel free to post up here and I will do everything I can to answer or help. I have learned a great deal since I started this adventure and still have much to learn. When I started out I did not have a clue, I just knew that I would succeed no matter how difficult it was and I was correct in that assumption. It has taken longer than I thought but that is ok.
Cheers! :)
 
Last edited:

jbcurt00

Moderator
Staff member
Joined
Oct 25, 2011
Messages
24,863
Man thats hard to follow and reference w the pix.

I see you fixed the polyurethane vs polyester question I asked earlier, it got lost jammed in between all of that ^^^

but:

Own any fiberglass boats? Using lots of glass boat work materials and methods.....

Gelcoat seems an odd finish choice on an aluminum boat. Do that on a previous boat?

Please try to keep boating and boat building discussions online in the open forum, here or someone elses topic here, rather then PMs.

Thats the whole point of a forum, shared info for us now, but also a recorded history for others to follow later...
 

Sagerider

Seaman Apprentice
Joined
Jul 2, 2017
Messages
37
I went through some indecision reguarding the seat pedistals and ended up with 2 7/8” post diameter because I liked them being a bit more beefy than the 2 3/8”. I had to cut them down from taller posts because standard ones were either too tall or too short. I fitted them for me and I like the feeling of being inside the boat instead of on top of the boat if you know what mean. Same with my Ducati motorcycles as opposed to other makes. I still have very good visibility and my upper legs are horizontal not up or down which is the most comfortable for me.

I ended up with a quality marine grade carpet after going different directions.. Lower pile carpet will not hide screw heads. There are some marine carpets that are for pontoon type applications that will not go around corners well both ways so make sure you get the right type for your application. Bend it one way good 90 degrees the backing smiles at you, not good.

The marine plywood I used was Okoume that was just a touch under 5/8” thick. Very nice looking wood and they think a lot of it too but I think it was worth it in the long run.

Ship to shore radio is a Uniden VHS with a five foot antenna which should do the job I need it for in inland waterways.

The boat came with a Humminbird 788c which for now is fine but we’ll see as time goes on and I learn more.

i recommend a custom cover as generic covers are just that and won’t fit as well as you will like. They are a bit more expensive but you will be happy with it. After the generic one wears out a custom cover will be next. Be sure to place carpet or soft material between boat high points to keep the cover from rubbing or tearing on sharp corners.

a shameless plug for iboats here. They carry multiple quality brands of boating items so you have good choices at decent prices. Shipping is fast too. :)

if your not sure ask lots lots of people, everyone has their own oppinions some not always the best. The whole process is a steep learning curve so think through things first instead of regret later. Stay away from negative people who will never understand why or what you are doing. Negative vibes are inspiration killers. You will be really surprised at how innovative and creative you can be. YouTube is your friend! Lots of smart guys putting out good information on how to. Frustration and triumphs abound just relax and enjoy the adventure. You are a lot smarter and capable than you think you are when you start a project like this so jump in there and getter done. :)
 

Sagerider

Seaman Apprentice
Joined
Jul 2, 2017
Messages
37
Ok, I will keep things open and not pm.
Sorry for any confusion with descriptions and pictures.
No, I had no experience at all with fiberglass before this project other than a few small patchs on racing bike fairings after minor crashes.
i went with the gelcoat for the main deck surface for wear and easy cleaning issues. Many boat manufactureres use carpet everywhere like paint or other coverings were never invented. In my opinion carpet covers those small fitup issues that make for a good look but limited life span. A manufacturer can not afford to take the time to custom fit things and still produce a boat the average customer can afford to pay for. Yeah carpet feels great on bare feet and down the road I can always purchase snap in carpet but for now I am happy with the non slip gelcoat surface. With a nice pair of comfy boat shoes I am good to go.
i am a single old guy with no grand children and plan on being out on the boat alone much of the time so skiing and water sports are not in the picture. I made my alterations as a fishing boat. The fore deck is big enough to lay around on even for two people so no pedestal seat base to poke my back on or trip over and same for the rear deck surface. My personal philosophy is I never stand up when I can sit down and never sit down when I can lay down. :)
thanks for the tips.
 
Last edited:

Watermann

Starmada Splash of the Year 2014
Joined
Jan 12, 2013
Messages
13,753
Thanks for taking the time to document all the work you did on your SN, as you know most threads here are created as we go through our process of restoring rather than one batchy of posts on a completed project.

You boat looks like it came out very nice with some non standard approaches. I do have to question why you didn't replace the transom that you indicate was suffering some rot issues.
 

Sagerider

Seaman Apprentice
Joined
Jul 2, 2017
Messages
37
Thanks but the boat is not completed, still lots of work remains. I did not think to post any of this anywhere when I first began the project. I will continue to document and post up as I progress if that is ok. Just think of me kindly and as kindly unconventional.
Some rot is not all rot, only the two areas at the hold down u bolts, about two inches in diameter or less in those two locations, are at issue here. Hardly justification to rip the entire stern off with such a cursory examination. If you remember while reading the post my last good day here was September the 13th and winter began on the 14th. I just barely made it to get the main deck in, rain and snow ever since. This summer I will evaluate the transom further, for now it is fine with no signs of eminent collapse or failure to safely perform it’s function as designed. When I noted the transom was wet and slimy on the inside from being in contact with the floatation foam with no air flow gap does not declare it rotten but merely indicative of a precursor to rot and if not mitigated properly such as cleaning and drying, which I did quite addiquately I believe, would eventually require transom replacement. I also noted that the transom wood is solid by sight as well as by smacking it all over with a hammer on the outside of the transom surface. Also note the pictures of the transom wood surface from the inside, obviously not rotten but stained a bit. The transom wood was pressure treated from the factory is also noteworthy.

There does appear to be some shock and disbelief that anyone could possibly even imagine let alone actually apply non slip gelcoat over fiberglass as a deck surface, I don’t get where your coming from with this shock and awe.
Did I hear someone yell “Burn the witch”? If we are not here to learn from each other then there is not much point in being here now is there.

Here are two methods, I chose the first method demonstrated by Mike using crushed walnut shells from fiber glass site dot com. Mike was also very helpful during all my fiberglass work and his site is where I obtained all of my fiberglass products from. Mike also has many videos demonstrating fiberglass applications for varying types of projects not just boats. Mike and his products are cited as one of the best if not the best one stop shop for fiberglass supplies. He carries not only polyester but also epoxy resins.

https://m.youtube.com/watch?v=BE0VKVU0uqk

https://m.youtube.com/watch?v=JAZxGwia3aQ

This video has more information about mixing batches of resin and a different way to achieve a non slip surface.

https://m.youtube.com/watch?v=sjFNhMmTPRw


Photos of the inside of the transom wood surface again for clarification after floatation foam removal, cleaning and drying.

A photo of one of my support teams, the other team is my dogs and just as helpful.
 

Attachments

  • photo284020.jpg
    photo284020.jpg
    81.4 KB · Views: 1
  • photo284021.jpg
    photo284021.jpg
    99.9 KB · Views: 1
  • photo284023.jpg
    photo284023.jpg
    93.1 KB · Views: 1
  • photo284054.jpg
    photo284054.jpg
    106.2 KB · Views: 1
Last edited:

chevymaher

Commander
Joined
Mar 29, 2017
Messages
2,915
Having support is a key factor. And it looks like your team is keeping a eye on you make sure you don't make a mistake.
 

Watermann

Starmada Splash of the Year 2014
Joined
Jan 12, 2013
Messages
13,753
All well and good but if you look over some other threads, the wood replacement is only half the battle with the transom. The inner AL skin corrosion is on every SN or SC boat that has been in the water. The degree of corrosion is of course varied. My SN had an okay transom with no rot but the inner transom skin was suffering from corrosion that had pitting eaten half way through the AL skin. I've seen many that are pin holed all the way through.

My SN with AL pitting all cleaned up before filling with marine tex and primer/paint. Right around that stern eye and the transom had no rot, just water intrusion.

y4msolm1OSHx1Wlr2N-MLmk6okR2P1QxL6QCfNhX-ZM_R19BQekVnranQS5GAH9iQEDtcjerwUiMwbcG9H3maSzoGRzUKbYHfMtY5o_4g3S3Fuxudmwx3TQhSNShGJpDgBIz5mqYOWhzBNGk_2C4eRnYy5W2x4_YUEtuUlL3fsr8r0tEDRZTwQrYuejAK7yq-2jm8TPt21VdzR1BqCaIbcbxQ
 
Top