1991 Searay 225 BR Transom and Stringer Evaluation

GCartwright

Petty Officer 2nd Class
Joined
Jul 1, 2012
Messages
149
Thanks JAS, I will give that a try,

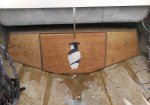
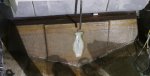
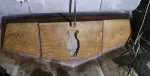
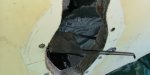
One other question, I somehow ended up with 1/2" chop strand in my online order which isn't worth returning, I've since picked up 1/4",any benefit or problem using the 1/2" to pb the transom in?
 

kcassells

Fleet Admiral
Joined
Oct 16, 2012
Messages
8,600
Nope, Soak em first i the resin. When they are saturated they will fall to the bottom. Then add the catalyst and mix.
 

Mad Props

Lieutenant Commander
Joined
Jul 8, 2016
Messages
1,766
as Kev stated, nothing at all wrong with 1/2" chopped fibers... actually, they are stronger... most people usually just go with 1/4" since its a little easier to work with. Some people even use milled fibers which are way small, but I like knowing theres some strength to my PB.
 

GCartwright

Petty Officer 2nd Class
Joined
Jul 1, 2012
Messages
149
thanks guys, 1/2 it will be
​​​Made ade a mistake earlier with what I said about the transom thickness, right now with csm on both sides I'm right at 1.6" plus .30" for the hull
 

Mad Props

Lieutenant Commander
Joined
Jul 8, 2016
Messages
1,766
Two layers of 1708 on the inside and the pb behind and should be right on the money
 

GCartwright

Petty Officer 2nd Class
Joined
Jul 1, 2012
Messages
149
I'm jumping ahead a bit but the original transom shown in the picture was not tabbed in the lower section, the tabbing stopped where the angle changes at the stringer
I made the new transom slightly bigger so that there's more meat in it where the lower part of the transom plate mounts.
I want to fill in the area around the drain with pb and get some tabbing in along the bottom edge but that would cause a lip and a flatness issue..
Could the center part of the transom be skinned/ tabbed with two layers of 1708 or should I leave it like original
 

Attachments

  • photo304108.jpg
    photo304108.jpg
    697.9 KB · Views: 4
  • photo304109.jpg
    photo304109.jpg
    656.2 KB · Views: 4

Woodonglass

Supreme Mariner
Joined
Dec 29, 2009
Messages
25,924
Install it, fill the drain cutout with PB, fillet ALL the edges and tab All sides. Why would it cause a lip and flatness issue? Pic doesn't show that.
 

GCartwright

Petty Officer 2nd Class
Joined
Jul 1, 2012
Messages
149
Wouldn't a strip of tabbing at the bottom of the keyhole run accross the transom plate mount and cause a step?
 

Woodonglass

Supreme Mariner
Joined
Dec 29, 2009
Messages
25,924
Not if you use a butt joint when you lay the 1708 across the full width of the transom and then follow up with the last full layer that covers the entire transom AND the tabbings.
 

GCartwright

Petty Officer 2nd Class
Joined
Jul 1, 2012
Messages
149
Back at it's after a bit of a break to take care of some other things on the list, picked up a few heaters and lamps for some cool weather glassing, using a 8000 btu propane heater to bring the tented canopy up to temperature then electric and ir heat to maintain during gassing /curing

Transom is in using thickened resin, I'm happy with the results, got good squeeze out and inner transom seems parallel to the outer outer hull.

Tabbing and transom skin are on as well, going to have to do a bit of clean up with a few air bubbles, not sure what the white spot is to the right of the drain, must of been some sort of contamination on the glass,

There is a slight difference (. 010") between the tape roll and the full roll of 1708 which you can see in the picture, was surprised just how much more resin the thicker glass used.
Glad this part of the rebuild is done
 

Attachments

  • photo308902.jpg
    photo308902.jpg
    138.3 KB · Views: 4
  • photo308904.jpg
    photo308904.jpg
    317.2 KB · Views: 5
  • photo308905.jpg
    photo308905.jpg
    278.7 KB · Views: 4

GCartwright

Petty Officer 2nd Class
Joined
Jul 1, 2012
Messages
149
Got a few more things done this past week, had a customer I do work for make me up a thickness jig, it measures 2 1/4" on the inner cutout, I'm right at 2 1/8" and parallel between inner and outer, need a helper on the inside to get better measurements since I need three hands

Going to pick wood for the stringers this week and have a question : if ACX uses c grade core plies then why use it if the only difference between it and CCX is one good face? Is that enough of a difference or does some ACX have better inner plies?
 

Attachments

  • photo309610.jpg
    photo309610.jpg
    1.5 MB · Views: 2

JASinIL2006

Vice Admiral
Joined
Feb 10, 2012
Messages
5,546
I think the only difference between ACX and CCX is a good face on one side. Some brands of plywood are better than other (e.g., more plies, fewer voids), but for something you'll never see, CCX would work just as well.
 

GCartwright

Petty Officer 2nd Class
Joined
Jul 1, 2012
Messages
149
Well since I took special wood out I better put something special back in
 

Attachments

  • photo309689.jpg
    photo309689.jpg
    288.8 KB · Views: 1

GCartwright

Petty Officer 2nd Class
Joined
Jul 1, 2012
Messages
149
Got some items crossed of the list on the weekend, I've had my motor on blocks in the corner of the garage for a year and a half and reading comments on the forum about an engine sitting and rusting made me get my butt in gear.

​​​​A company I do work for was throwing out material handling carts with nice locking casters so I grabbed two of them and hauled them home, cut them up, blew the dust off the welder and got to work.

I plan on changing the starter.... just because, compression check, replace impeller and belts, nice that I can now roll it away from the wall and get access.
Got tired of wrestling with my rolls of cloth on the ground out of the box so I put together a rack, now to clean my bench so I can use it
 

Attachments

  • photo310054.jpg
    photo310054.jpg
    617.3 KB · Views: 1
  • photo310055.jpg
    photo310055.jpg
    508.9 KB · Views: 1
  • photo310056.jpg
    photo310056.jpg
    322.3 KB · Views: 1
  • photo310057.jpg
    photo310057.jpg
    377.3 KB · Views: 1
  • photo310058.jpg
    photo310058.jpg
    321.6 KB · Views: 2

GCartwright

Petty Officer 2nd Class
Joined
Jul 1, 2012
Messages
149
Had a bit of grinding left up in the bow area, picked up the plywood for the stringers, went with the arauco ACX, nice looking wood with minimal voids.

So question, the new transom will be very close to having one of the transom plate mounting screws partially exposed due to a taper in the keyhole in that location . It's the third hole up on the starboard side (picture of original transom shown) Should I drill the hole, see how much meat is left on the edge and fill the hole and tapered area of transom with epoxy and redrill if necessary or just build the area up with epoxy first? (I have some marine tex already)
 

Attachments

  • photo312325.jpg
    photo312325.jpg
    513.1 KB · Views: 1

GCartwright

Petty Officer 2nd Class
Joined
Jul 1, 2012
Messages
149
2nd attempt at wrapping csm around the bottom of the stringer was better but still has spots were it wont lay down along the top edge. I put a 22 deg bevel in the stringer to match the hull deadrise which isnt helping get a tight wrap on the one side. Any point in bevelling the stringer or should I just go with this since its going to be set in pb anyway?
 

Attachments

  • photo312554.jpg
    photo312554.jpg
    512.4 KB · Views: 3

Chris51280

Ensign
Joined
Jan 24, 2018
Messages
909
looks better than mine. I had some spots on the top where i wrapped the csm over but i left it like that. it is still sealed and my cleats went there. csm does not add much to the strength of the stringer so it is mainly to seal the wood more than just the poly by itself
 
Top