1991 Cheetah 350 XLS

BRL2307

Cadet
Joined
Oct 3, 2017
Messages
29
WoG, I agree. Once things get warmed up and closer to fiberglass time, I plan to finish all the touch up grinding. I figured the excess PL had to go. In the mean time, I just wanted to continue making progress. It has been driving me (and the wife) nuts looking at pretty much the same thing, week after week. Getting the floor down lets me visualize the interior a little better and work towards finalizing a layout.
 

BRL2307

Cadet
Joined
Oct 3, 2017
Messages
29
Had an hour and a half to work this evening. Deconstructed part of the old bench to get a template for the angle of the seat backs.
Resized pictures - 1.jpgI then traced the outline on cardboard and cut it out. That was transfered to some scrap plywood to create a mock seat that I could easily modify. This went in the boat to see what seat height would be most comfortable. Resized pictures - 1.jpg After some playing around, decided on a seat height. Resized pictures - 1.jpg I then modified the legs to set the seat to the height I wanted.
Resized pictures - 1.jpg
It didn't turn out too bad. Just need to play with the backrest elevation, and should be good go!
 

BRL2307

Cadet
Joined
Oct 3, 2017
Messages
29
Thanks to everyone who is tagging along. Another big day this afternoon. The first bench seat section has been fabricated!
Resized pictures - 1.jpg There will be a lot more room for storage this time. The old bench has zero storage space.
Resized pictures - 1.jpg Here it is in its new home. The plan is to place it on hinges to allow this section to flip forward for engine maintenance. Once everything is completly layed out, and with arm rests, I will cut access holes in the base.
 

BRL2307

Cadet
Joined
Oct 3, 2017
Messages
29
Another section of seating is "done".
Resized pictures - 1.jpg Nothing has been set in place yet. Next up is to work on the side panels. This will form part of the backrest for the lounge seat.
Resized pictures - 1.jpg The forward square area will hopefully have a reversable backrest to allow that entire side to be used as a lounge. I still need to order that hardware to see exactly how that will work.
 

BRL2307

Cadet
Joined
Oct 3, 2017
Messages
29
Thanks Chevymaher. It definitley feels good to actually see what I have been visualizing in my head for the past 6 months.

The seat back brackets have been ordered. Hopefully it will be here within a week so I can see how I need to modify the seat to make it work.
Resized pictures - 1.jpg

I also need to start thinking about a source for the foam cushions. Heavily leaning towards finding a free or extremly cheap sectional couch so that I have enough foam to ensure all the seats are the same thickness and firmness. Especially since the vast majority of the seating is connected.
 

BRL2307

Cadet
Joined
Oct 3, 2017
Messages
29
A little progress since the last update.

Unfortunately, our water heater went out a couple weekends ago. About $500 for a new one definitely didn't help with the boat budget. But, the new heater is in, and the admiral is no longer restricted to 2 minute hot showers.

While looking at the rear bench seat in relatuon to the vertical side panel, I decided to cut the bench down so that a stationary 12" is adjacent to the sidewall. This will allow the bench to fold down without rubbing against the wall.

I have also begun cutting out the storage access holes in the seat bases for the rear bench and the port side lounge. Seat cushion bases are also cut out.

Resized pictures - 1.jpg

The new steering system has been ordered. I tried to just get a new cable, but it turns out the company who made it went out of business a few years ago. So, I opted to just replace the old rack system with a new one. The only part that will be reused is the steering wheel. Fortunately, it was not much more expensive for the whole kit than the cable alone.

​​​​​​​
 

BRL2307

Cadet
Joined
Oct 3, 2017
Messages
29
Time for an actual question, but I'm pretty sure I already know the answer. I was going to relpace the steering cable this afternoon and ran into a problem before I even got started. I pulled the cable out of the box, and the outer sheath is cracked.
Resized pictures - 1.jpg
I assume this needs to be sent back? I plan to send it off tomorrow, unless someone tells me it is okay. Thanks for your input.
 

BRL2307

Cadet
Joined
Oct 3, 2017
Messages
29
It's been a little while since my last post! Oops. We have made a good bit of progress since March. The new steering cable is in place, stringers fiberglassed, cavities foamed, and floor installed. I spent the last couple of days installing carpet.

wAAACH5BAEKAAAALAAAAAABAAEAAAICRAEAOw==


I also have the rear engine hatches roughed in, and will make adjustments after the seats are installed.

wAAACH5BAEKAAAALAAAAAABAAEAAAICRAEAOw==


I will keep working as time allows. We are going on vacation in September, so there is now a hard deadline we need to finish up by. I think it is doable...
 

BRL2307

Cadet
Joined
Oct 3, 2017
Messages
29
It has been a productive couple of months. I dug the boat out of the garage, hooked up the hose, and fired her up. Click, then, nothing. Well, thats not good. I have read enough on this forums to know that the answer of what to check is in the stickies. I check the slave solenoid, it is not functioning properly. The ignition swich is working, and the neutral safety switch works. Time to replace the solenoid. It goes in, and turn the key to see if it wanted to turn over. Success!

While under the dash, I also rewired the ignition switch. Someone had wired it up to the blower switch as well. (There was no blower in the boat, which has been corrected.) I could pull the key out of the ignition, and the boat kept running until the switch was also turned off. This has also been fixed.

Last week, got the boatbon the hose again, and tried to start. One click, then all the gauges die. Tried jumper cables to the truck, and she starts! Must need to throw the battery back on the charger. Which was weird, because it was sitting in the boat without the positive lead hooked up.

After a week on the charger, it still shows it is trying to charge. Back in the boat, same. A single click, and the gauges go dark. Maybe a bad battery? Take it to the store for testing. The girl can't get the machine to read properly, and says the 2 year old battery is bad. Still covered under the limited warranty, so the new is about half off. Works for me.

New battery back in the boat. Same issue. Start looking at the battery cables, and decide it is time to replace the positive. New cable goes in, and victory is mine! Boat is sitting in the driveway on the hose, running under its own power.

While all this is going on, realize that the shift cable bellows needs replaced. That is likely where the water was coming from last year. It was all cracked and dried out. Thankfully, I was able to get it replaced without pulling the drive. The admiral would have had a stroke if I started tearing into that right now.

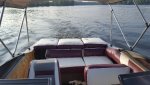
On Sunday, with everything running, it was time for a lake test! Had to stop 3 times on the 20 mile drive to re-secure the new engine hatches, then the cover for the bimini. Get her backed down the ramp, and she fires right up! Good sign. Open the hatch: no water in the bilge. Good sign. The new steering system works like a dream. Feels like a brand new boat!

Got her on plane, and cruised the lake for a few minutes. All the gauges were reading as they should. Opened it all the way up. WOT is low, about 3400. Never tried it before the rebuild, as I had the whole family out. May need to look into that.

Throttled down, and started getting into a no wake zone. After a few minutes, I glance at the temp gauge. It is reading hot, and climbing. Not good. I turn around, and head to the ramp, watching the gauge. Once I throttle up, the temp drops to normal. Has to be the impeller going bad. Curious, I drop back to no wake speed, and temp starts going up again. I give it a little more juice, and we drop back down. The touch of throttle keeps me at no wake, and brings the temp to normal. I'll keep an eye on it the rest of the season, and replace this winter.

Back at the ramp, pulled the plug, no water came out! That made me smile. Overall, I would say it was a successful weekend. There is still some upholstey work to finish, but we are oficially spalshed! We are good to go for vacation next month. I can sleep a little easier tonight.

Resized pictures - 1.jpgResized pictures - 1.jpg
 

Attachments

  • Resized pictures - 1.jpg
    Resized pictures - 1.jpg
    106 KB · Views: 1
Top