1966 Starcraft Holiday Engine Repower

66Holiday924

Chief Petty Officer
Joined
Aug 21, 2017
Messages
525
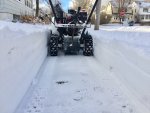
So, I've been thinking about what I'm going to do as far as the lights on this trailer go. I want to get something done about the bent up pieces where the tail light mount when I bring the trailer in to have the new fenders welded on.

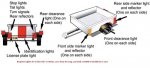
At first I was thinking KISS (Keep It Simple Stupid), as far as lights go. I was thinking keep it simple, less work, less of a problem when they need replaced. So I was just going to go with tail lights and a few reflectors only. However, it turns out that that would have been illegal. There are federal standards (DOT 571.108) for what lights you must have on a trailer. You can go to a popular trailer website and they simplify the requirements for you. There's a nice picture of what's required, from the website.


null


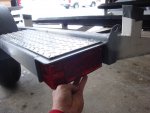
It's kind of a mess and this trailer, very painfully, had each and every individual light & reflector shown except for the front side marker & reflectors. I found a tail light setup that dubs as reflectors and will make this way simpler than what was on there. It turns out I'll need the tail lights I picked, ID lights, front clearance, and front side markers. A total of three lights (that dub as reflectors on each side) and the ID light. My driver side tail light will have a plate light under it.

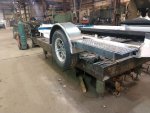
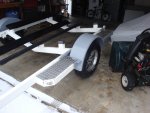
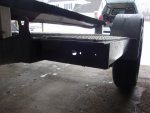
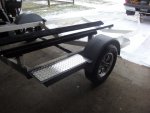
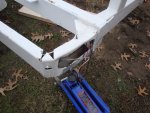
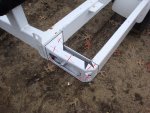
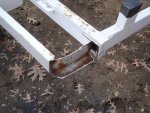
Additionally I decided I don't want the flush mount oval tail lights either. You can't get tail lights that will dub for all these other functions (rear marker lights & reflectors, plate light, etc) if you have the flush mount tail lights. Plus I thought it would be easier to replace them in the future if I go with rectangular surface mount lights. So I cut out all the framing for the oval lights leaving the plate across the back, which I will have the welder cut out and adjust so that my rectangular lights will be recessed. Then I'll run the diamond plate step over the top of the light to protect it from accidentally being stepped on and broken off.

This trailer didn't have the front marker lights, I'm adding those for good measure. The law says on a boat trailer you must have front marker lights as far as practical but not on the tongue. I see them on brand new boat trailers, so I'm going to add them. Otherwise it would have only required 2 lights (with one being the combo tail light) on each side.

So that's the plan:yo:. A lot of typing for what the pictures will explain in seconds... Oh well, it's what we do here. :thumb:
 

Attachments

  • photo306098.jpg
    photo306098.jpg
    1.6 MB · Views: 0
  • photo306593.jpg
    photo306593.jpg
    1.8 MB · Views: 0
  • photo306594.jpg
    photo306594.jpg
    1.5 MB · Views: 0
  • photo306595.jpg
    photo306595.jpg
    1.8 MB · Views: 0
  • photo306596.jpg
    photo306596.jpg
    35.7 KB · Views: 5
Last edited:

mickyryan

Rear Admiral
Joined
Apr 18, 2016
Messages
4,210
i did 2 on the front under the winch ambers then 2 amber down the side as reflectors then 2 clearance lights on the fenders then the rear reflectors as you show , also put two penny lights up top of my guides just so i could see them :) and 1 center on rear since my trailer is 80 + inches wide pics are on my post for trophy
 

66Holiday924

Chief Petty Officer
Joined
Aug 21, 2017
Messages
525
i did 2 on the front under the winch ambers then 2 amber down the side as reflectors then 2 clearance lights on the fenders then the rear reflectors as you show , also put two penny lights up top of my guides just so i could see them :) and 1 center on rear since my trailer is 80 + inches wide pics are on my post for trophy

Sounds like we got the same thing as far as the requirements go. I'm doing the same light scheme as you, minus the penny lights. The amber side marker and clearance lights that I chose dub as reflectors, and my tail lights have the rear marker & clearance lights, necessary reflectors, and a plate light, built into them. The way it was set-up all of those things were individual fixtures on this trailer. It was messy.
 

66Holiday924

Chief Petty Officer
Joined
Aug 21, 2017
Messages
525
My trailer doesn't currently have the front amber side markers. It must not have been a requirement when the trailer was built. The way I read it, they are required as far forward as practical but not on the tongue. I looked at pictures of new boats and they are on there. I could probably get away with not having them. Since the trailer was built without them, I'm sure they weren't required when it was built and it's grandfathered in to not having them, but I'm going to put them on.
 

mickyryan

Rear Admiral
Joined
Apr 18, 2016
Messages
4,210
one thing i did was repotted all my lights with epoxy to be sure intrusion wasnt a thing and used sealant on all my connections to be sure water didn't run down the jacket and erode the copper.
 

66Holiday924

Chief Petty Officer
Joined
Aug 21, 2017
Messages
525
I took the trailer to B&W Welding today. They did such a nice job on the transom welding I thought it was worth it to go back to them. They're going to weld the fenders on, clean up where the passenger side tail light area got bent, weld in some reinforcement members for the diamond deck steps, weld a few old screw holes shut, and he's going to sell me some diamond deck plating for my steps. When they're done with everything, they're going to prime the bare metal to prevent flash rusting. The diamond deck is what I pictured perfectly. It has a mirror shine, like on a fire truck.
 

66Holiday924

Chief Petty Officer
Joined
Aug 21, 2017
Messages
525
On another note I read somewhere on the internet that you can use an infrared laser temperature gun and take your hub temperatures to see how hot they are running and get a pretty good indication how your bearings are holding up. The general consensus seems to be that about 120 degrees is healthy, 150, is ok, and when you start to approach the 200 degree mark, you might have something going on. So I bought a Ryobi gun for like $35 and tried it out. After an hour on the turnpike, I got that my hubs were 35 degrees. That's with no boat and on a 25 degree day, but it seems like they're going to be good. This gun is cheap and cool. It's basically a laser pointer that gives you the temperature of any surface it touches. :cool:
 

mickyryan

Rear Admiral
Joined
Apr 18, 2016
Messages
4,210
i just torque them to within 20 and back off tiny bit like 1/16th of a turn for the cotterpin and they usually good to go :)
 

66Holiday924

Chief Petty Officer
Joined
Aug 21, 2017
Messages
525
Apparently the vendor who sells me the Van Sickle paint also paints equipment. He hasn't looked at it but his usual running price for a boat trailer sounds pretty damn good. He says he would sandblast it to bare metal, SE Prime, and paint with the Van Sickle (hardener added). He's saying 20-25 per running foot, $400-$500. I'd probably get it back painted in a month. I'm assuming it would be good for 15-30 years after that.

My other options are rattle bombs or buying the equipment and painting it myself. I think I would need a 20gal compressor ($200), use with a cheap LVLP gun. Then I would still have to buy all the ancillary equipment and paint.

$200 Compressor
$15 Gun
$60-$90 Paint
$75 - Regulator, oil/water separator, and hoses and fittings...

If that price holds true, I don't see how it would make sense to not let him do it. Then I can keep working on it too. I can get the lights on it and rebuild the bunks. I have to wait till good weather if I paint it, which holds the whole project up. What do you guys think?
 

ab59

Ensign
Joined
May 10, 2017
Messages
979
I dunno . I do things myself all the time because I can buy the equipment and do it myself for about the same price or less , as paying someone else to do it. I have found more often than not that I do a better job than a " professional " ( some guy paid minimum wage and knows next to nothing and does not want to learn more ) would do.
And best of all I get to have new tools and that is worth something as well ! But this is just me .
 

66Holiday924

Chief Petty Officer
Joined
Aug 21, 2017
Messages
525
I dunno . I do things myself all the time because I can buy the equipment and do it myself for about the same price or less , as paying someone else to do it. I have found more often than not that I do a better job than a " professional " ( some guy paid minimum wage and knows next to nothing and does not want to learn more ) would do.
And best of all I get to have new tools and that is worth something as well ! But this is just me .

That's how I usually am to, but I don't think I can compete with sandblasting it down to bare metal and this guy is going to use the exact paint I wanted to, only with 48 years experience in his corner.
 

66Holiday924

Chief Petty Officer
Joined
Aug 21, 2017
Messages
525
If that painter's price stays in the $400-$500 window, I'm going to let him go ahead with it. It's a tad over what I think I would spend, having to buy my own compressor and equipment, but going down to bare metal is tough to beat. He's going to use the Van Sickle SE Primer, and the Van Sickle Top Coat with Hardener in it just like I want.

The other added bonus to letting him paint it, is that I get to keep working on it. Otherwise I'm looking at painting this thing as late as June. I don't really want it hanging out in my backyard that long (neighbors will start to *****) and There's the potential to get my boat on it as soon as I get it back from Wisconsin, which means I can sell my current trailer in the Spring, which will be prime time for that.
 

66Holiday924

Chief Petty Officer
Joined
Aug 21, 2017
Messages
525
Good move getting the trailer to the welder's shop. I don't know when I would have been able to get it out of here...:smow:
 

Attachments

  • photo307170.jpg
    photo307170.jpg
    1.1 MB · Views: 3
  • photo307171.jpg
    photo307171.jpg
    2 MB · Views: 3
  • photo307172.jpg
    photo307172.jpg
    1.2 MB · Views: 3

66Holiday924

Chief Petty Officer
Joined
Aug 21, 2017
Messages
525
A little bit of movement on the trailer front, today B&W let me know the welding is done and sent me the attached picture. I think they did an incredible job! Too bad they only sent one picture. Don't they understand a guy has needs!?!? Additionally on the trailer front, my painter says he will sandblast it to clear metal, prime and paint using the industrial Van Sickle paint w/hardener, and SE primer, not to exceed $425. So, I think the painting is a no brainer. That paint is extremely durable, looks nice, and I think it will hold up well. So it's going from the welding shop to the paint shop.
 

Attachments

  • photo308114.jpg
    photo308114.jpg
    504.9 KB · Views: 2

66Holiday924

Chief Petty Officer
Joined
Aug 21, 2017
Messages
525
Well I finally got the call I've been waiting for all winter. Riggs Marine is starting work on my boat this week. :) They're going to start with installing the gimbal assembly, throttle and steering and while the engine is out of the boat and it's easier to work on, they're going to look it over for me.
 

66Holiday924

Chief Petty Officer
Joined
Aug 21, 2017
Messages
525
I went and picked up the trailer today. I'm happy with the welding. They did a great job. It's turning out just like I was envisioning it so far. I especially like the job they did on the tail lights. They uploaded some measurements and hole sizes into their computer and had their machine drill the holes for the tail lights. Other than that I drilled a few holes in the frame for my marker/ side lights. They said this trailer is heavy duty. I have to agree a went through three drill bits trying to drill into it. It destroyed one of the cheapo bits in about 10 seconds. I'd say it's around 3/16" thick. The trailer is now sitting at the paint shop and I don't expect to get it back until April or May.

I got an update on the boat today too. The engine I'm putting in it ran on a test drive, but it was a little on sluggish side, so I was suspecting a carburetor and probably doing a tune-up. They say it needs a fuel pump, carburetor, and they said the distributor cap was total junk, couldn't believe it ran at all with that distributor cap. The good news is that they said the compression was spot on and
..………….. my summer paid off!!!!!!:drum:they tailored my transom, they used a jig (I've seen them for sale in the far corners of the internet). They said they don't see any problems with my work. :pray: nothing comes up when they put the gimbal assembly on it.
 

Attachments

  • photo308286.jpg
    photo308286.jpg
    1.7 MB · Views: 2
  • photo308287.jpg
    photo308287.jpg
    1.7 MB · Views: 2
  • photo308288.jpg
    photo308288.jpg
    1.9 MB · Views: 2
  • photo308289.jpg
    photo308289.jpg
    1.4 MB · Views: 2
Top