1966 Starcraft Holiday Engine Repower

66Holiday924

Chief Petty Officer
Joined
Aug 21, 2017
Messages
525
Hey the keyhole is a bowling pin shape already :thumb:]

I'm looking at the Chief and Dozer's In The Red. I never notice the difference in the shapes of the keyholes. So your Chief is what it looks like before it is tailored and Dozer's is after? Are you saying that my keyhole should work for the 1992 3.0L?
 

66Holiday924

Chief Petty Officer
Joined
Aug 21, 2017
Messages
525
Sweet! I didn't really understand what they were talking about. I knew the hull had to be cut, but I didn't realize how little needed to be cut. What is the purpose? Is that where the trim lines go through the Gen II gimbal assembly? I think somebody must have had a newer set-up and then reinstalled the old stuff when it failed, probably to sell it. I never encountered a gasket in removing any of it. It was all caulked with silicon...

I'm considering removing the engine and gimbal assembly from my donor boat, cutting the fiberglass around the keyhole so I have a fiberglass template of what it should be.
 

Watermann

Starmada Splash of the Year 2014
Joined
Jan 12, 2013
Messages
13,753
Lot of work cutting that FG for nothing really, you have the right keyhole.
 

Watermann

Starmada Splash of the Year 2014
Joined
Jan 12, 2013
Messages
13,753
Oh I see now yeah that's not right, looks familiar. :grumpy:

y4mkWGNj5WuOk6mswMawdj8bJjjuwC_9h5diRniwSprh2ZKe0N_Yhwp_ysbbZ5tmYT2y9649Ke69mpkczPX1OB-_nNvhHq4d5rtAv9u0MRM2EAGz4oMLvkue64tskG2iXp74eiKXwKGiNWExpLSJT-BweoFZ_WFB3XcoOVYH1oxPsWfkOzK8-eTZIEXw4UjNF80Kh1Tdo5Y2488svPfSi8afA
 

66Holiday924

Chief Petty Officer
Joined
Aug 21, 2017
Messages
525
I saw what you were seeing in the pictures until I went out and looked at and figured out it was carbon residue making it look like the bowling pin. I didn't realize how little the difference is though. Does the Gen 2 setup have 8 bolts? Two more at the top?
 

66Holiday924

Chief Petty Officer
Joined
Aug 21, 2017
Messages
525
Looks like it's going to be a good week for cleaning up old parts, listing them on eBay, and surfing iboats. I'm thinking that I'm going to go ahead and have all the bolt holes in my transom tig welded. In all I've got about 25 bolts to have closed up. I figure doing that will basically eliminate the chance that they will leak.
 

Attachments

  • photo286089.jpg
    photo286089.jpg
    58.7 KB · Views: 0

66Holiday924

Chief Petty Officer
Joined
Aug 21, 2017
Messages
525
Day 5:

A couple more hours on the boat today and I got the transom wood out. I ended up using the jack method. It didn't want to come out. and I had to work it for awhile with the jack, I poured a little motor oil between the transom metal and the wood and it broke it free. The transom was still pretty solid and had some life in it but the bottom few inches was really starting to rot.
 

Attachments

  • photo286564.jpg
    photo286564.jpg
    140.2 KB · Views: 11
  • photo286565.jpg
    photo286565.jpg
    97.8 KB · Views: 1

Watermann

Starmada Splash of the Year 2014
Joined
Jan 12, 2013
Messages
13,753
Yeah that transom was shot alright and all the brown / white stuff you see in the pic is corrosion that has to be removed. At least you have enough left for a template. :thumb:

fetch
 

sprintst

Commander
Joined
Apr 18, 2009
Messages
2,066
The good old days. I dragged mine out for a bit and treated it like a second job but you will be happy with it once you forget about all the pain :) I rebuilt everything including seat frames, etc. It's all epoxied and as solid as a rock. It's all buried in here somewhere.
 

66Holiday924

Chief Petty Officer
Joined
Aug 21, 2017
Messages
525
sprintst thanks for sharing, looking forward to having an undiscovered build to go through. I feel like it's a jackpot when I come across builds that I wasn't aware of. I'm not doing a total rebuild. This is all part of my repower. I figured I might as well rebuild the transom while I'm at it. I don't know though, one issue seems to have a way of leading to the next. lol.

Day 6:

Short day today. I got the paint cleaned up around the holes that I am considering having tig welded. I'm thinking Monday I might take it to get an estimate. It's amazing how many holes are in the transom of a boat. I count about 30 that I don't want, from old hardware. I feel like tig welding them gives me a clean slate.
|
After this project is over with, I'm hoping I will mount my hardware and it will stay in place for the next 15 years, at least. I'm thinking I want a swim platform, smart tabs, and I'm going to try a transom saver for mounting my transducer(s). I hope the smart tabs will last as long as I want them to. Does anybody have anything to say for their durability?
 

66Holiday924

Chief Petty Officer
Joined
Aug 21, 2017
Messages
525
I marked the holes that I don't want touched with painters tape and circled the holes that I want welded with a grease pen.
 

Attachments

  • photo286626.jpg
    photo286626.jpg
    124.1 KB · Views: 2

SHSU

Lieutenant Junior+Starmada Splash Of The Year 2019
Joined
Mar 8, 2017
Messages
1,665
Catching up on your thread. Great progress. Looks like some of those holes might need some additional material, other than just welding.
 

66Holiday924

Chief Petty Officer
Joined
Aug 21, 2017
Messages
525
Catching up on your thread. Great progress. Looks like some of those holes might need some additional material, other than just welding.

Yeah there are some 1/2" and 3/8" holes. Luckily the larger holes are above the water line. I'm going to talk to the shop about it and try to get a feel for what the appearance will be when they are done. I might have them stick to the small stuff and everything below the waterline and patch those bigger holes myself with JB weld - water stick. I'm thinking I can us 5200 to place aluminum mesh so it spans the backside of the holes, and then fill them in with the JB. Push the JB through the mesh so it's nice and bonded to it. When it hardens sand it smooth, refinish, and there will probably be little evidence there was ever a hole
 

66Holiday924

Chief Petty Officer
Joined
Aug 21, 2017
Messages
525
I got some goodies in the mail today. These are all the bolts and screws I should need to reinstall my transom. It's not very exciting. I'm mostly posting this for the benefit of anybody who may be trying to size up their own transom project. I bought 1/4" #10 screws to go across the face of the Z-Bar, long enough to secure through both sheets of plywood. My through bolts are 3" - 1/4" dia., and I got flat washers and lock nuts to match. I can't believe the nuts I took off weren't lock nuts. Everything I bought is 316 stainless, which should minimize the chance of galvanic corrosion, but I plan to use tef-gel additionally.
 

Attachments

  • photo286798.jpg
    photo286798.jpg
    116.8 KB · Views: 0

66Holiday924

Chief Petty Officer
Joined
Aug 21, 2017
Messages
525
Day 7 & 8:

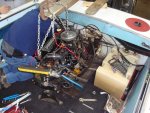
This weekend I finished up the demolition phase of my project. I'm in awful deep for a re-power project...

It's like pulling a loose thread and unraveling a whole sweater... Upgrading to a newer engine was going to equire new gauges and I wanted a new steering wheel, so rebuilding the dash became part of my project. I figured what better time to do the transom than during the repower, while everything is off of it, so I'm doing the transom. Doing the transom required taking up my aft florr ply. It had a rotted section, so now I'm replacing that. Removing the steering wheel, I managed to destroy the threading on my helm, so now it's getting new steering, and what the hell, while I'm at it, I'm going to go ahead and buy that nice new throttle control I was eyeballing. lol.

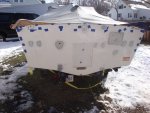
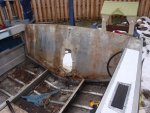
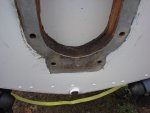
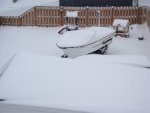
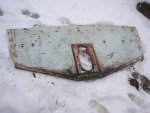
Demolition phase complete. I'm happy with the progress. It's cleaned up for the welder. I will do another round with cleaning it at the start of the next phase. Tomorrow or Tuesday it's going to the welder to have the old hardware holes closed up. From there it's going to go back into storage for another month or two, until the weather is consistently warm and I have the best conditions Northeast Ohio has to offer for treating the new transom and floor. It sucks but conceding to the idea that I won't be using my boat this summer gives me the time to wait for the best conditions.
 

Attachments

  • photo285861.jpg
    photo285861.jpg
    150.2 KB · Views: 4
  • photo286564.jpg
    photo286564.jpg
    140.2 KB · Views: 4
  • photo287133.jpg
    photo287133.jpg
    131.3 KB · Views: 4

Watermann

Starmada Splash of the Year 2014
Joined
Jan 12, 2013
Messages
13,753
It seems to always go that direction when guys think they'll just do one job or another, full on rebuilds happen that way all the time.
 
Top