1987 Searay Seville Cuddy Restoration - stringer and engine mounts

Mechanicalmike08

Petty Officer 1st Class
Joined
Aug 29, 2018
Messages
308
I've always viewed these threads as a place to document your build in its entirety. If you have specific questions that aren't being answered here post it in the appropriate section. I'd say keep it all here.
 

kcassells

Fleet Admiral
Joined
Oct 16, 2012
Messages
8,598
Just saying a lot of the motor guys don't wanna page thru a rebuild.
You can enter the new thread link in your signature.
 

oldrem

Commander
Joined
Nov 7, 2013
Messages
2,002
Just saying a lot of the motor guys don't wanna page thru a rebuild.
You can enter the new thread link in your signature.

I agree. That's why my motor rebuild was a separate thread in the outboard section last Winter. Many of the motor guys don't ever seem to venture into this section.
 

tpenfield

Moderator
Staff member
Joined
Jul 18, 2011
Messages
17,705
If the engine thread is separate, then the OP could always post the link to the engine thread here and vise versa on the engine thread,
 

Broaters

Petty Officer 2nd Class
Joined
Jul 31, 2017
Messages
139
Hello everyone,

It has been a long time since our last post, here is an update from our last work.

Since the floor was completed we have put more work in getting it flat and smooth before glassing. the result is pretty good.

we used a quick cure fiber filledcompound to fill the gaps. it is dry to the touch within 10 min and can get sanded within the hour.

before sanding

2019-04-17 21.37.34_r.jpg
they feel pretty though this way already.

We plan on getting the floor fully coated with CSM before to glue the seat base. I guess it will give more water resistance to the deck.

on the engine side we finished to sand the outdrive and it is close to be ready for painting. I'll start an other thread about the mechanic soon

more work to come on wednesday :)
 

Attachments

  • 2019-04-24 22.36.12_r.jpg
    2019-04-24 22.36.12_r.jpg
    174.7 KB · Views: 0
  • 2019-04-27 13.00.25_r.jpg
    2019-04-27 13.00.25_r.jpg
    185.6 KB · Views: 0
  • 2019-04-27 13.00.37_r.jpg
    2019-04-27 13.00.37_r.jpg
    228.8 KB · Views: 0
  • 2019-04-27 12.59.55_r.jpg
    2019-04-27 12.59.55_r.jpg
    236.8 KB · Views: 0

Broaters

Petty Officer 2nd Class
Joined
Jul 31, 2017
Messages
139
We have been glassing the engine mounts this week.
not an easy job... not enough room, tiny spots, blind work for the inside;.;

We did what we could. it is still messy but we will grind it next time and put more glass as needed.

2019-05-08 21.26.01_r.jpg

2019-05-08 21.26.10_r.jpg

2019-05-08 21.25.53_r.jpg
 

Broaters

Petty Officer 2nd Class
Joined
Jul 31, 2017
Messages
139
How many layers are needed on the engine mounts? how many did youput guys ?

currently we are about 3 layers overlaping in every way we could
 

Arron

Recruit
Joined
May 10, 2019
Messages
1
Good pictures a good lesson for all the work that is needed to be done now i know what iam up against having worked with fiberglass on cars we need to save these old boats love them :)) . >>1988 celebrity 180 v 4.3
 
Last edited:

Broaters

Petty Officer 2nd Class
Joined
Jul 31, 2017
Messages
139
What are you using for each Layer?

We have mainly used some biax but our density on this one is more like 1405 rather than 1708 like you have in the US.
there is more tabbing on the outside than inside the engine mount because accessibility is not good.
we put CSM under the biax for the first layer.
we have also used CSM in some places as it is more easy to shape

would you recomand we add some layers?
 

Broaters

Petty Officer 2nd Class
Joined
Jul 31, 2017
Messages
139
we finished grinding the engine mounts from the glass spikes.
we added some extra layers for peace of mind and finished with one wrap of CSM around the edge.

the result seems ok on the port mount but we waited too long before doing the same on the starboard and the glass was too hard to apply the CSM. ehhhh more grinding to come next time...

2019-05-15 22.33.41_r.jpg

we did a lot of cleanup from the fiber dust on the boat and altough there is still some work to get it done it feels way better with a good touch of vacuum cleaner and wet cloth.
We should have done that before to keep the moral up

2019-05-15 22.33.26_r.jpg
 

Attachments

  • 2019-05-15 19.21.44_r.jpg
    2019-05-15 19.21.44_r.jpg
    232.8 KB · Views: 0

Woodonglass

Supreme Mariner
Joined
Dec 29, 2009
Messages
25,924
CSM does not add much Strength to the laminate. For Motor mounts I'd recommend using a Layer of CSM and then a Layer of the heaviest Biaxial fabric you can get. 4 layers of that should be more than adequate.
 

Broaters

Petty Officer 2nd Class
Joined
Jul 31, 2017
Messages
139
CSM does not add much Strength to the laminate. For Motor mounts I'd recommend using a Layer of CSM and then a Layer of the heaviest Biaxial fabric you can get. 4 layers of that should be more than adequate.

Hello Woodonglass, thanks for the advice. do you mean using CSM under each layer of Biax?
biax already have some CSM on the bottom face isnt'it enough?
 

Woodonglass

Supreme Mariner
Joined
Dec 29, 2009
Messages
25,924
Yes and No. Yes I'd use separate Layer of CSM. No it's not enuf. You need Bulk soooo The additional CSM gives you the bulk and the Biax gives you the strength.
 

Broaters

Petty Officer 2nd Class
Joined
Jul 31, 2017
Messages
139
Yes and No. Yes I'd use separate Layer of CSM. No it's not enuf. You need Bulk soooo The additional CSM gives you the bulk and the Biax gives you the strength.

ok lets go bulk then :) more layers it will be. would you suggest to finish by a layer of biax or CSM? or it doesn't matter?
 

Broaters

Petty Officer 2nd Class
Joined
Jul 31, 2017
Messages
139
Hello guys

Long time no post, I'll try to catch up with what we have done since May,
we have been somehow busy, tired, under motivated... we are still doing one work session a week instead of 2 or 3 as we should. time to speed up as summer is already started and we would like to get on water this year.

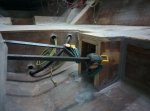
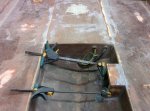
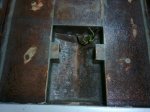
We have worked the engine mounts to re enforce them further by alternating CSM and biax as suggested. I believe they are fine now even tough some little air pockets are visible around the tight edges. They have been very difficult to work due to the shape of the parts and the lack of space.

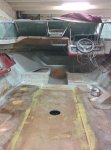
We have also covered the seems of the different floor elements with biax tape before covering the whole floor with 2 layer of CSM. It was also a tricky job due to the surface to be covered and the amount of resin to be used as we wanted the 2 layers to be done wet on wet.

Here is how it looks afterward
2019-05-22 19.30.40.jpg

2019-05-22 23.56.40.jpg
The 2 layers of CSM also extend to the side of the hull on the top of the 2 existing 1708 tabbing.
hope it will be enough.
 

Attachments

  • 2019-05-22 23.57.09.jpg
    2019-05-22 23.57.09.jpg
    900.4 KB · Views: 0
Top