1987 Searay Seville Cuddy Restoration - stringer and engine mounts

chevymaher

Commander
Joined
Mar 29, 2017
Messages
2,915
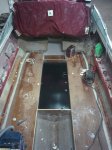
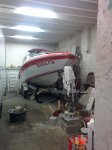
I started in the back. Front was tilted up. The foam worked its way forward and up. Started in the rear because of the outer stringers the inside section is sealed. Except the transom. So I started there. Where as the front is open along the hull for the air to escape.

I just went to the next forward hole when it was to the top. When you put the plug in have something heavy to sit on it. Foam pushes hard. I had 10 lb weights and it was pushing them off. 25 lbs weights were doing the job well tho.

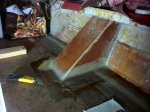
That was another reason I left the tabbing off when i did it. to relieve pressure when the foam expanded. I bought the larger kit. More than I would ever need. I was over filling and allowing it to push out the open tabbing. I didn't get a picture I was to busy cleaning it as it came out. But it was similar to the video if it coming out of the cup holder hole in the side. It was a sight tho all along the deck hull edge Like the blob invading.

I was concerned before I started if i was going to have issues. It is a mess got to just brace for it. But it is easy peasy and fun to do. Once you accept your gonna wire wheel it all to clean it up. Mix pour and giggle and watch.

I did mix and wait to long on one batch. I set the cup down to adjust my glove or something. turned around and it was over the top of the cup all over the deck. Mental note be ready to pour once you stir nothing else matters.
 

kcassells

Fleet Admiral
Joined
Oct 16, 2012
Messages
8,595
Just looked at the gas tank. How are going to secure it so it does not move? Does it have clips on it to screw to the sides?
 

Broaters

Petty Officer 2nd Class
Joined
Jul 31, 2017
Messages
139
Looks pretty good.

When you poured/ drilled the holes are they tword the front of that section so that when u tilt it up and pour it runs to the back? Or did you pour near the back and let it expand forward. (If that makes sense)

we made the holes higher and let the liquid foam flow down before expanding. having the holes close to the edge also seems better to fill the void even inthe tiny angle where the deck leets the hull
 

Broaters

Petty Officer 2nd Class
Joined
Jul 31, 2017
Messages
139
Just looked at the gas tank. How are going to secure it so it does not move? Does it have clips on it to screw to the sides?

the tank was secured with multiple L shaped profile screwed to the stringer and with foam between the tank and the L.

I was willing to use the same and also consider gluing a kind of cleats on the stringer so that we can screw the L in the cleat. the cleat would also serve as a support for the floor above the tank.

When we get the boat, the floor above the tank was screwed into some cleats and the cleats themselves were screwed in the stringers. Not sur if it was the original design or some work from the PO...
 

Broaters

Petty Officer 2nd Class
Joined
Jul 31, 2017
Messages
139
we completed the foaming of the other side this evening.

it went ok as well using the same technique.

only strange thing if not a bit scary is that we notice some CRACK noise occasionaly after 1 hour cure...
not a big loud CRAAAAAACK like somtehing being ripped off but more a quick sudden noise .

The outer shell of the hull has not moved so we more think about the wood inside...
any idea?

some of you guys already encoutered this while foaming?
 

Broaters

Petty Officer 2nd Class
Joined
Jul 31, 2017
Messages
139
we are now working a bit faster than posting...

a quick view of how we lifted the boat for foaming using the trailer fron wheel and some "shims" We lifted as much as we could until the back of the trailer touches the floor. It gave us a good slope and the foam was going to the bottom very fast.

2018-12-12 20.50.17_r.jpg

we have use the boat cover and a electric heater to try to keep it warm enough during the cure.
 

Attachments

  • 2018-12-12 20.47.09_r.jpg
    2018-12-12 20.47.09_r.jpg
    292.4 KB · Views: 0
  • 2018-12-12 17.58.49_r.jpg
    2018-12-12 17.58.49_r.jpg
    289.3 KB · Views: 0

Broaters

Petty Officer 2nd Class
Joined
Jul 31, 2017
Messages
139
Hello guys, hope you all had a nice end of the year break and wishing you all a happy 2019 year. Hopefully full of splashes :)

We tooked a couple hours to clean the space from all the junk pieces and it took quite some space in the car (EU car are smaller than US one :) )

2018-12-30 11.22.13_r.jpg
The supplier suggest a coat from 0,6 to 0,8mm wet but even with a good generous coat applied with a brush It is not more thant 0,35 to 0,45 mm. This was not a very satisfying job.

After a couple hours of heating with the fan heaters and a heating lamp I tried applying some PVA to get sore it was fully air sealed for the cure. and the heated again... I'll clean the PVA next time and see how it went.

Not sure about you but this period of the year is dark, cold rainy, exhausting... it can be seen on our faces...
We have to work under the boat cover with all the heaters on to keep the supplies and the work area hot enough, this is a real PITA.


2018-12-30 13.14.33_r.jpg
 

Attachments

  • 2018-12-30 13.14.28_r.jpg
    2018-12-30 13.14.28_r.jpg
    351.6 KB · Views: 2
  • 2018-12-27 12.05.56_r.jpg
    2018-12-27 12.05.56_r.jpg
    262.7 KB · Views: 2
  • 2018-12-27 12.05.35_r.jpg
    2018-12-27 12.05.35_r.jpg
    302.4 KB · Views: 0

Broaters

Petty Officer 2nd Class
Joined
Jul 31, 2017
Messages
139
A bit of progress yesterday evening...

The gel coat in the tank area seems finaly cured. I guess the best help in this was heat. maybe PVA helped also hard to figure it out as both were applied at the same time.

We applied 2 coats of black PU paint to the tank to protect it from future corrosion. We installed some Neopreme foam strips on the bottom, the cut in the middle is in the idea of having smaller area if water evers gets trapped in between 2 strips. Not sure it is usefull but it is done :).

2019-01-09 20.57.21_r.jpg

2019-01-09 21.01.08_r.jpg

We have glued the cleat to the stringer to avoid having some screw holes through the glass job.

Next time will be removing the clamps and fit checking the floor. getting close to finally finishing the deck covering.

2019-01-09 22.02.04_r.jpg

Still waiting for some USCG aprooved fill and vent line that are on backorder. a real pain to find them in our area.
Nearly every shops have hoses that resists to everything but gasoline...

minor glass work done in the cabin as well but nothing worth showing.

cheers
 

kcassells

Fleet Admiral
Joined
Oct 16, 2012
Messages
8,595
I see nuttin butts flex issues there. So...……………...
Put some more wood across the tank for support of the floor. You do not want soft spots. That's what I see now, JMHO.
Max 24" best 16" on centers.
Best would be to notch out those side rails, cut would to fit and lay on the vertical grain for best strength/flex.
Place some neoprene under the vertical wood to avoid issues.
Looking good.
KC
 

Broaters

Petty Officer 2nd Class
Joined
Jul 31, 2017
Messages
139
I see nuttin butts flex issues there. So...……………...
Put some more wood across the tank for support of the floor. You do not want soft spots. That's what I see now, JMHO.
Max 24" best 16" on centers.
Best would be to notch out those side rails, cut would to fit and lay on the vertical grain for best strength/flex.
Place some neoprene under the vertical wood to avoid issues.
Looking good.
KC

Hey KC thanks for the advice. you're right the piece of wood itself it very flimsy.
we tried reinforcement from the back side with 1708 but still too flexible.
Next plan is to add stiffeners
 

Broaters

Petty Officer 2nd Class
Joined
Jul 31, 2017
Messages
139
We worked on the tank area yesterday.

the glueing of the cleats seems fine we still need some minor grinding to finalize it. amazing how many time we need to use this tool in boat restoration !

we re-inforced the wood pannel by adding some wood on the vertical grain as suggested by KC.
only with the woods screwed in place it feels strong but we added 2 ply of 1708 on each side to get sure. Still under cure so load test will be next time. by load testing I mean me and my brother... about 400 pounds :)

IMG_20190116_202415_r.jpg

It is successfull so far

IMG_20190116_202425_r.jpg

other than that was small jobs here and there, foaming the fuel chase and the deck.
putting back some foam plugs with PB.
re-installing the fuel tank level with a new gasket, ground wiring for the tank... nothing really visual.

The temp is now close to 0°C so getting a good temp for glassjob becomes a challenge

more next time :)
 

Attachments

  • 2019-01-16 20.27.59_r.jpg
    2019-01-16 20.27.59_r.jpg
    294.4 KB · Views: 1

dezmond

Senior Chief Petty Officer
Joined
Jul 21, 2010
Messages
760
Nice job guys. Every little bit counts. Just one more thing to check off the list :)
 

Broaters

Petty Officer 2nd Class
Joined
Jul 31, 2017
Messages
139
Hello folks

It's been a while since we did not post any update. Project is still going on but we are really slowed down by the temperature here.

Since the last post we completed the deck above the fuel tank and finished foaming and pluging back the rest of the floor.

the fuel tank cover was stenghtened again with 2 ply of 1708 on each bracket.

2019-01-19 17.51.39_r.jpg

and finally, we have A COMPLETE FLOOR !!! never tought i was going to be so happy about a floor :)

2019-01-19 18.33.35_r.jpg
We installed only a single access hatch over the fuel level transmitter. the idea is to minimize water ingression risk.

If we need to access the other connection point we will drill holes later and re-install a hatch.

The temp in the hangar is now below 0°C and it gets difficult to have a proper working temp while keeping easy access to the part we need to glass.

So we have siwtched to the refurbishment of the outdrive. It is in pretty decent shape but still needs a paint of coat and new gasket, bellows, hose etc.

Not sure If i open a new thread in different section of the forum or keep in this one? what do you guys think?
 

Attachments

  • 2019-01-19 15.23.46_r.jpg
    2019-01-19 15.23.46_r.jpg
    274.2 KB · Views: 0

kcassells

Fleet Admiral
Joined
Oct 16, 2012
Messages
8,595
I might think in the engine dept you may want to open up a new thread. Just so the motor guys can directly see what you are asking instead of your whole thread.
 
Top