1987 Searay Seville Cuddy Restoration - stringer and engine mounts

Joined
May 31, 2018
Messages
13
Thank you guys for the feedbacks

Woodonglass we will definitely try the pull and stretch tips on our next glass time.

WolverineLiving what do you mean by dry underneath? not enough resin? altough we use the primer it is only on the wood, and we still wet the surface with poly resin before puting the glass.

more to come soon (we hope) :)

Yes, it looks a little dry like the glass isn't completely wetted out from the wood out. That being said, I'm looking at pictures on a website half a world away so I could be full of ….!!;)
 

Broaters

Petty Officer 2nd Class
Joined
Jul 31, 2017
Messages
139
Yes, it looks a little dry like the glass isn't completely wetted out from the wood out. That being said, I'm looking at pictures on a website half a world away so I could be full of ….!!;)

For sure it's a picture, and with not such a good angle/light... I suppose you refer to the whiter spots that look clearer on the wood? I think they are due to residues of the glue we used to attach stringers to the hull ? (we have similars on the transom)

As far as I remember, we struggled with too much resin for the stringers and the glass was nearly drowning in resin. We were moping from side to another to try to spread the excess of resin we had. And that for the two layers of glass. We'll see next time we go to the boathouse.
 
Last edited:

kcassells

Fleet Admiral
Joined
Oct 16, 2012
Messages
8,599
Good progress Bro! Lookin good! Pics can be decieving that's for sure.
 

Woodonglass

Supreme Mariner
Joined
Dec 29, 2009
Messages
25,924
Yeah people who aren't use to glass work, usually always use way to much resin. That's why I always recommend that you roll on an ample amount of resin first and then lay the glass on top of it. Use the bubble buster roller to force the resin up from the back side and then add additional resin on top as needed just enuf to make the glass go Clear. Less is best when it comes to resin. Too much resin actually can make the lamination weaker and more apt to crack.
 

Broaters

Petty Officer 2nd Class
Joined
Jul 31, 2017
Messages
139
Hello boys...

It's been a long time since we posted something! We had to stop working due to my ACL Surgery and access to the forum wasn't possible anymore due to european GDPR...
After some research, I ended up using a VPN and *tadah*.... We have acces !

Anyway, surgery was a success, I'm now able to work again with my bro...

On his side, he cleaned and disassemble the transom gimbal housing, getting it ready for painting. We ordered new seals,hoses,etc....

We took it over where we had stopped.

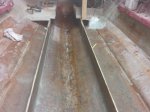
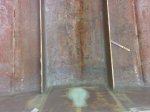
So we glassed the inner side of our stringers. (we added a 3rd layer compared to the outer side)
Then we glued the wood for fuel tank compartment and the front end. We also placed the drain pipe.
(see photos)

Click image for larger version  Name:	2018-08-30 23.11.44.jpg Views:	3 Size:	1.73 MB ID:	10654423Click image for larger version  Name:	2018-09-02 12.41.54 bis.jpg Views:	2 Size:	1.65 MB ID:	10654425

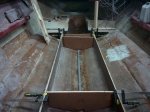
We glassed the compartment sides and started grinding/cutting the stringers and compartment so we get a flat surface for the floor... but we figured out that the original floor wasn't flat at all and we were out of grinding paper ;).
(no pics of this)

So next steps are finishing the wood grinding, cutting and placing the fuel tank floor on the drain pipe, placing the lower floor on the front side of the boat (under the cabin)... and glassing all that stuff...
 

Attachments

  • 2018-08-30 23.11.50.jpg
    2018-08-30 23.11.50.jpg
    1.9 MB · Views: 0
  • 2018-08-30 23.11.44.jpg
    2018-08-30 23.11.44.jpg
    1.7 MB · Views: 0
  • 2018-08-30 23.11.44.jpg
    2018-08-30 23.11.44.jpg
    1.7 MB · Views: 0
  • 2018-08-30 23.11.44.jpg
    2018-08-30 23.11.44.jpg
    1.7 MB · Views: 0
  • 2018-09-02 12.41.54 bis.jpg
    2018-09-02 12.41.54 bis.jpg
    1.6 MB · Views: 0

Timr71

Petty Officer 1st Class
Joined
Jul 19, 2012
Messages
326
Looking good. I'd read this thread before but didn't subscribe. I'm on board now. Hope you're recovering from the ACL surgery.
 

Panoguy

Petty Officer 2nd Class
Joined
Jul 29, 2011
Messages
150
Hi Broaters...really great to see you're back to better health, back online, and continuing your Seville restoration!

Popcorn is popping, beer is taken from the fridge; Yep, I'm ready to watch the show!!!
 

Broaters

Petty Officer 2nd Class
Joined
Jul 31, 2017
Messages
139
Hey guys may thanks for your messages it is very encouraging. We will try to pick up speed and to be ready for next summer.

Our biggest question for now is about foaming the deck. The boat was built this way and the existing foam was almost entirely dry. I'm also convinced but the added structural strength. My current reference is Friscoboater's searay restoration but many suggest that he made some mistakes.
Can you be more specific about the best way to foam it.

Many thanks
 

Timr71

Petty Officer 1st Class
Joined
Jul 19, 2012
Messages
326
Here's a video about working with flotation foam. I don't know if this helps you or not. I didn't do my own foam, I had a guy (very much like the guy in the video) do it. BTW, the boat being restored in an American Skier, and the guy in the video is the former president and owner of American skier (Ron Tanis).
 

chevymaher

Commander
Joined
Mar 29, 2017
Messages
2,915
I left the edge tabbing off and when I did the foam that let the air escape. Yes it made a huge mess but you are positive it is completely filled below deck.
 

Panoguy

Petty Officer 2nd Class
Joined
Jul 29, 2011
Messages
150
I followed Friscoboater's videos also, the only mistake I saw was pouring too much into an unplugged hole, so it made a bit of a mess... no big deal. My foam pours worked very well, I'm quite sure that I have no air voids.
 

Broaters

Petty Officer 2nd Class
Joined
Jul 31, 2017
Messages
139
Hello guys,

quick update on our project.

We have installed and foamed the small deck under the gas tank. our first experience with pour foam... fun product to use and to watch as it cures. We followed the advice about tilting the boat backward to ensure that the foam flow back all the way to the end of the cavities. It seems to work well altough it was difficult to observe is such a small cavity.

The whitish stuff on the side is an attempt to mix PB with aerocell microsphere to make it lighter.

2018-10-17 19.33.35_r.jpg

We used some cardboard template for cutting the decks much cheapper than pink insulating pannels but strong enough to make the job in that size of boats.

2018-10-17 17.53.47_r.jpg

here is how it looks with the 2 main floors pre-cuts

2018-10-17 22.27.02_r.jpg

We finished the day by having some drains from the fuel tank compartment to the bilge.

2018-10-17 22.27.35_r.jpg

Question for you all
We made 2 drain holes with the idea in mind to locate them in front of the lower point of the tank area.
after drilling them I know feel that they are close to the hull in the bilge and I'm affraid that water in the bilge could rech the drain holes during turns and revert back to the tank compartment.

Am I right to worry about it? I could plug them and drill a center hole just above the main drain pipe.

what do you think?
 

Woodonglass

Supreme Mariner
Joined
Dec 29, 2009
Messages
25,924
If you're planning on foaming the hull then weep holes are a Moot point. The foam will fill the holes rendering them useless.
 

chevymaher

Commander
Joined
Mar 29, 2017
Messages
2,915
LOL I watched some videos on factory boats getting foamed. I kinda came to the conclusion weep holes are really just access holes to stick the wand in when they foam.
 

tpenfield

Moderator
Staff member
Joined
Jul 18, 2011
Messages
17,705
The weep holes would only serve as inspection holes. Normally, you would want them plugged to prevent bilge water from going forward into the fuel tank bay.
 

Broaters

Petty Officer 2nd Class
Joined
Jul 31, 2017
Messages
139
Hello

Thanks for your feedback.
These holes are between the tank compartment and the bilge so no foam will go there. The idea was to create a permanent drain for any water that can go into the tank compartment either from the fill hose sheath or from condensation.
From Ted reply I understand than there should not be any permanently open hole in between these areas.
Am I correct?
​​​​​​

As for the foamed area they are completely sealed with no weep holes.
 
Top